Mont Blanc Chestnut Dessert Tart
 chestnuts, tarts
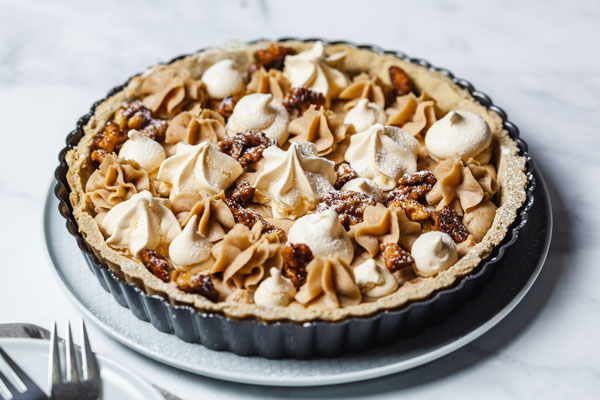
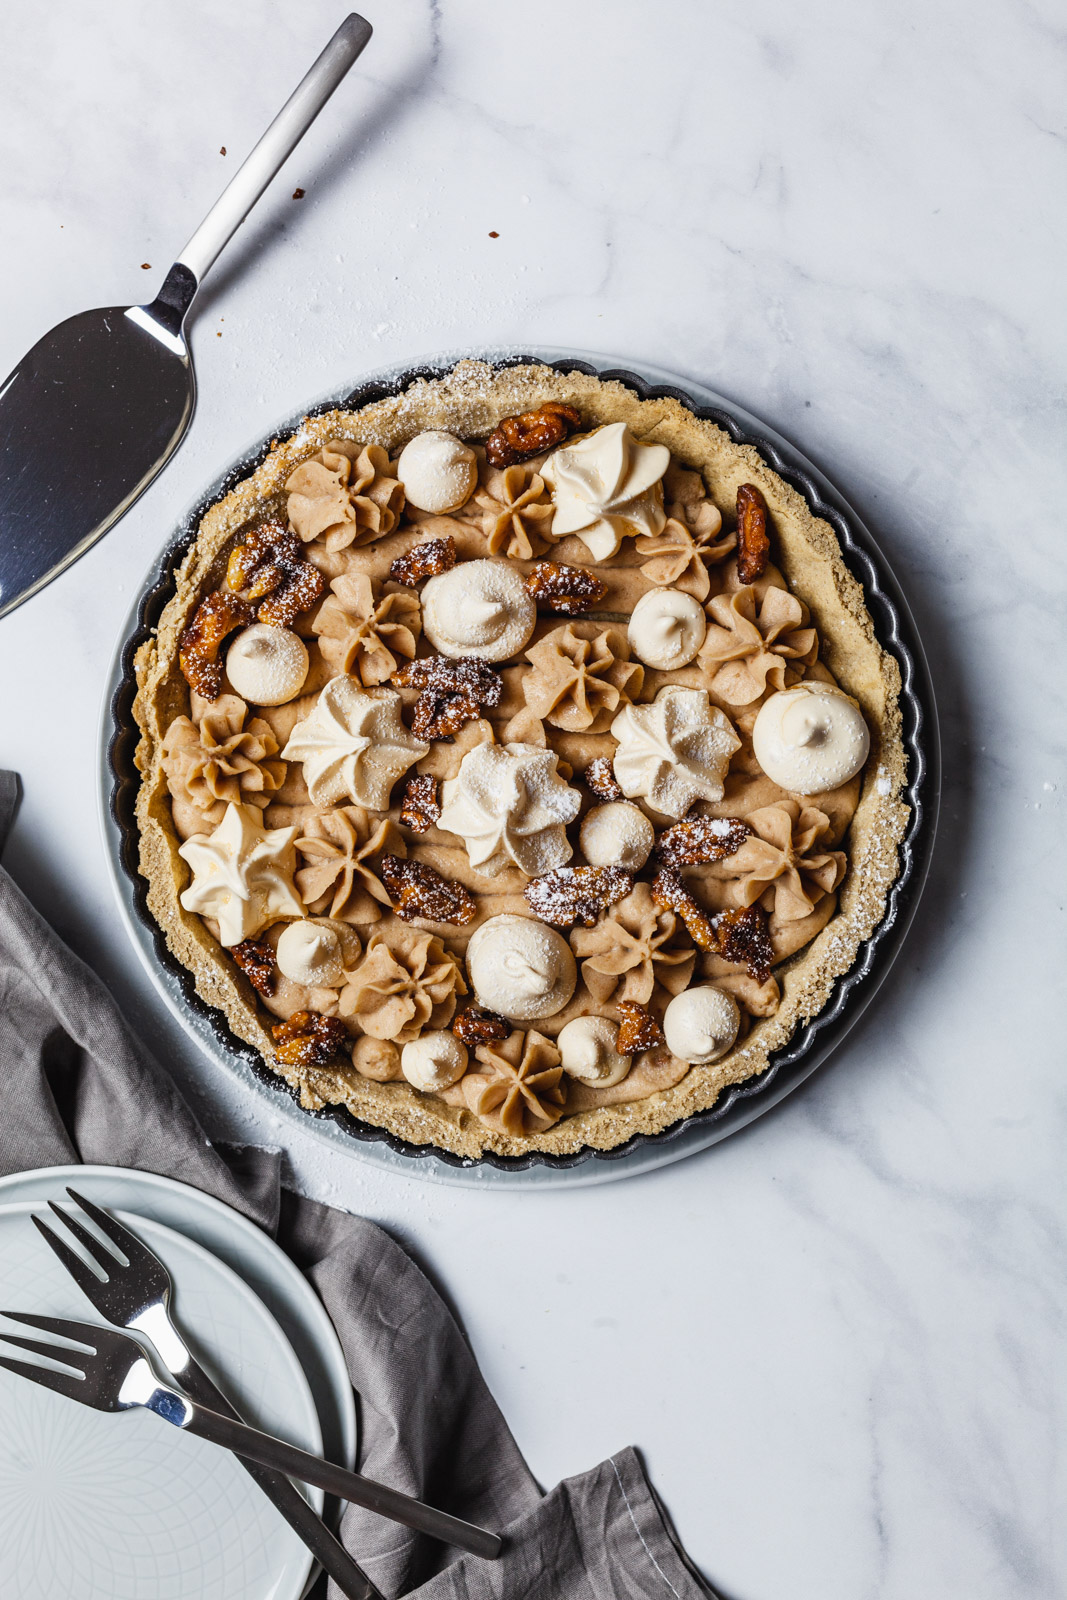
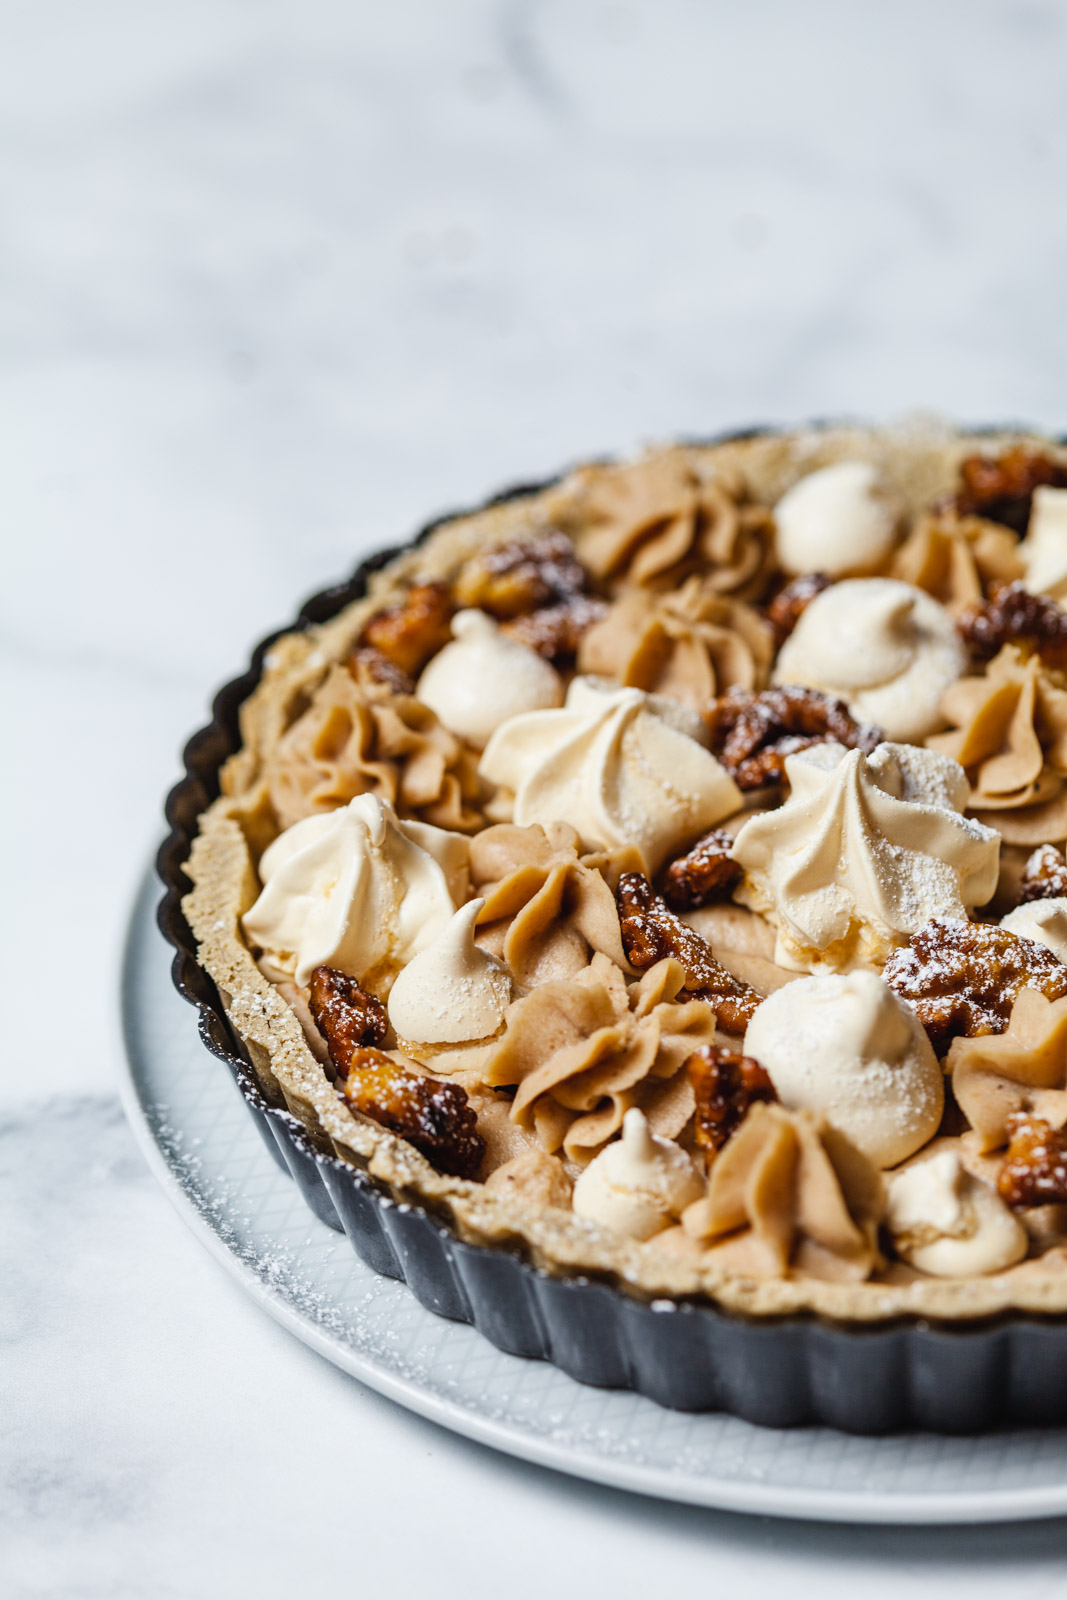
Literally meaning white mountain in French, this dessert is appropriately named. It’s a French dessert pastry that has many variations, but the common thread to most versions is the cake or pastry layer, chestnut cream and purée along with some crunchy meringue. It’s usually served in individual cakelet/tartlet fashion but I decided to make a tart out of the same components as I thought it would make it easier and less finicky making individual portions. That being said the tart shell recipe can easily be made for individual sized tarts as mentioned in the recipe below.
I have been pretty excited about making this a Mont Blanc ever since having dinner at my friends a few months back. They talked about having this amazing dessert at a restaurant in Toronto that was chestnut based and told me I had to make it. They sent me a link of a recipe for it from the Tasty website and after seeing it I knew I had to try making it. I love chestnut anything and something made with a chestnut based cream intrigued me and definitely had me excited to make it. The only thing that held me back was my poor piping skills. The individual Mont Blanc desserts on the Tasty website looked like a piece of art! They were piped perfectly and to tell you the truth I find that sort of piping super stressful and I really don’t have the time or probably more accurately the patience for super intricate desserts like that. I then started thinking of how I can simplify this Mont Blanc.
Well I thought, why not make one large tart? So I googled Mont Blanc tart and The Olive Magazine had a beautiful recipe for a Mont Blanc tart (I think that is the only one I could find on the web). I was sold and I was determined to make the tart. I wanted to make the shell or crust with chestnut flour instead though and so I searched for a pastry crust of sorts that would be simple and made with chestnut flour. Thanks to Food52 I found one and guess what - it is so easy to make because it’s a shortbread crust meaning you can work the dough to death and it will still turn out fine. You literally just need to press it into the tart pan and bake it once before filling and enjoying. The chestnut flour in the crust brings the whole dessert together in flavour and the shortbread texture is so delicious and buttery and subtlety nutty in flavour.

Now that I had a tart crust to work with I also needed to find an alternative to marron glacé or candied chestnuts. I had enough trouble looking for chestnut flour so I decided to use something nutty instead to give the dessert that extra bit of texture. Candied chestnuts are fairly uncomplicated to make - you bet I did my research, but it takes many steps and they need to be repeated at least twice taking many hours in between. To me that is not an option, so if I couldn’t buy any I was going to sub them out somehow. I’m glad I did. The maple candied walnuts were the perfect nutty addition and any leftovers make for some very delicious snacking as well.
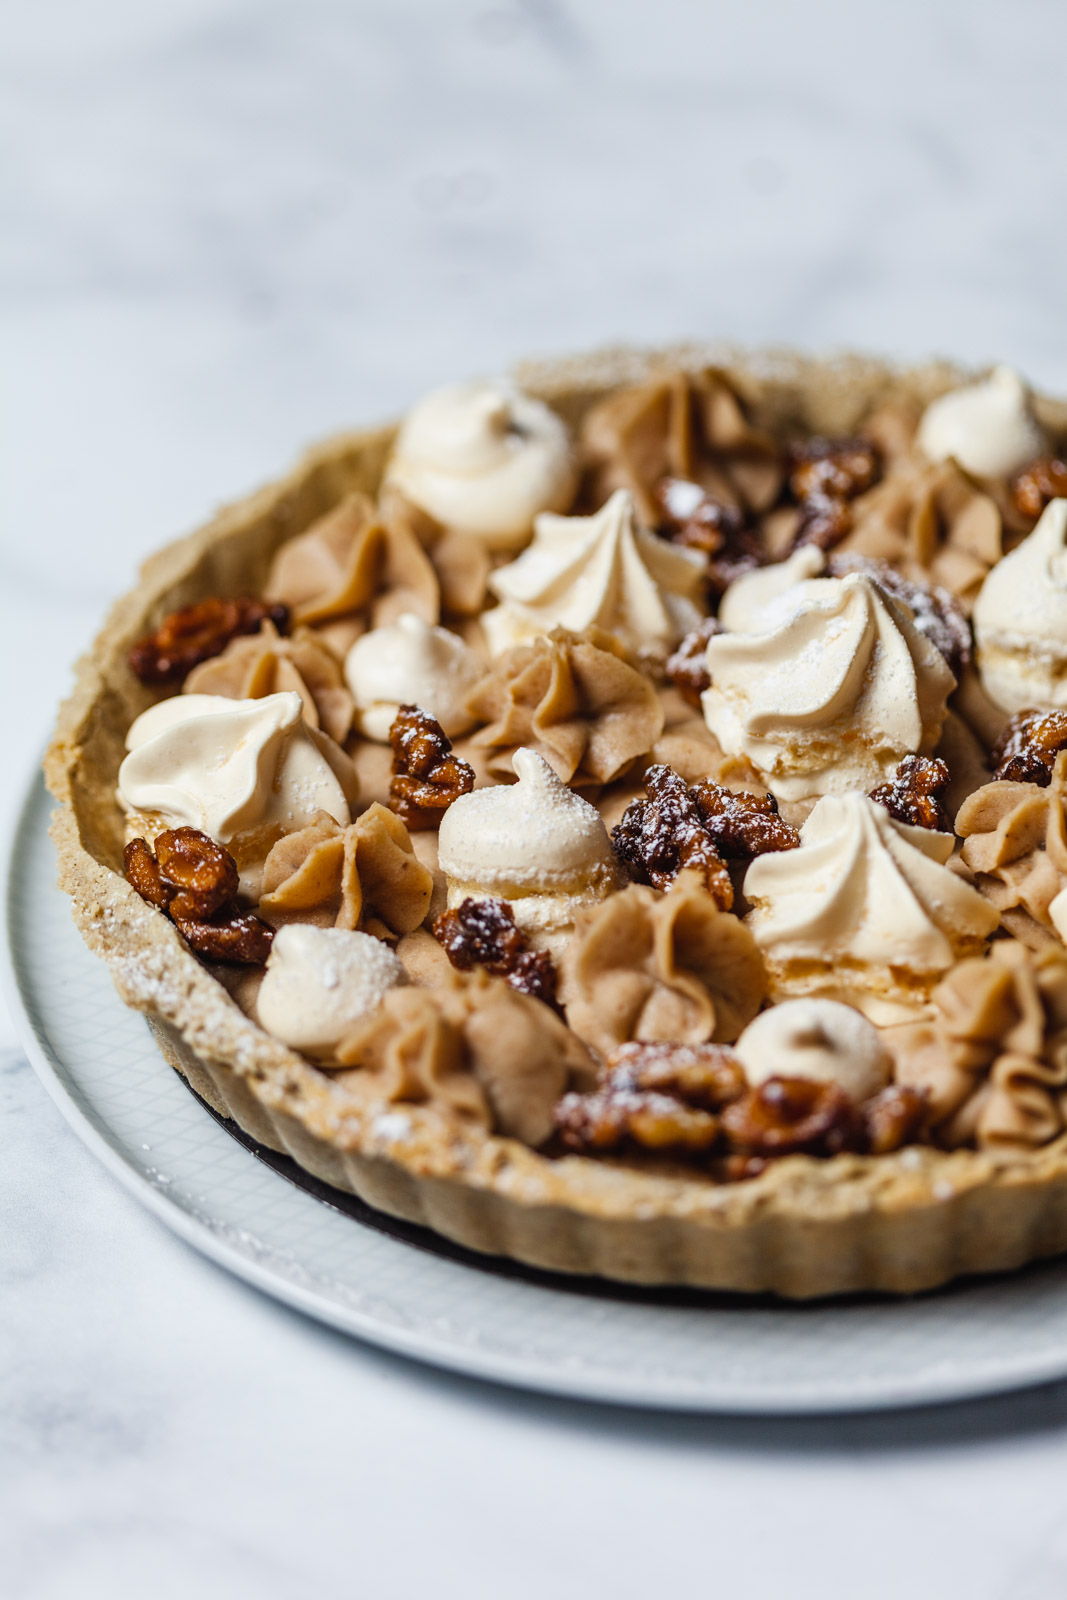
So you’re starting to get a clear picture of all the textures now I’m guessing. The crust has a gently crispiness with subtle nutty chestnut hints, the filling is a chestnut cream made from chestnut purée and whipped cream. Now many recipes call for raw egg in the whip cream but I just used plain whip cream for simplicity sake. Next the meringue cookies, which are super easy to make by the way. Add the next layer of texture with is light and airy but at the same time add a nice crunch to the tart. And of course lastly those candied walnuts which are so delicious.
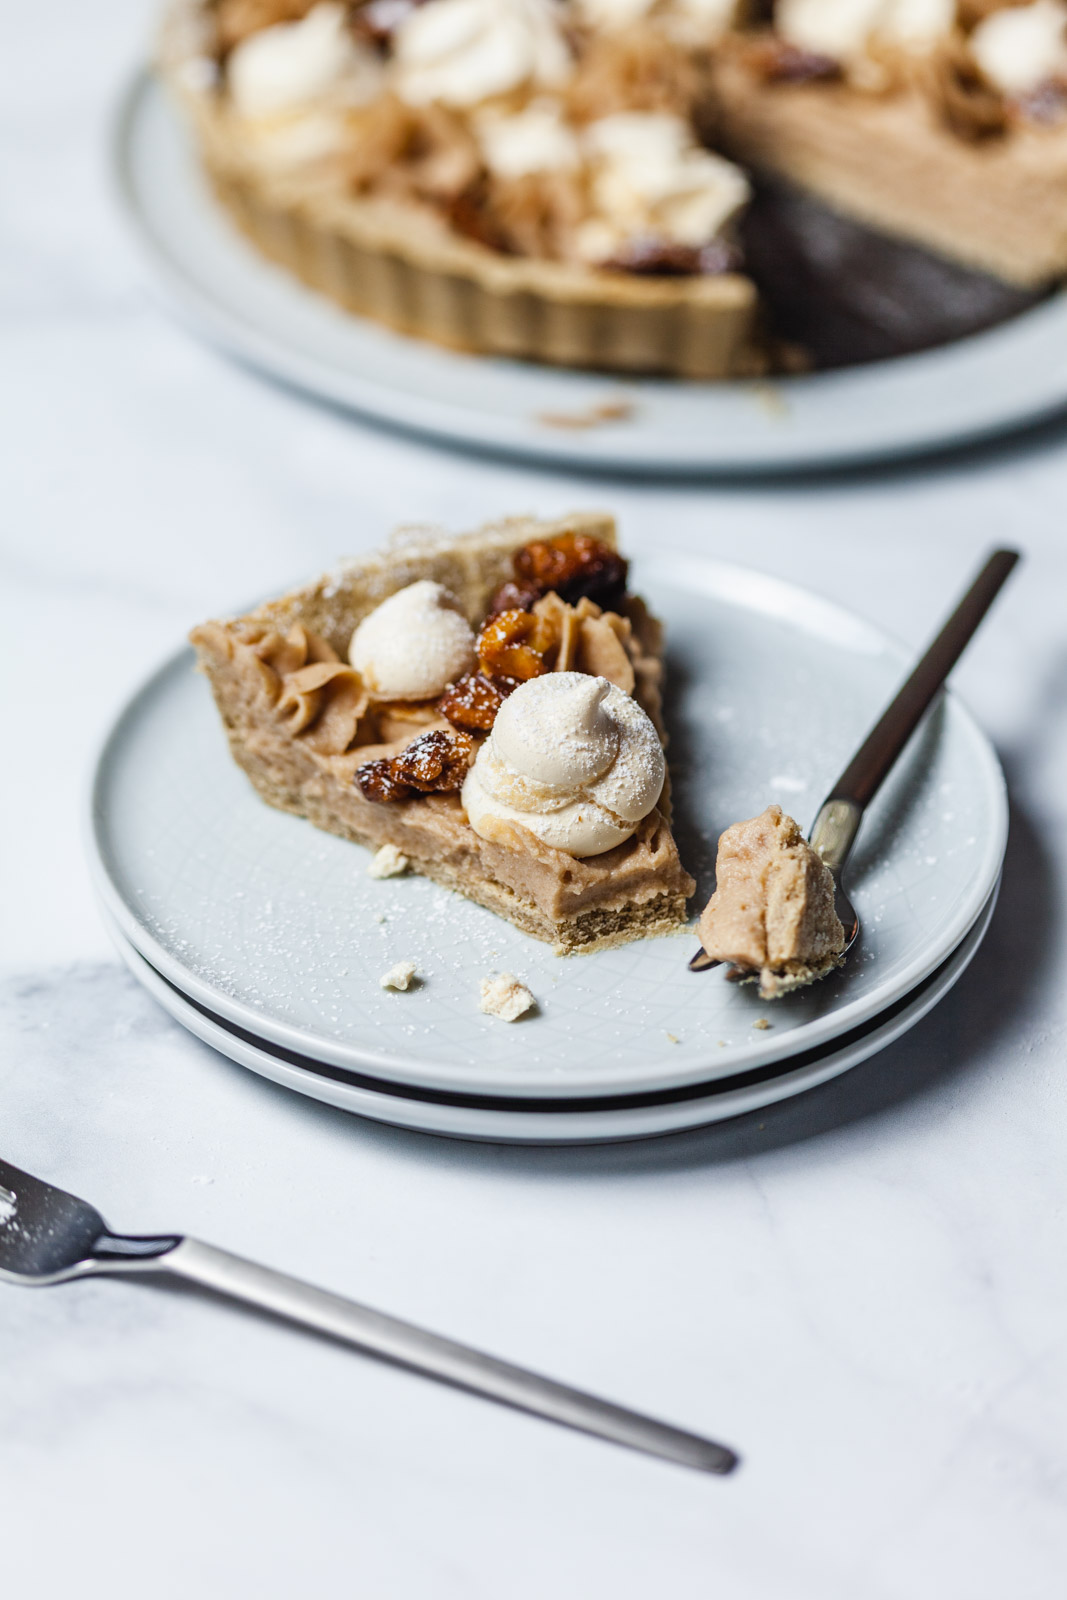
Did this dessert live up to the hype? It most certainly did!! We loved the textures and flavours of it. This Mont Blanc tart definitely is unlike anything I have tasted. So delicious and tastes like something you would have out of a French bakery. The good news is that each part of it is quite simple to make and once you have all your components made and ready, putting it together is fun and easy. It’s quite impressive with the meringue and the walnuts which can be made and stored in a sealed container up to a couple of weeks ahead and has the most wonderful textures in each bite. The crust can also be made ahead and kept refrigerated a few days or frozen for longer. If you are looking for something different to make for dessert, I think you will love this one. We loved it and I’m so happy I decided on making it in tart form.
Recipe
Ingredients
Short bread crust
- 1 pinch of salt
- 2 cups chestnut flour
- ½ cup whole wheat flour or plain
- ½ lb. salted butter (2 sticks), left out of the refrigerator for 10 minutes (use cold if using a food processor and cut it into cubes)
- 1 tbsp bourbon vanilla extract (or plain vanilla extract)
- 2 tbsps sugar
- 1 egg yolk
- 1 egg, beaten
For the chestnut cream filling
- 400g tin (or approx 2 cups homemade) chestnut purée
- 250ml (approx 1 cup) heavy whipping cream
- 1 tbsp dark rum (optional)
- marrons glacés a few, roughly chopped to serve or maple candied walnuts what I used cause I couldn’t get my hands on marrons glacé (recipe below for the walnuts)
For the meringue
- ¾ cup icing sugar, plus more for dusting
- 3 tsp all purpose flour
- 2 egg whites
- 100g (approx ½ cup) white sugar
Directions
For the crust
- In a large mixing bowl or food processor, whisk or pulse together the flours, pinch of salt and sugar.
- Cut slightly softened butter into small pieces and place into mixing bowl or food processor.
- With your fingertips, begin to gently incorporate the butter into the flour mixture.
- Pinch the pieces of butter so they become smaller and more integrated. (Unlike traditional pie crust, you don’t have to be super careful about overworking the dough). If using processor, add the butter and pulse a few times until butter is broken up and texture is coarse crumbs.
- Make a well in the middle of the flour and butter mixture and add the beaten egg and yolk.
- Begin to incorporate them into the mixture using a fork. If using a processor add the eggs in and pulse a few more times until dough is formed.
- Gather into a ball, cover in plastic wrap and refrigerate for 15 minutes. (You can also refrigerate for up to 24 hours but let the dough warm up a bit after taking it out).
- Pre-heat the oven to 350 degrees F and grease your pie/tartlet pan.
- Lightly flour your work surface and roll out the dough until it’s approx. ¼ in thick.
- Gently lift up the dough and place it into the pan.
- Firmly press it into place, especially on the sides, (don’t worry about tears or breaks in dough, just press the dough together to reattach and bake blind for 15-20 minutes, until it begins to turn golden. Allow to cool completely before filling
For the meringue (if making your own - you can use store bought too)
- Turn the oven down to 280°F.
- Mix 60g (approx ½ cup) of the icing sugar with the flour.
- Whisk the egg whites in a standing mixer or with a hand mixer until they reach soft peaks, then add in the white sugar a spoon at a time, continually whisking, until the mixture is glossy and holds stiff peaks.
- Fold in the icing sugar/flour mixture and spoon the meringue into a piping bag with whatever nozzle you would like.
- Pipe little meringues of varying sizes onto a lined baking tray and bake for 1 hour, or until the meringues are hard.
- Open the door slightly and leave a wooden spoon in the door to leave it open a fraction.
- Allow them to cool completely. (Meringue are best made and enjoyed the same day as storing them can be a bit tricky -If you live in a really dry environment, and you want to take your chances, place the meringue cookies in an airtight container and seal it tightly to keep the humidity out. They can last for a few days at room temp without spoiling, but they may become a bit sticky.)
For the filling
- Beat the chestnut purée until it’s soft.
- In a separate bowl whip the cream until it just reaches soft peaks, then beat in the remaining icing sugar and fold this into the chestnut purée along with the rum (if using).
- Spoon into a piping bag, fitted with a star nozzle and chill for 15 minutes.
- Pipe the cream into the tart case in stripes.
- Pipe any remaining mixture onto the top in blobs.
- Dot some meringue cookies among the blobs along with some pieces of marrons glacé or candied walnuts then dust the top with icing sugar and serve. Best enjoyed within 2-3 days. Store covered in plastic wrap refrigerated.
For the Maple candied walnuts (optional)
Ingredients
- 1 tbsp unsalted butter
- ½ cup pure maple syrup
- 2 tsps pure vanilla extract
- ½ teaspoon ground cinnamon
- Coarse salt
- 2 cups walnuts (6 ounces)
Directions
- Preheat oven to 375°F.
- Melt butter in large skillet over medium heat.
- Stir in maple syrup, vanilla, cinnamon, and ¾ teaspoon salt.
- Bring to a simmer (mixture should be frothy), about 3 minutes.
- Add walnuts, and toss to coat using a rubber spatula.
- Cook, stirring, until sauce is syrupy and bubbly, about 3 minutes.
- Transfer walnut mixture to a parchment-lined baking sheet, and spread into a single layer.
- Bake until walnuts are caramelized, about 10 minutes.
- Transfer sheet to a wire rack.
- Stir, and let stand until cool and hardened, about 30 minutes.
Recipe Notes
- I halved the recipe for the walnuts for this tart but if you make the full amount you won’t regret it as they are perfect for snacking
- Nuts can be stored in an airtight container for up to 2 weeks.
Recipe adapted from Food 52, Martha Stewart and The Olive Magazine
