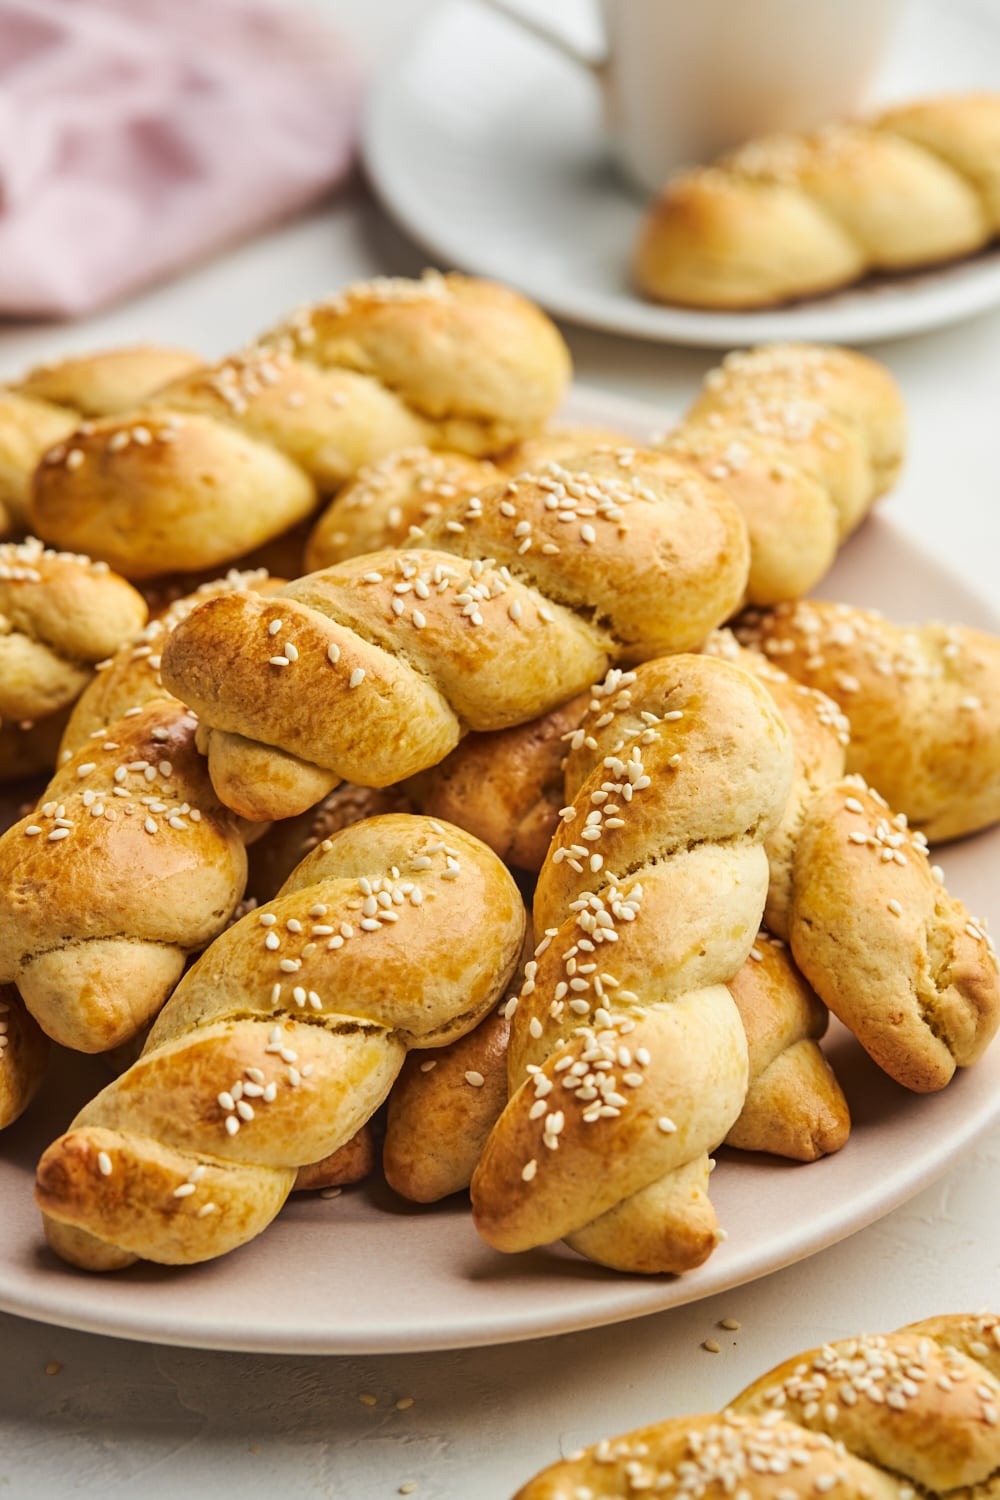
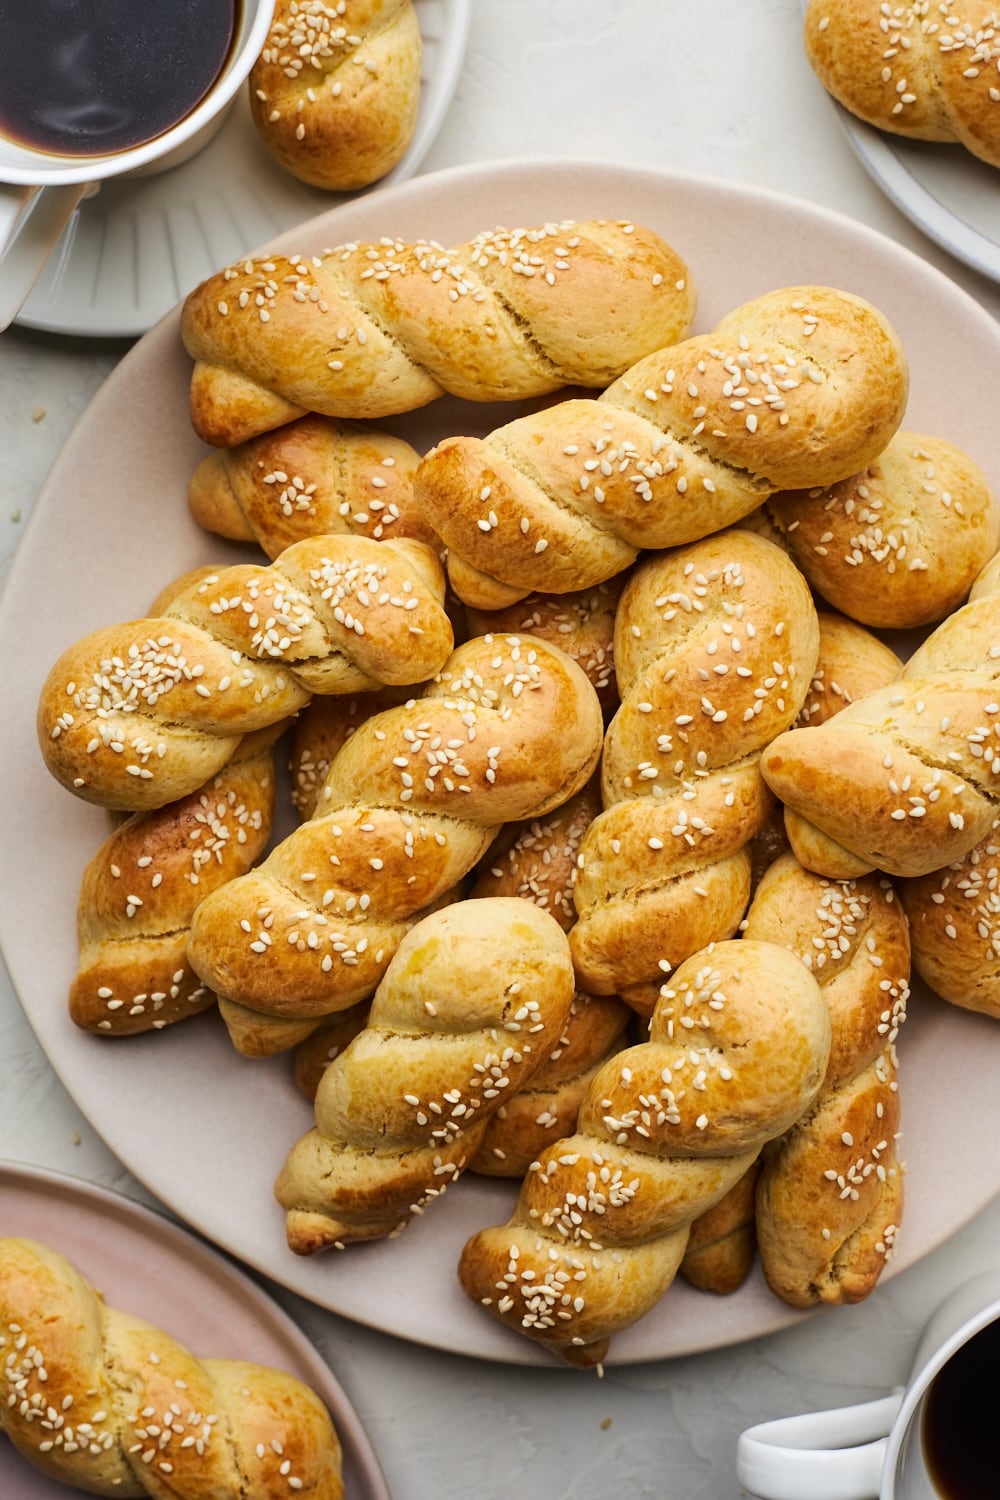
Koulourakia
Koulourakia are Greek butter cookies that we know you won’t be able to get enough of! This is a small batch recipe for them but the recipe is easy to double if you would like. Koulourakia are perfectly soft on the inside with crisp edges and crunchy on the outside - they are my favourite the day they are baked and more specifically once they have cooled from being out of the oven but they keep really well and freeze well too and are just as tasty eaten days later when the flavours have sort of concentrated as well. I have flavoured mine with the typical orange zest, orange juice and pure vanilla extract flavours but also with a little bit of cognac and some mastic for the extra boost of flavour. They are the most nostalgic cookie for me because my mom made these ALL the time growing up - they are my dads favourite morning cookie with his coffee so she always had a batch in the house. They truly are the best accompaniment to coffee or tea and I strongly recommend making a batch to enjoy!
There are so many great Koulourakia recipes out there for these little famous Greek cookies and I can’t say that any are good or bad because judgment like that is only based on preference. I love this recipe because it makes a very manageable amount of cookies especially for home bakers like me who don’t have huge mixers that can handle 6-8 cups of flour, but this recipe can easily be doubled if you want to make a bigger batch. My preference for Koulourakia is fragrant, not too sweet, crispy on the outside when baked and tender in the middle. That is how my mom and grandmother made them so that is my preference. I always say crispy on the outside when freshly baked because although they taste amazing days after - the texture does changes. The moisture from the cookies eventually softens those crisp edges so the entire cookies becomes more tender. It is just a fact - and that is a fact that never stops me from enjoying them days after. That is not to say I would’nt eat one that is hard and crispy like some other recipes make them out to be - but it’s not the way I would make them. Some prefer them with a hint of lemon instead of orange and that is ok too. See? No right or wrong way - just how you like them! Ok let’s get talking about the ingredients
Homemade Koulourakia Ingredients
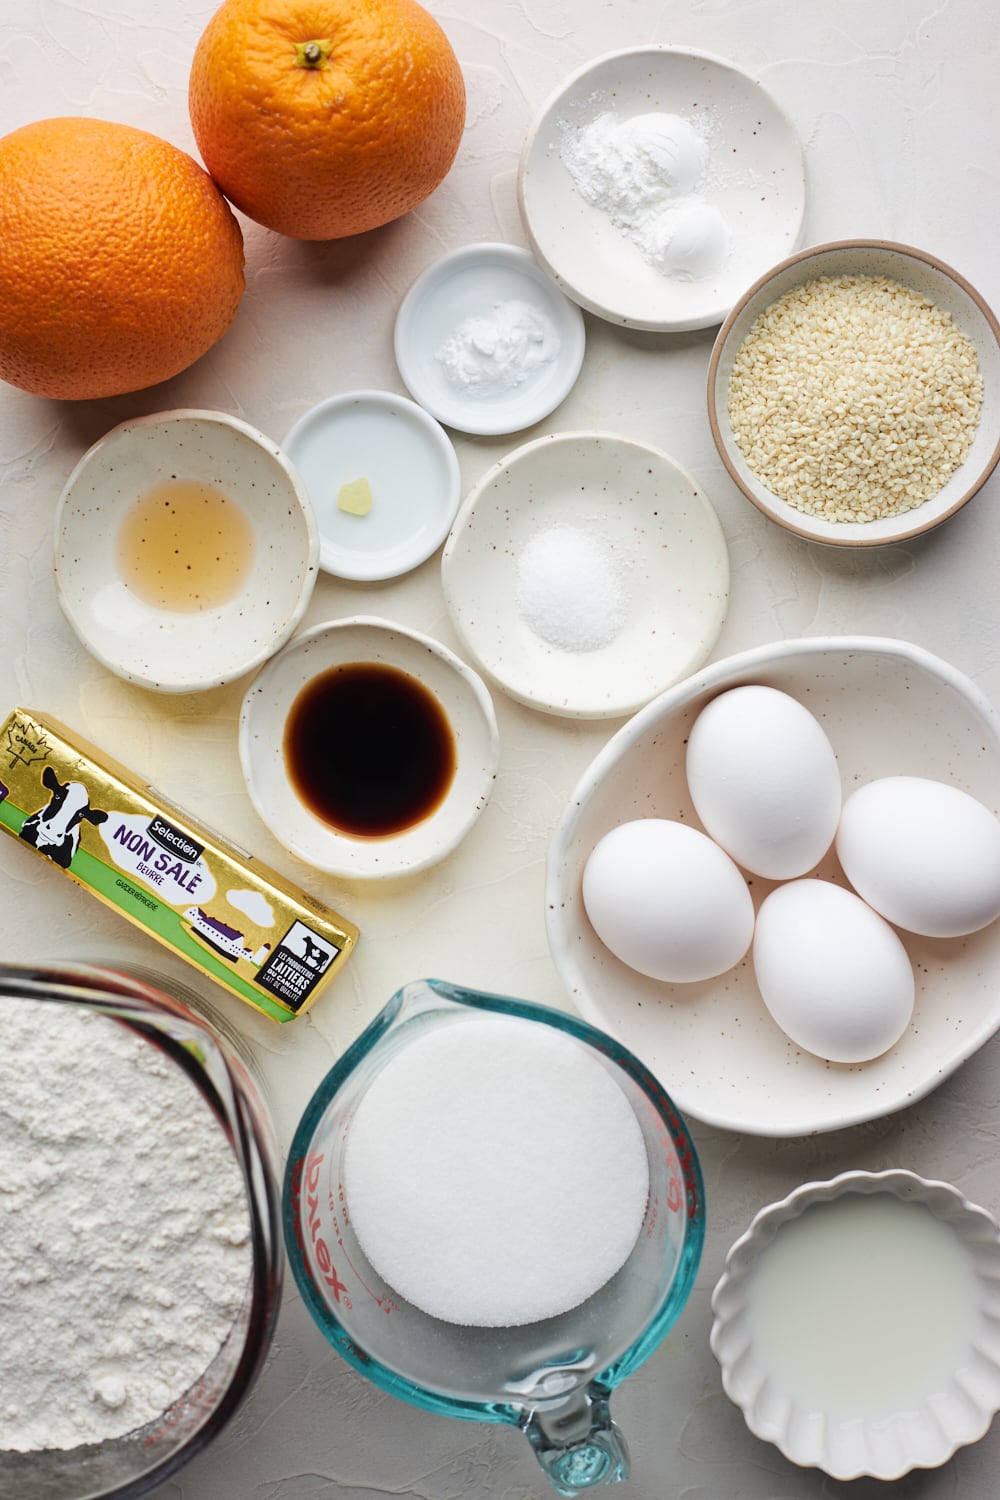
- Pure Vanilla Extract: This flavours the dough and is essential to most sweet baked goods - always use pure vanilla extract for best flavour
- Unsalted butter: Make sure its room temperature- soft and will leave an impression when pressed into it and the butter and sugar needs to be creamed until super light and fluffy
- Eggs: I used 2 large eggs + 1 yolk the extra yolk helps these cookies stay soft and tender in the middle. Make sure they are room temperature so that they blend well into the batter
- Sugar: Granulated sugar and only 3/4 cups of it and I think that is the threshold for me as I don’t like these overly sweet but if you prefer a sweeter cookie then you could increase the amount to 1 full cup
- All-purpose flour: I have not tried these with gluten free flour but I’m sure a good 1-1 gf flour would work in its place. I only add a little flour at a time to the dough if needed after you have mixed it all in - as too much flour will result in a tough or hard cookie.
- Salt: Just a pinch is all you need
- Baking powder & Baking Soda: both leavening agent (I stir the soda with orange juice before adding to the batter to get a reaction - nice and frothy) which will help the batter stay light. Traditionally Koulourakia are made with bakers ammonia but my mom never made them with it just baking powder and soda
- Orange Juice & Orange Zest: Freshly squeezed and zested is what I use for the best flavour - if you prefer lemon over orange feel free to use it
- Milk: Whole milk is what I use and make sure its room temperature though you could use cream as well
- Additional Flavour Add Ins: I added a splash of cognac cause that is what my mom always added but feel free to use an orange flavoured liqueur if you wish. I also add some mastic or mastiha something I typically add to tsoureki and often used in middle eastern and Greek cuisine. I buy it in rock from and I use a mortar and pestle to grind it. Both of these things add flavour to the Koulourakia but are not essential in making these tasty cookies so don’t fret if you don’t have them and don’t add them in
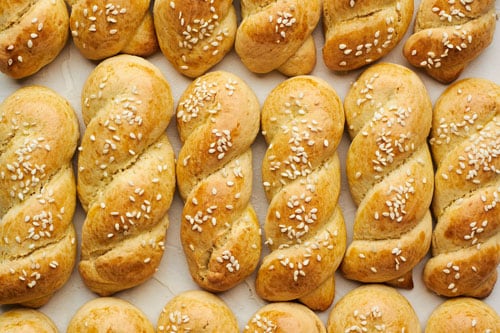
- Sesame Seeds: Sprinkling some sesame seeds over the Koulourakia after they have been brushed with egg wash is customary but totally optional
Simple Instructions For Making Koulourakia
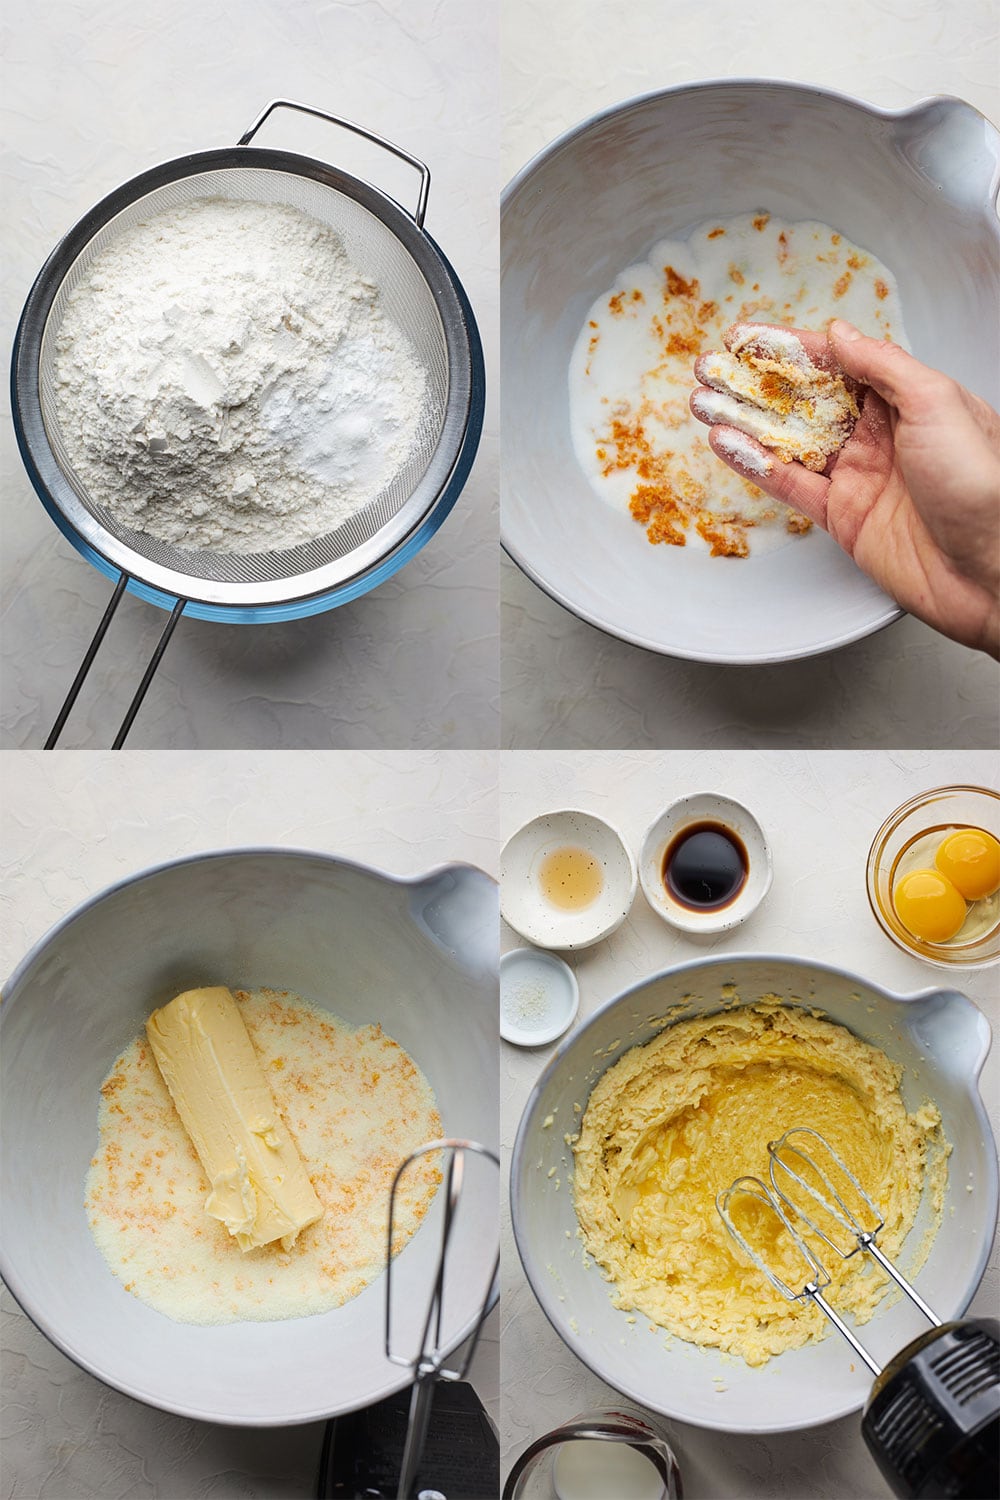
- SIFT the flour baking powder and salt and set aside
- INFUSE the sugar with orange flavour by rubbing it with orange zest
- CREAM butter with the sugar until super light and fluffy
- MIX in the eggs one at a time, followed by the milk, cognac and mastic if using followed by the orange juice and baking soda mixture
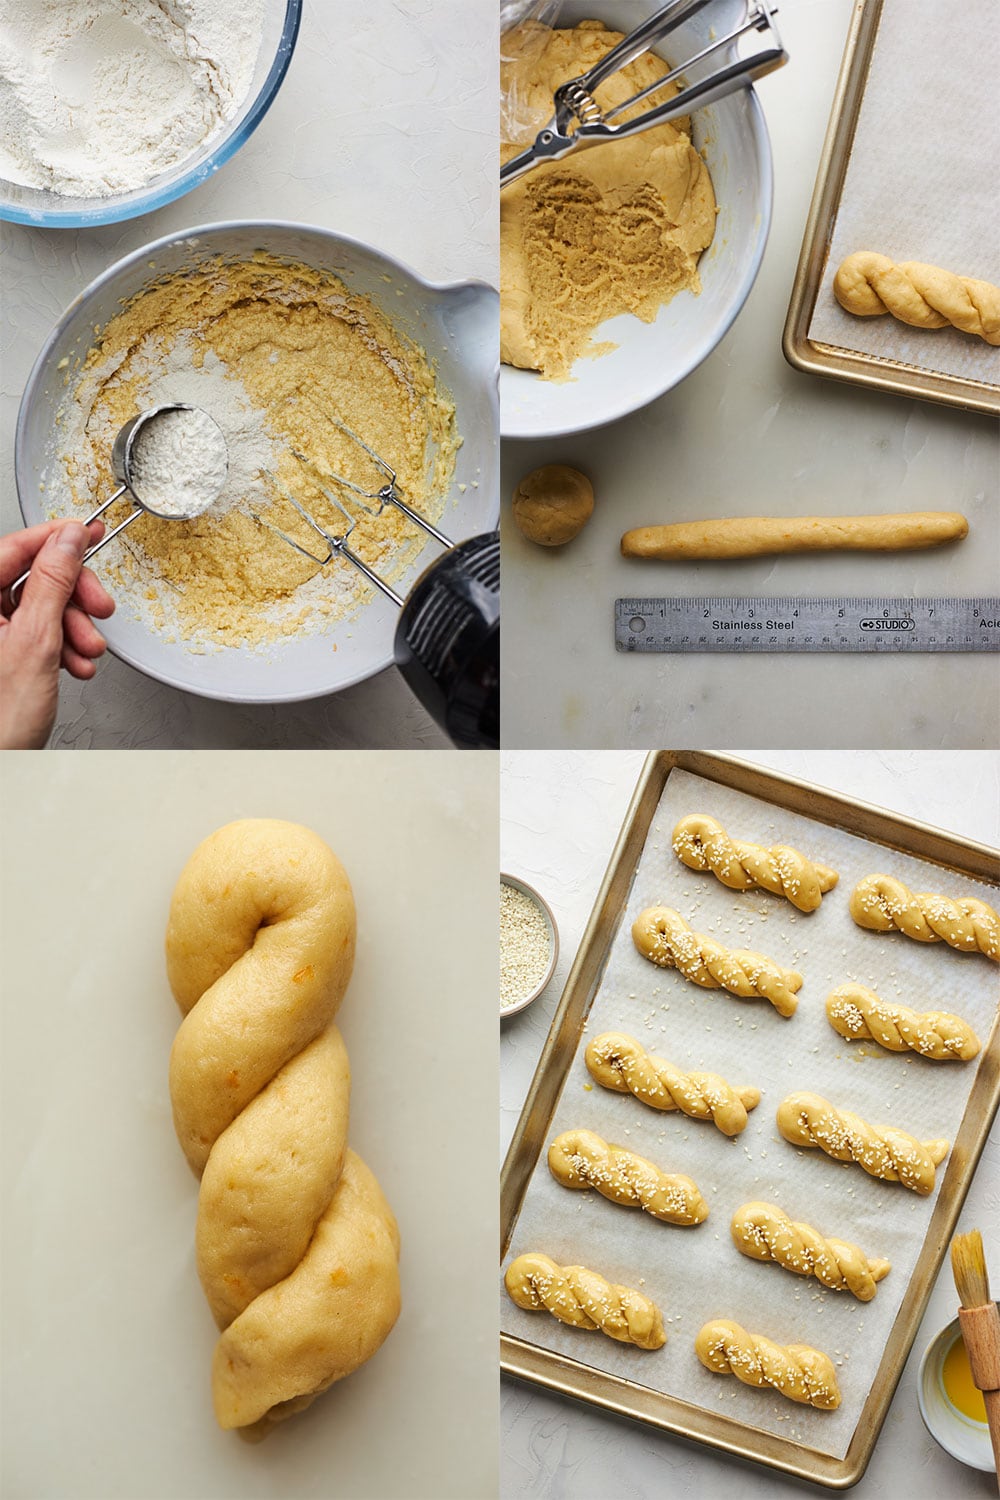
- Gradually BEAT in the sifted dry ingredients until a soft pliable but not sticky dough forms - allow it to rest covered while you preheat oven
- SCOOP out portions of dough and ROLL into ball then rope and shape into twists or any shape you would like
- BRUSH cookies with egg wash and SPRINKLE with sesame seeds if desired
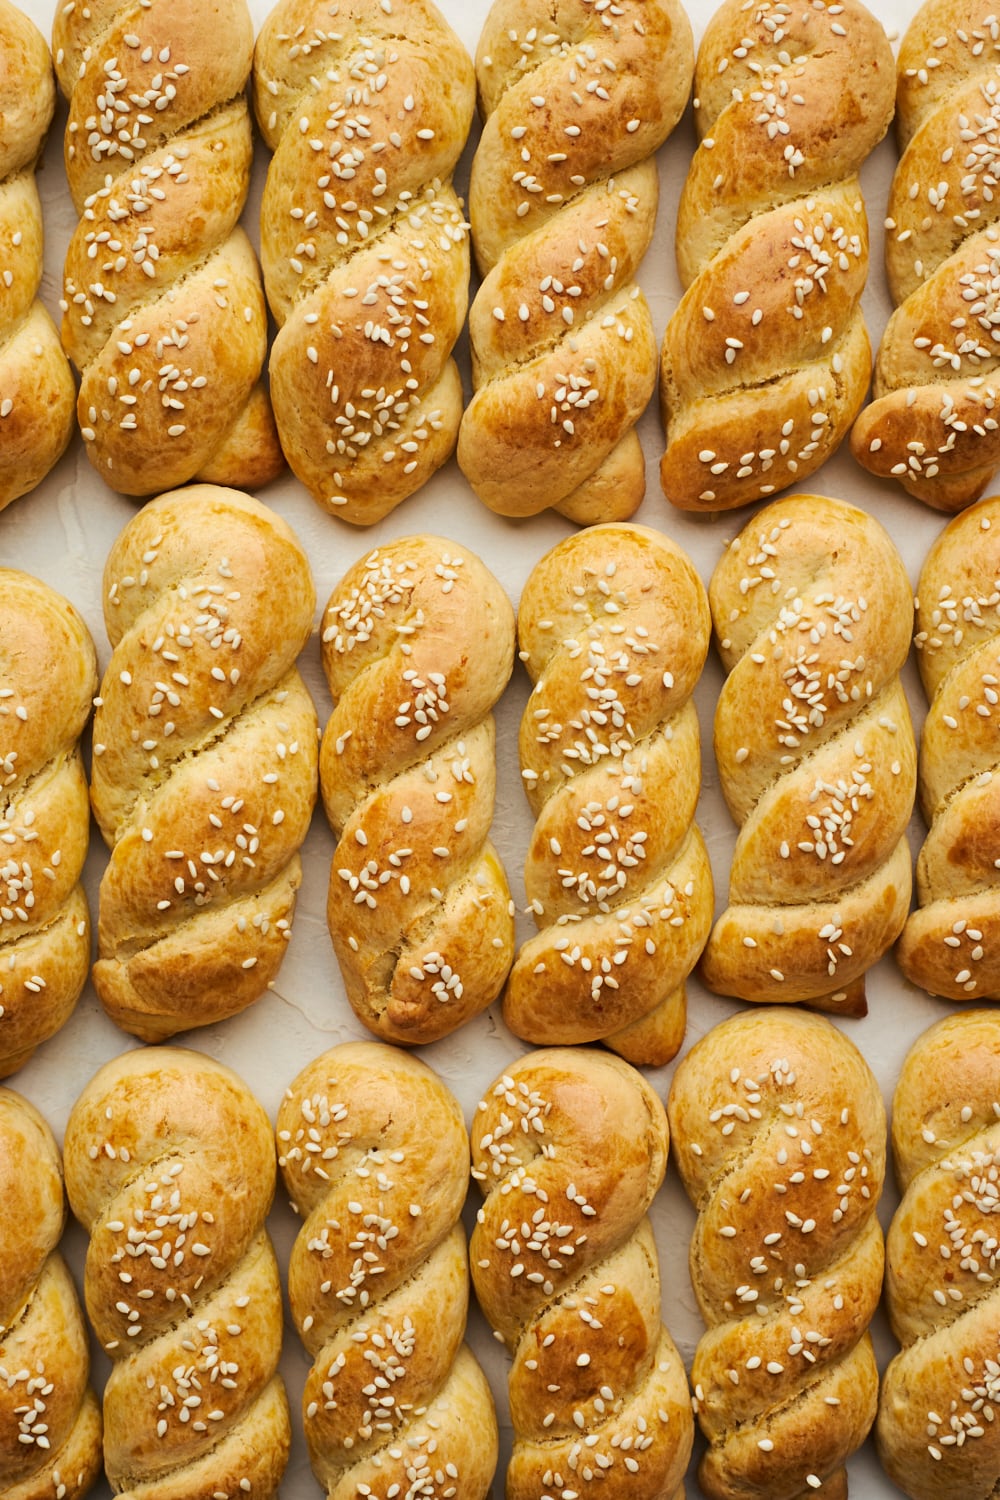
- BAKE - total time for baking is 15-18 min per baking sheet
- ENJOY with your favourite hot beverage
Tips For Making The Best Koulourakia Every Time
- The eggs, butter and the milk should be at room temperature to ensure they incorporate evenly into your batter without over-mixing. The butter should be soft enough so your finger leaves a dent or impression when you press into it.
- You can twist the koulourakia into many different shapes, such as rings, S-shapes, braids or whatever you prefer
- Baking time will vary a little depending on how much dough you use for each shape - the more dough you use the longer they will need to bake the less dough you make the smaller your cookies will be and will therefore need less baking time. You will always know when they are done when the base of he cookies and edges are lightly golden
- If you do not have a stand mixer, you can use a hand held electric mixer to combine the ingredients together like I did for the sake of the video and photos - a note about using hand mixer - once you get to adding the last bit of flour the dough gets very thick and your mixer blades may not be able to handle it - so I switch to the dough hooks at that point and they do a great job on the low power.
- Be careful about adding too much flour to the batter as this will make cookies hard - no need to flour your rolling surface either as the dough shouldn’t be so sticky that you can’t roll it out.
- Koulourakia are generally pale like any other butter cookies but if you wish to get a little more colour on them feel free switch to broil for the tops to become slightly golden for the last minute of baking.
Storage and Freezing
- STORAGE: Once cookies have fully cooked they can be kept in an airtight container at room temperature for about 2 weeks or if you prefer you can store them in the refrigerator.
- FREEZING COOKIES: Cookies can also be frozen once they have cooled and sealed in an airtight bag and container for up to one month or more - if they last that long. Thaw at room temperature and enjoy!
- FREEZING KOULOURAKIA COOKIE DOUGH: Once the dough has been made you can freeze it - wrap it tightly with a couple layers of plastic wrap and place in an airtight container or freezer bag. It can be frozen for up to a month. Thaw or defrost overnight in the fridge and allow to come to room temperature before scooping out dough and forming the cookies.
If You Liked This Recipe You Will Love These:
Recipe
Ingredients
- 3½ cups all purpose flour (plus 1-2 tbsp more if needed)
- 1½ teaspoons baking powder
- ½ teaspoon salt
- ¾ cup granulated sugar
- 1 orange zested (reserve the rest for juicing)
- ½ cup butter softened room temperature
- 2 large eggs room temperature
- 1 large egg yolk room temperature
- ¼ cup milk room temperature
- ¼ teaspoon baking soda
- ¼ cup orange juice freshly squeezed
- 1½ teaspoons vanilla extract
- 1 teaspoon congnac (optional)
- ⅛ teaspoon ground mastic/mastiha (optional)
Egg wash
- 1 egg yolk
- 1 teaspoon water
- Sesame seeds for sprinkling (optional)
Directions
Prepare Cookie Dough
- Sift flour and baking powder and salt into a large bowl and set aside
- In a large mixing bowl, use your fingertips to rub together the sugar and orange zest to infuse the sugar with orange flavour.
- Add the softened butter to sugar mixture and beat on medium-high speed for 5-10 minutes, stopping to scrape the sides of the bowl occasionally, until the mixture is pale, and super light and fluffy.
- Add the eggs and yolk one at a time, beating for a full minute on medium speed between each addition. Add the milk, vanilla extract, cognac if using and mastic if using and beat to combine.
- Dissolve the baking soda in the orange juice (it will bubble and fiz) and pour into mixing bowl and mix until combined - The mixture will appear curdled and that is ok
- Add flour mixture a little at a time (½ cup at a time) and beat on low speed until just combined. Use a rubber spatula to fold or give dough a final mix and incorporate any pockets or traces of flour. The dough should be soft, but not sticking to your hands when you touch it. The dough must be fluffy, buttery and supple. Add a little more flour 1 tablespoon at a time if the dough is still sticky. Do not overwork the dough because the cookies will be hard and tough.
- Cover Dough with plastic wrap and allow to rest for 20-30 minutes while you prepare your baking sheets and preheat your oven. No need to chill unless you are planning on making them a lot later. (make ahead and freezing directions in post above)
- Preheat oven to 375°F. Line two baking sheets with parchment paper or silicone baking mats.
Shape Cookies & Bake
- Using about 2 tablespoons of dough at a time (or a large cookie scoop scantly filled or just filled not heaping), scoop out dough roll the dough into approx 1 ½ inch balls or so then into 7-9-inch ropes and then shape as desired: twists or spirals as pictured or you could do braids, circles, pinwheels, “S"s, or whatever shape you like.
- Place cookies at least 2 inches apart on the prepared baking sheet to allow room for them to puff and expand a little
- In a small bowl, whisk together the egg yolk and water for the egg wash. Brush over the cookies. Sprinkle the cookies with sesame seeds if desired
- Bake, one sheet at a time, until edges and bottom are golden brown, about 15-18 minutes. Allow to cool 5-10 minutes on baking sheet over cooling rack then remove and cool completely on wire rack then transfer them to an airtight container and they can be stored like that for up to 2 weeks.
Recipe Notes
- Be careful about adding too much flour to the batter as this will make cookies hard - no need to flour your rolling surface either as the dough shouldn’t be so sticky that you can’t roll it out.
- Koulourakia are generally pale like any other butter cookies but if you wish to get a little more colour on them feel free switch to broil for the tops to become slightly golden for the last minute of baking.
- Don’t over bake! Your cookies should be set at the edges and golden but may still look soft in the center.They will continue to bake on the hot pan out the oven.
- Be sure to allow the cookies to cool on the baking sheet for 5 minutes before transferring baked cookies to a cooling rack or wire rack so they don’t fall apart as your transfer them.
- Try to measure your ingredients carefully using a measuring cup to prevent a dry crumbly cookie and also do not over mix the dough because it will affect the texture of the cookies.