Chocolate Crème Brûlée
 chocolate
This chocolate Creme Brulee is extremely easy to make, rich in texture and full of flavour and the most perfect special occasion dessert. The combination of chocolate and caramel - both sweet but both share a delicious undercurrent of bitterness that is irresistible, a natural component of cocoa and burned sugar. Easily made ahead of time, and absolutely delicious and decadent, your guests will love this chocolate creme brulee. Step-by-step photos help make this delectable French dessert even easier. There are two methods for making the custard. In the “hot” custard method, egg yolks are whisked with sugar over a double broiler then heavy cream and vanilla are added. In this recipe, we are using the easier “cold” custard method in which the egg yolks and sugar are whisked together off heat and then warmed cream is gently whisked in. It really is one of the easiest desserts you can make!
What Is Crème Brûlée?
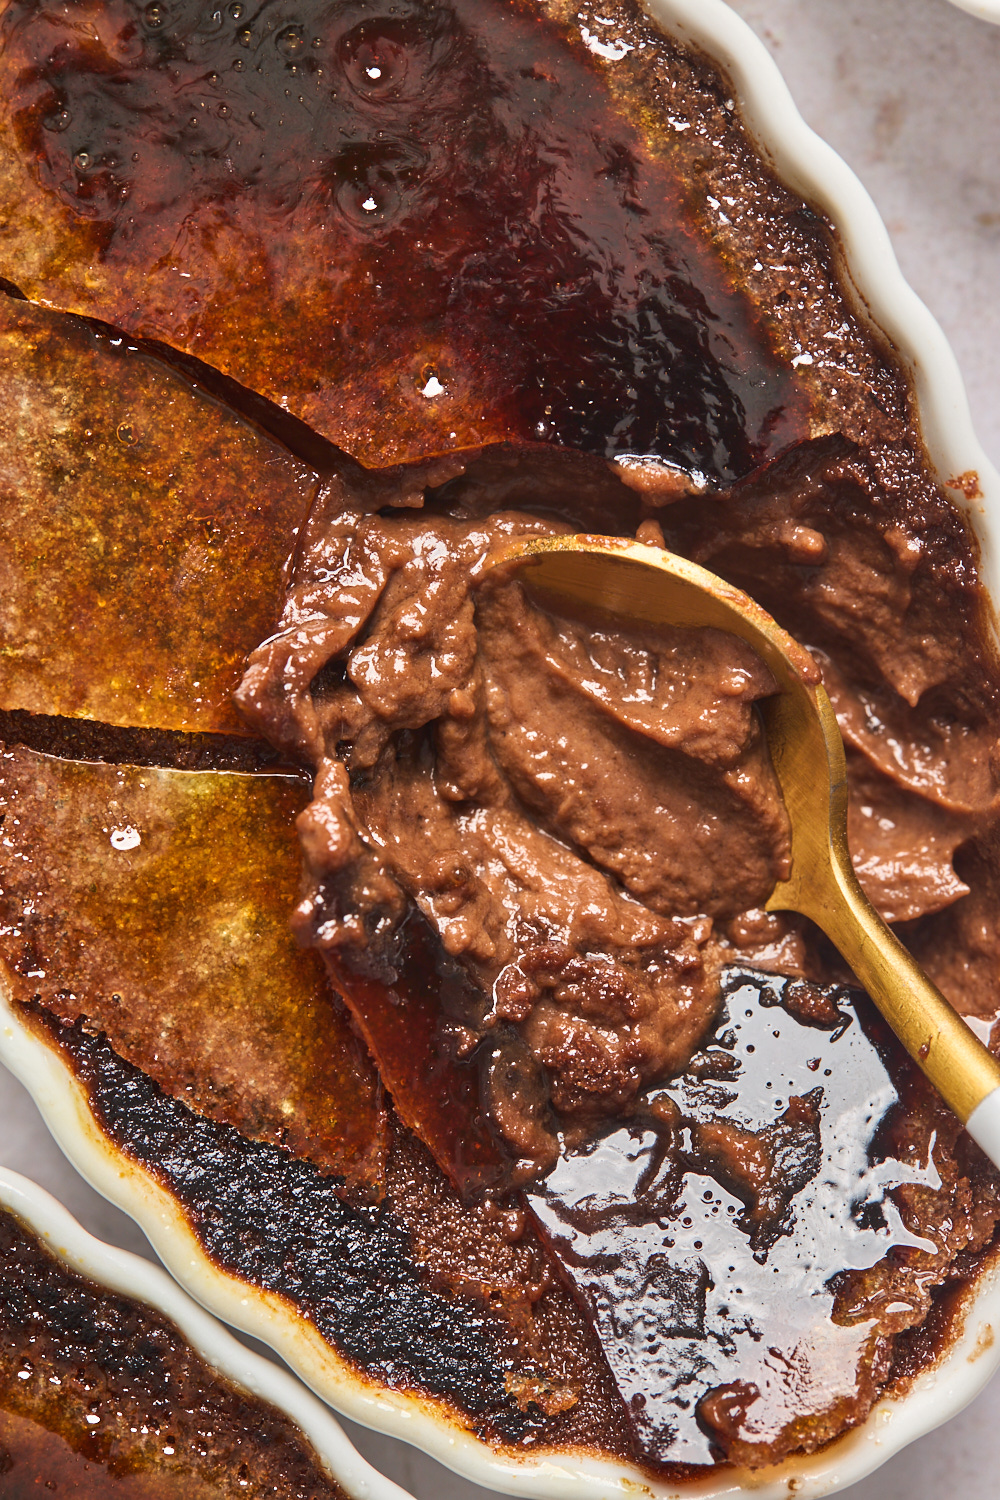
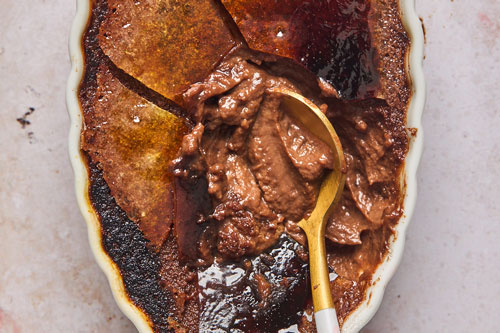
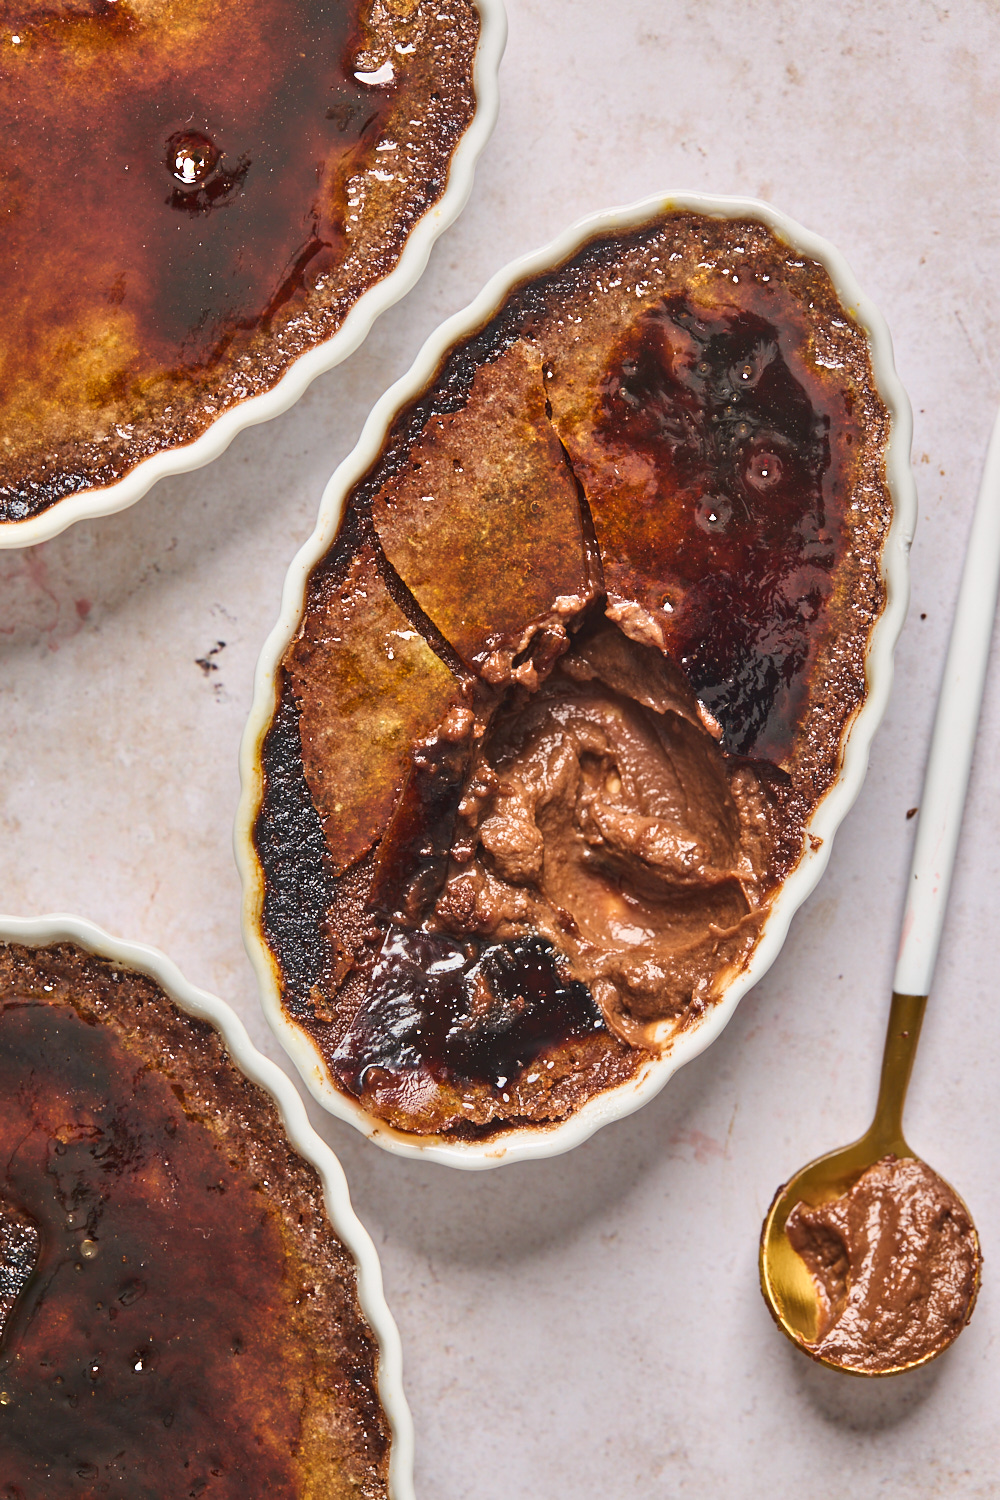
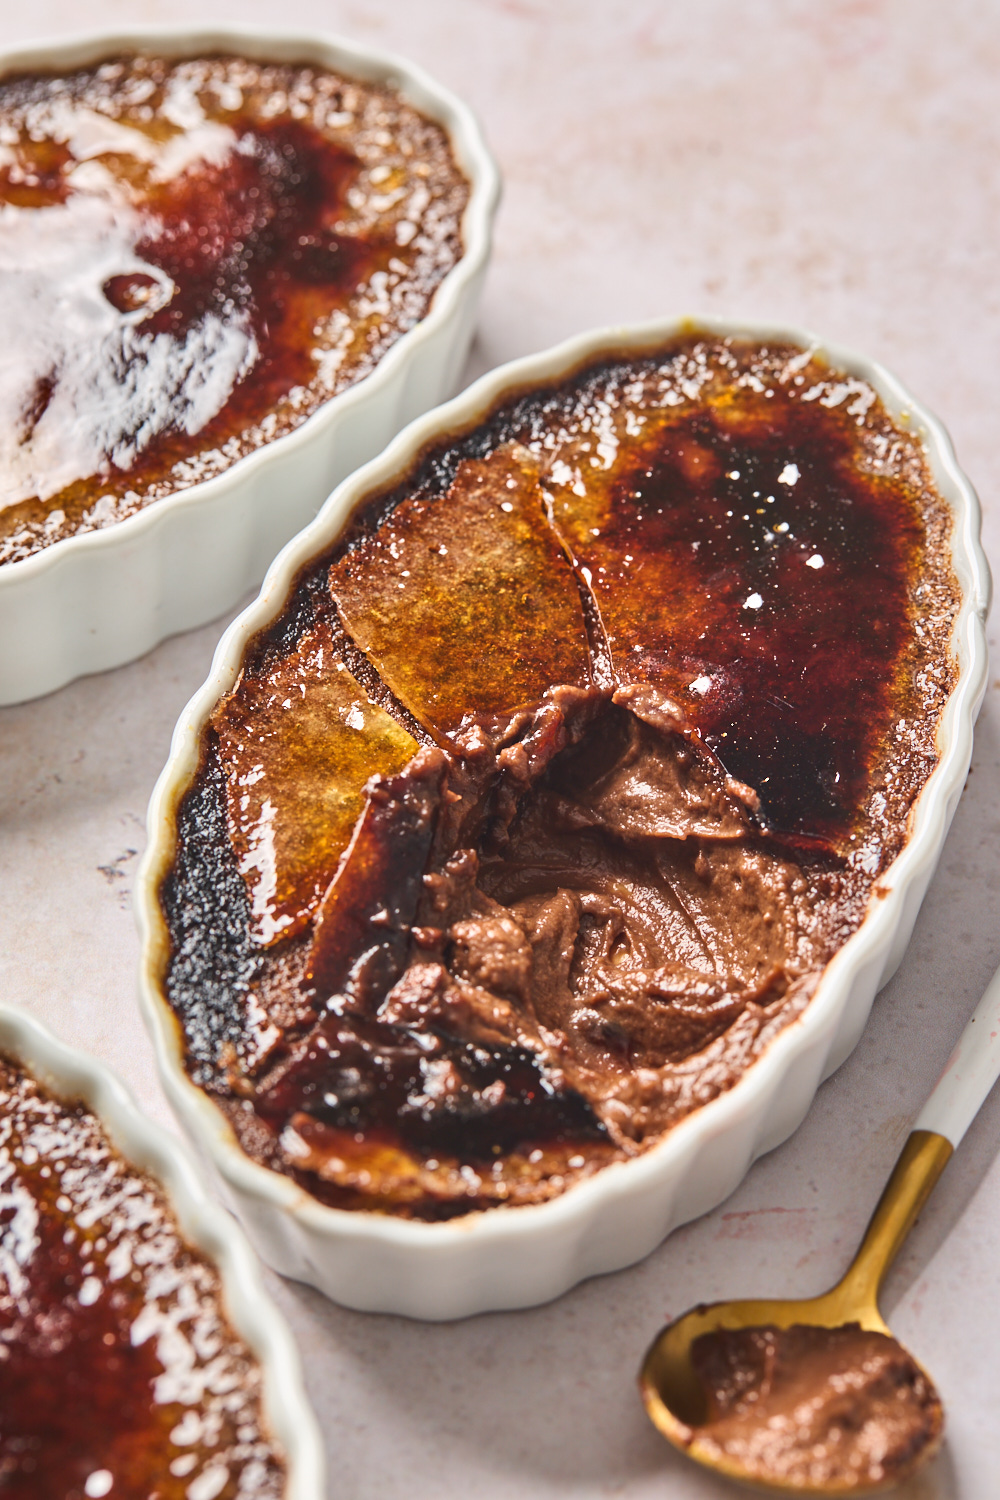
Pretty much the creamiest dessert on the planet! Simply put, creme brulee is a creamy, pudding-like, baked custard with a brittle top of melted sugar that cracks when you gently tap it with a spoon. The custard is made with heavy cream, eggs, sugar, and vanilla with the addition of chocolate for this chocolate version. The melted sugar crust will be slightly warm or room temperature when served, but the custard below should be cold. You can dress up a batch of creme brulee by adding caramel or fruit on the bottom, but the classic version is plain vanilla. The funnest part about eating creme brulee is all that crunch with the creaminess below. You use the edge of your spoon to gently crack the hard sugar surface, in order to expose the creamy custard beneath. You’ll get a little crunchy topping and custard in each bite. It’s the perfect dessert!
Chocolate creme brûlée ingredients:
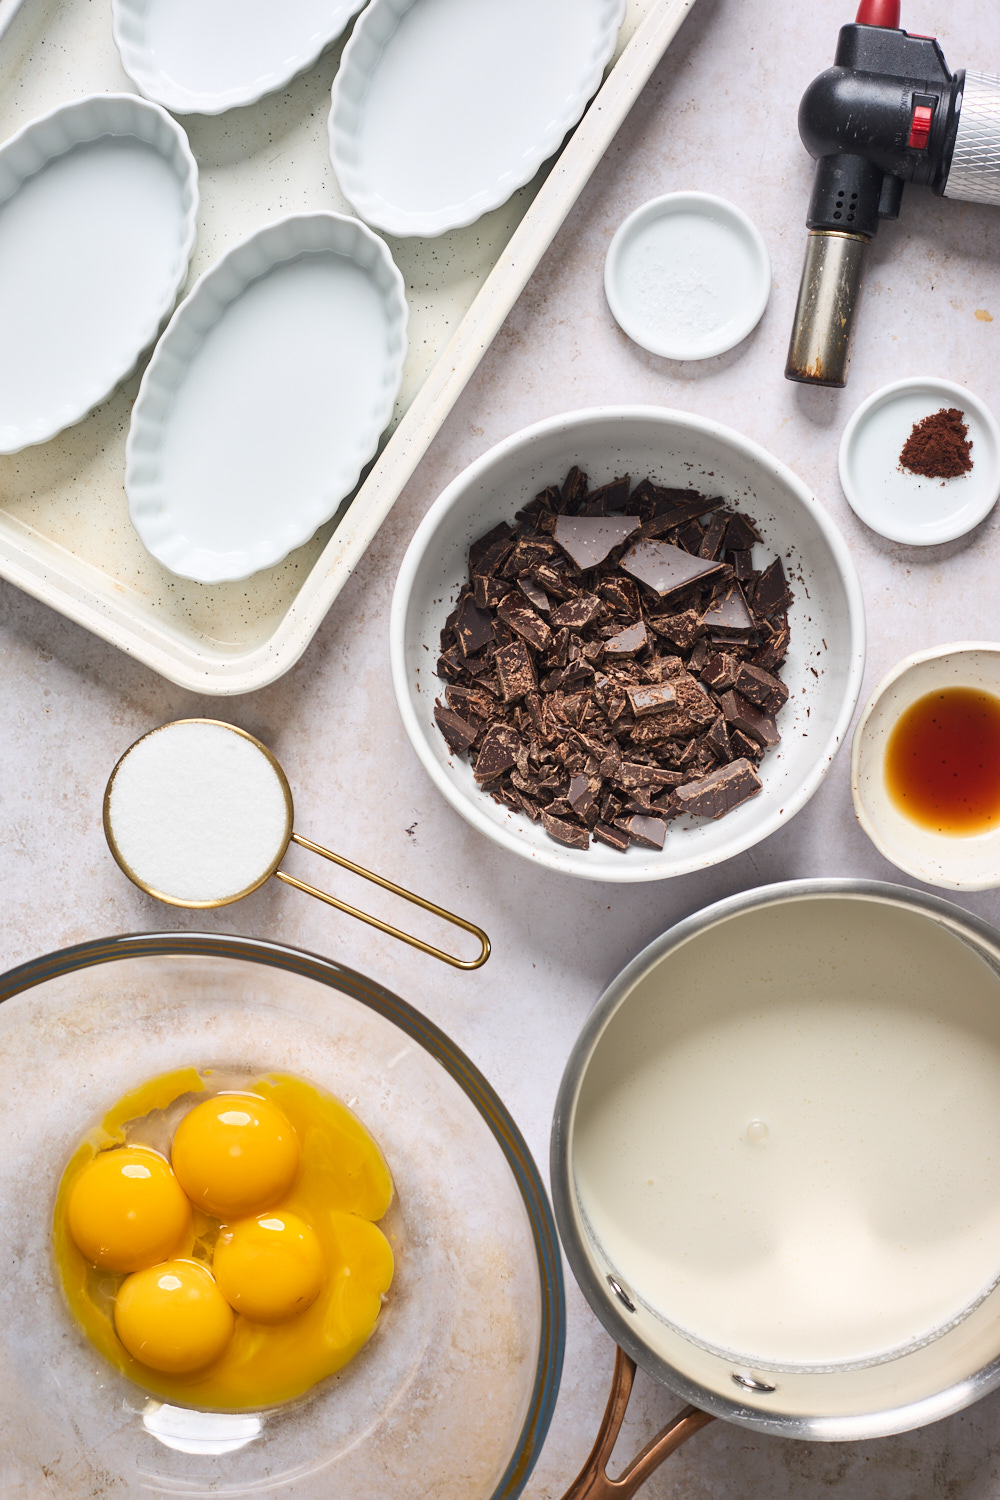
- Heavy cream - Also called heavy whipping cream. Please use full-fat heavy cream for this recipe — now isn’t the time to cut calories! Using half and half or another lower fat alternative will result in a less creamy, less heavenly crème brûlée.
- Egg yolks - Give crème brûlée its signature smoothness, richness and thickness. Save the egg whites for your morning omelette!
- Granulated sugar - Is used to sweeten the custard and is also sprinkled on top before being brûléed (i.e., caramelized with a kitchen torch). Some recipes insist on superfine sugar, but I’ve tried it with both and didn’t notice a difference.
- Salt - Don’t omit the salt! You need a pinch of salt to balance out the sweetness of the custard and to enhance the vanilla flavor.
- Vanilla extract - Please use pure vanilla extract for this crème brûlée recipe. Because the ingredients list is so short, it’s important that you use only the highest quality ingredients to achieve the richest, best flavor.
- Espresso powder - This ingredient is optional, but I love using it in chocolate desserts because it helps bring out and enhance the chocolate flavors.
- Dark/ bittersweet or Semi-Sweet Chocolate. I prefer not to use milk chocolate because of all of the cream and sugar already in the recipe, but you could. Some recipes call for cocoa powder but I find melted and smooth dark chocolate provides a better, richer flavor.
How to make it Chocolate creme brûlée:
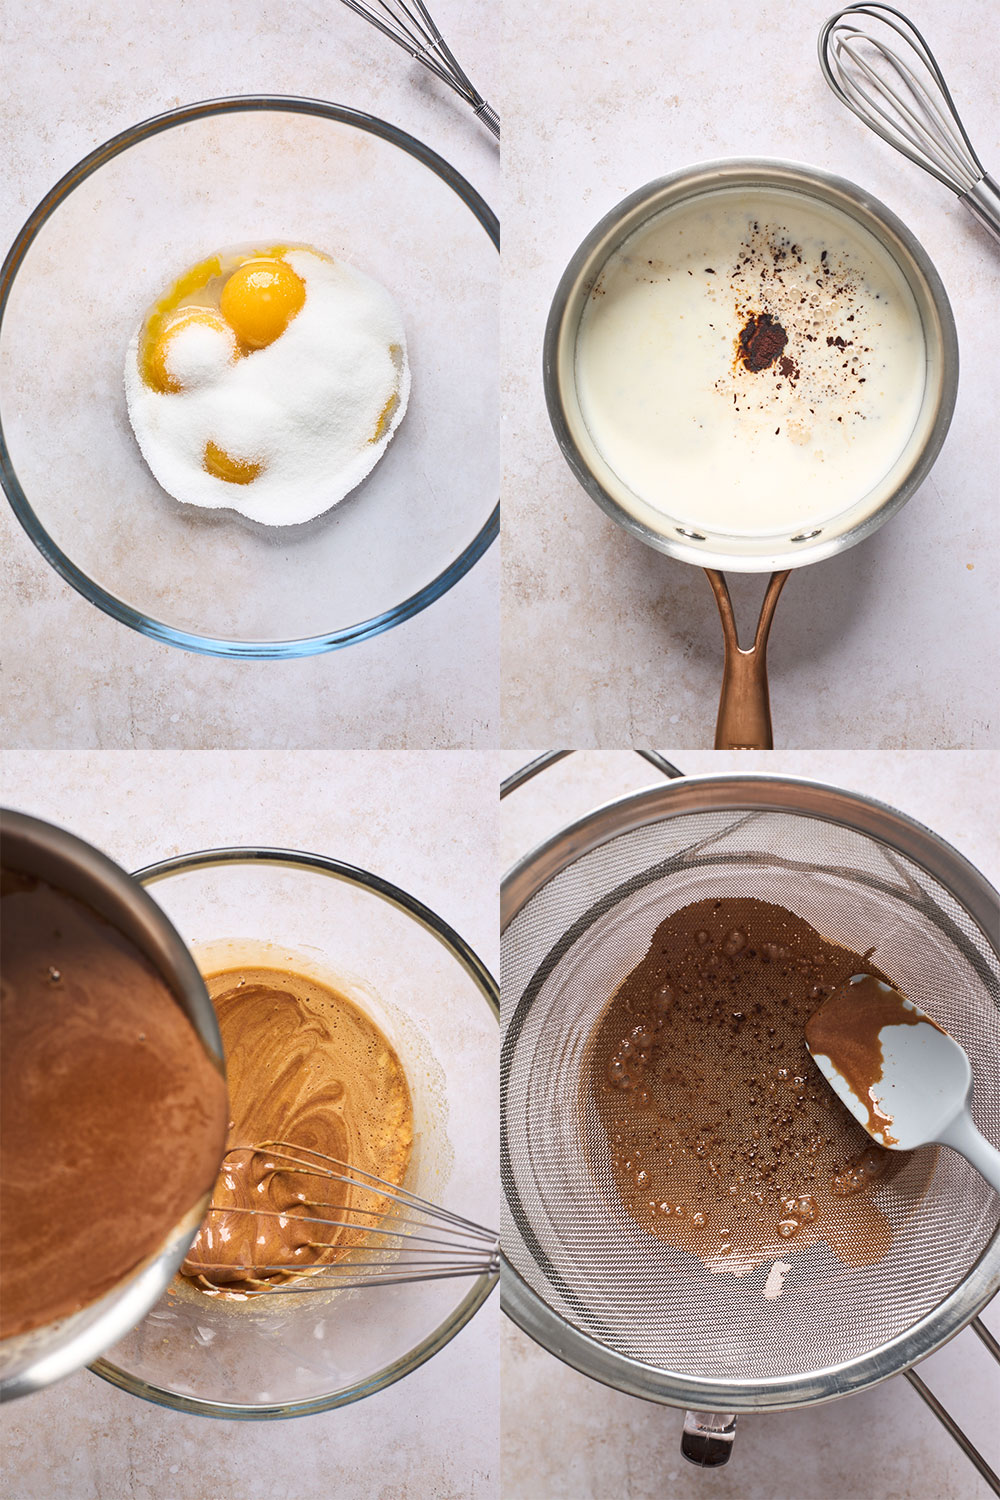
- Warm heavy cream - Place heavy cream in a medium saucepan over medium heat and bring the cream just to a simmer. Once simmering, remove from the heat add chocolate and espresso and whisk until smooth.
- Beat yolks and sugar - In a large bowl whisk the egg yolks and granulated sugar until nice and rich and creamy sugar. Tip: Keep those leftover egg whites. Leftover egg whites can be stored in a sealed container and refrigerated for up to 4 days OR they can be frozen for several months. Use them for omelets, soufflé, angel food cake, pavlova, royal icing or candied nuts.
- Temper the egg yolks - You can’t just add the warmed heavy cream to the egg mixture all at once or the eggs will scramble. Slowly and gradually whisk in a little cream mixture and then a little more and then a little more before adding the rest- but always keep that whisk moving!
- Prepare creme brûlée for baking - Strain custard and transfer the custard to a liquid measuring cup (or pitcher) so it’s easy to pour. Divide the custard between ramekins. Place the ramekins into a roasting pan with high sides. Carefully pour boiling hot water or just-off-the-boil water into the pan around the custard until it reaches about ¾ up the sides of the ramekins.
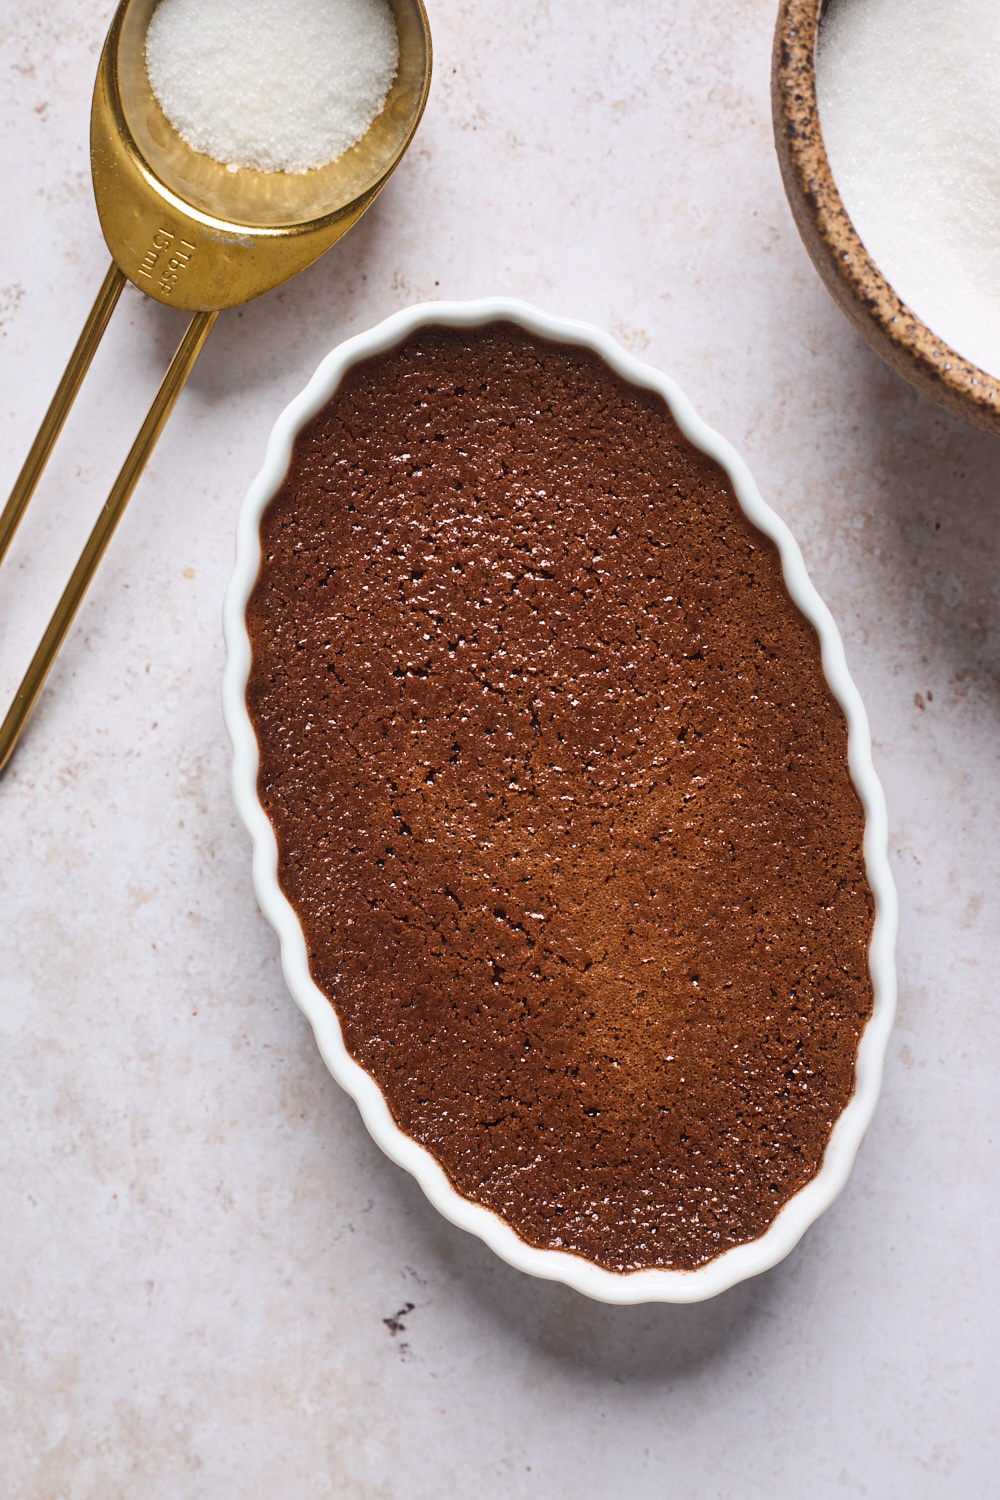
- Bake the creme brûlée- The depth of the ramekins will determine how long it takes for the custards to bake. Shallow 5- and 6-ounce ramekins that are less than 1 inch deep will take about 25 or 30 minutes. Deeper, narrower ramekins, about 2 inches deep, will require 40-50 minutes. I like to start checking mine at the 25 min mark.
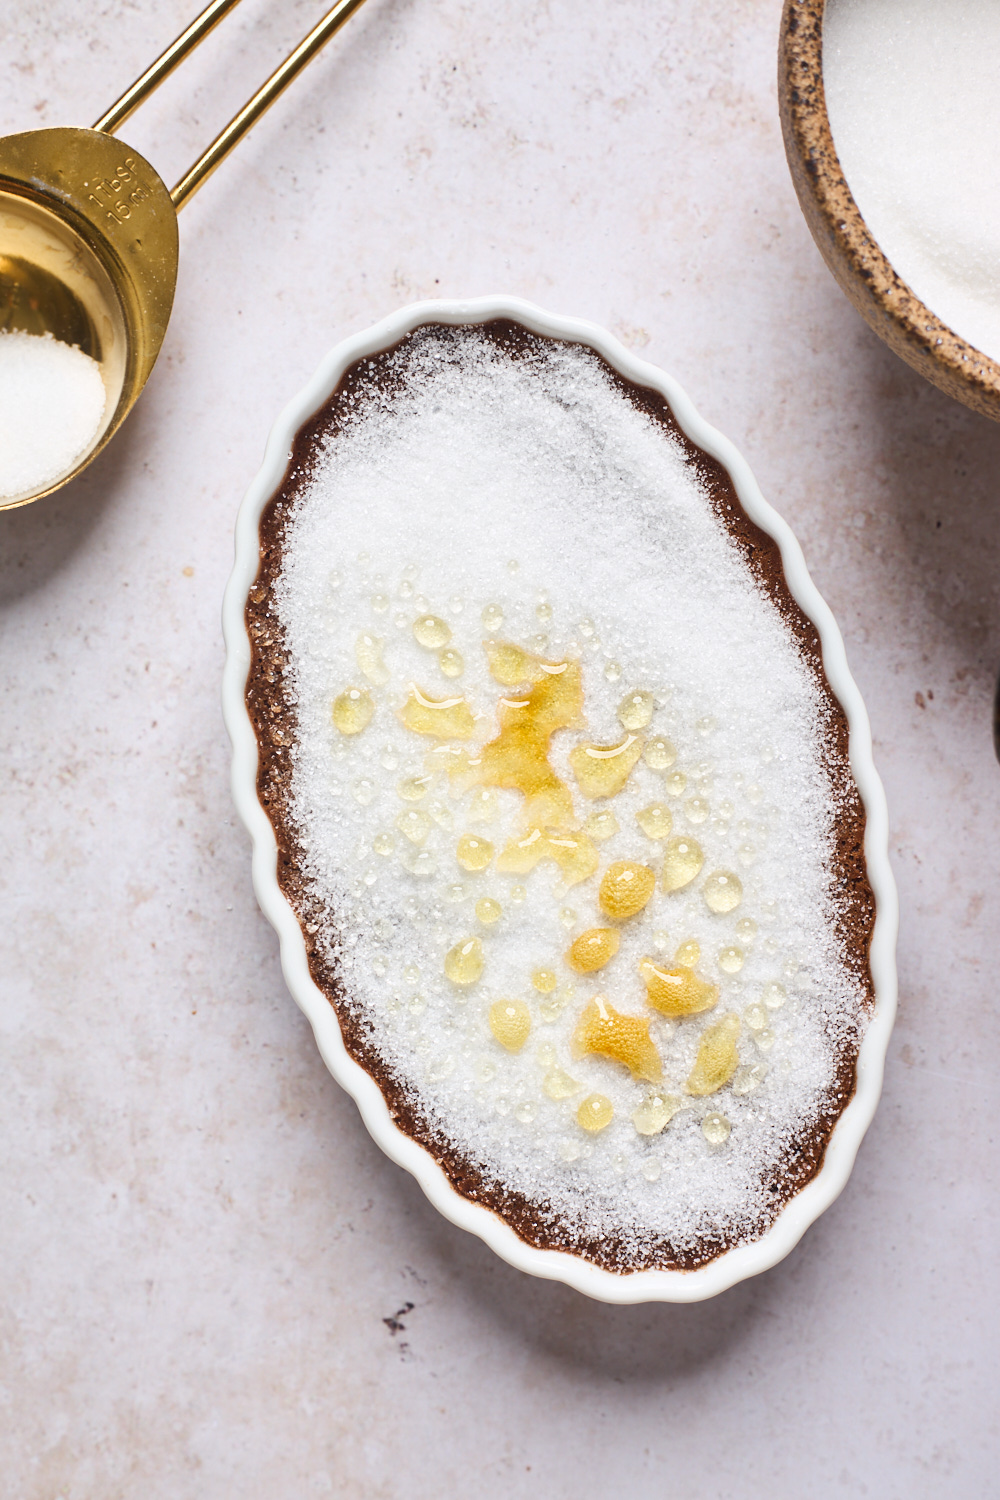
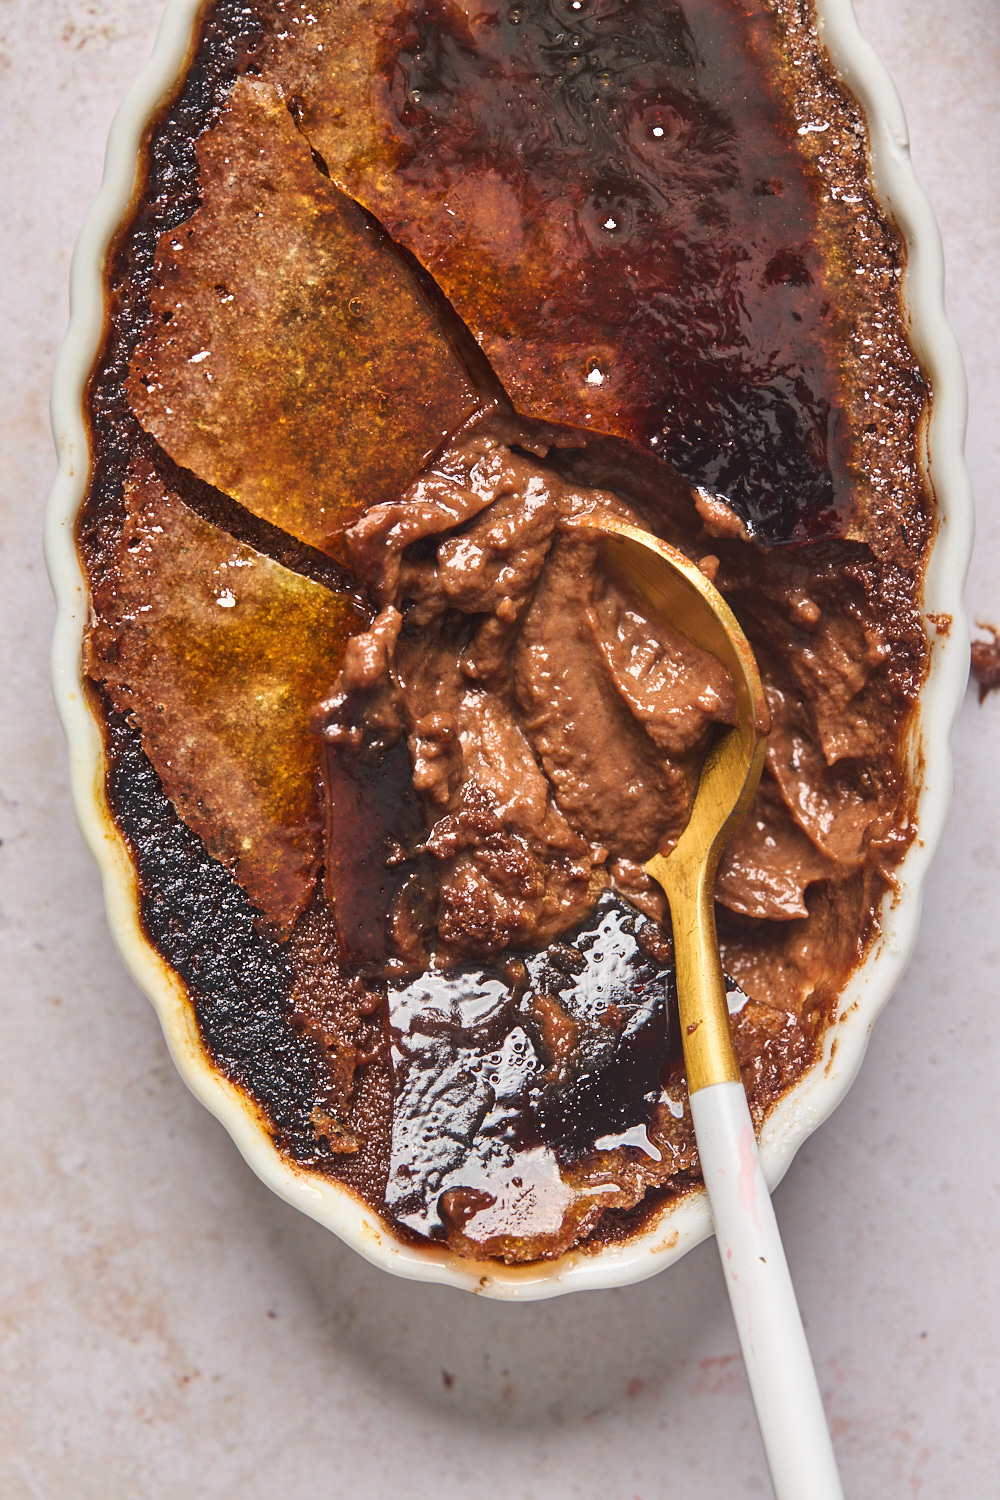
- Brûlée/caramelize the sugar topping - With kitchen or culinary torch: sprinkle baked custard with sugar. Hold creme brûlée torch about 4 to 5 inches from the sugar, and maintain a constant, slow, side to side motion. You should see the sugar melt first. If there is a patch of raw sugar, continue to torch it from side to side until it melts. I don’t mind the darker speckles around the edges on mine because I love the bittersweet flavour but to avoid that start with a thinner layer of sugar caramelize then add more layers as you like.
- Using the oven: Arrange a rack in the oven in the highest position. Place the ramekins on a baking sheet then place on the rack and turn on the broiler (DO NOT PRE-HEAT BROILER).Broil for 5 to 10 minutes, rotating the ramekins frequently with tongs so that they broil evenly. Watch closely towards the end so they don’t burn. Remove from the oven when the tops are golden brown and bubbling.
Tips for Making Creme Brûlée at Home
- Strain your custard. There’s no tempering of eggs or stovetop cooking of this custard (you’re basically just whisking eggs, sugar, and hot chocolatey cream together), so the one thing you can do to all but guarantee a perfectly smooth custard is to strain the mixture before filling the ramekins. Here’s how I do it: Mix up the custard and then strain the mixture through a fine-mesh sieve into a pitcher. The pitcher will make filling the ramekins easier.
- Skim foam. (Optional) For smooth crème brûlée, skim the foam off. After whisking the cream and eggs together, your custard will be foamy on top. Skim off the foam otherwise the bubbles will rise to the top of the crème brûlée once baked and create a bumpy texture. I don’t usually do this but if you are really picky about the way it looks then feel free to skim the foam off - I don’t find the texture comes through if you don’t because of the crunchy caramelized topping.
- Bake the custard gently in a water bath. A water bath is simply a dish of warm water that slowly cooks the creme for crème brûlée. Heat a kettle of water while you preheat the oven and make the custard. Then place the filled ramekins in a baking or roasting pan and fill the pan with the warm water.
- Chill the cremes before you brûlée. Crème brûlée can be served warm or cold, but you need to chill the baked and set custard before the caramelization step to ensure a thick, crackling crust. 1-4 hours is the average but overnight is great too. Don’t chill too long after adding topping: Once you caramelize the topping, don’t refrigerate the crème brûlée longer than 30 minutes because the gorgeous hardened top will deteriorate and become soft.
Make ahead and storage:
Crème brûlée is a fabulous make ahead dessert because it can be prepared almost entirely ahead of time, or you can prepare it in stages. Here are options for making ahead:
- Uncooked custard: can be covered and stored in the refrigerator for 3 days before baking. You can either store it in one container or go one step further and divide it between ramekins (make sure to cover all of the ramekins with plastic wrap as well).
- Baked custards WITHOUT brûléed sugar topping: can be covered and stored in the refrigerator for up to 4 days.
- Crème brûlée (baked custards WITH brûléed sugar topping): If prefer more lukewarm crème brûlée, then let custards sit for 30 minutes at room temperature before serving. Alternatively, if you prefer chilled crème brûlée, store the them in the refrigerator for up to 30 minutes before serving. Do not refrigerate any longer after brûléeing the tops or you risk the sugar absorbing moisture and the brittle top softening. Unfortunately, it doesn’t work well to torch the top again to try crisping it back up.
If you like this recipe you will love these:
Recipe
Ingredients
For the crème brûlée
- 2 cups heavy cream
- ⅓ cup sugar
- Pinch of salt
- 1 tsp vanilla extract
- 3.5 ounces bittersweet chocolate, chopped
- ¼-½ teaspoon of instant espresso (optional)
- 5 large egg yolks
For assembling
- 4 tablespoons sugar
Directions
- Preheat oven to 275°F
- Place 4 ramekins in a heat-proof baking pan, deep enough to fill with water to the middle of the ramekins
- Whisk egg yolks, sugar, and salt together in a heat-proof bowl vigorously for a couple minutes until the sugar is well incorporated.
- Heat heavy cream to a light simmer and add chopped chocolate and espresso; whisk until the chocolate is completely melted.
- Very Slowly and gradually pour the hot cream into egg yolk mixture, while whisking continuously. Whisk in vanilla
- Strain the mixture through a fine sieve (optional) and gently pour the liquid into the ramekins in the baking pan.
- Fill the baking dish with boiling water until it reaches the middle of the ramekins
- Carefully transfer the baking pan to the oven and bake 30-35 minutes or until the custards are set on the edges but still a little jiggly in the middle when gently shaken. Start checking at the 25 min mark.
- Remove the custards from oven and place the roasting pan on a wire rack. After five minutes carefully remove the ramekins from the roasting pan and let cool for 1 hour on a wire rack or until room temperature, wrap in plastic, and refrigerate until firm approx 1-2 hours or overnight.
- Assemble the cremes brulees: Top each with 1 tablespoon sugar. Hold a small handheld kitchen torch at a 90-degree angle 3 to 4 inches from surface of custard. Move flame back and forth until surface is caramelized. Alternatively, broil custards on top rack until caramelized, 1 to 2 minutes.
- Baked cremes brulees can be refrigerated overnight. Caramelize tops before serving.
Recipe Notes
Make ahead & Storage
- Uncooked custard: can be covered and stored in the refrigerator for 3 days before baking. You can either store it in one container or go one step further and divide it between ramekins (make sure to cover all of the ramekins with plastic wrap as well).
- Baked custards WITHOUT brûléed sugar topping: can be covered and stored in the refrigerator for up to 4 days.
- Crème brûlée (baked custards WITH brûléed sugar topping): If prefer more lukewarm crème brûlée, then let custards sit for 30 minutes at room temperature before serving. Alternatively, if you prefer chilled crème brûlée, store the them in the refrigerator for up to 30 minutes before serving. Do not refrigerate any longer after brûléeing the tops or you risk the sugar absorbing moisture and the brittle top softening. Unfortunately, it doesn’t work well to torch the top again to try crisping it back up.