Easy Red Velvet Marble Loaf Cake
 cakes, red velvet
Updated. Originally 1st Jan 2024
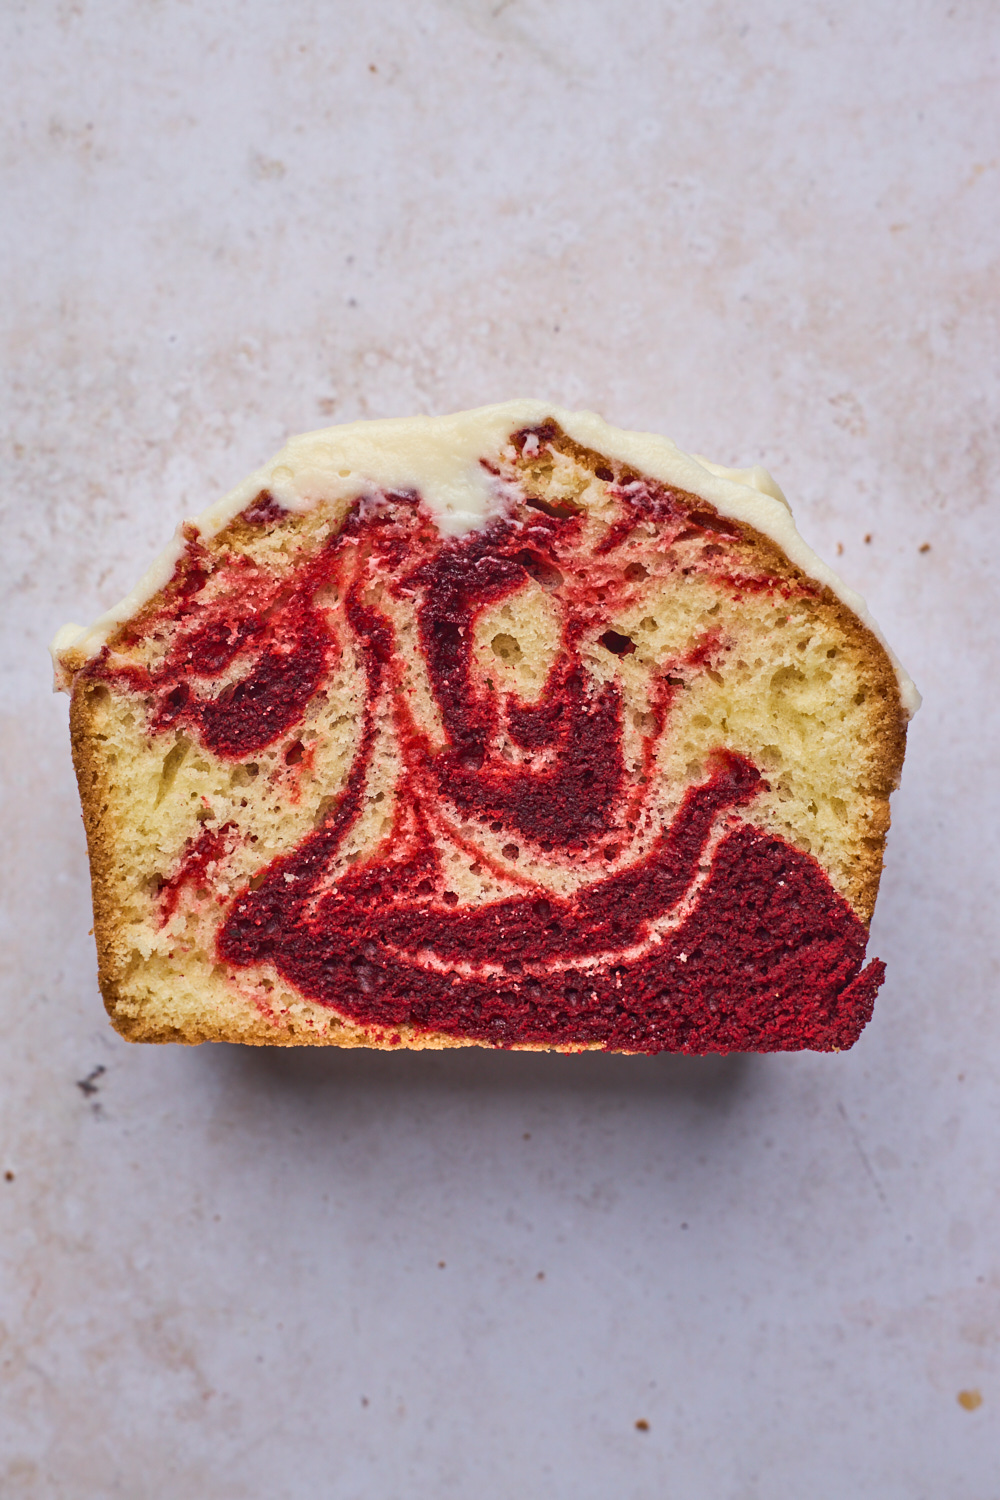
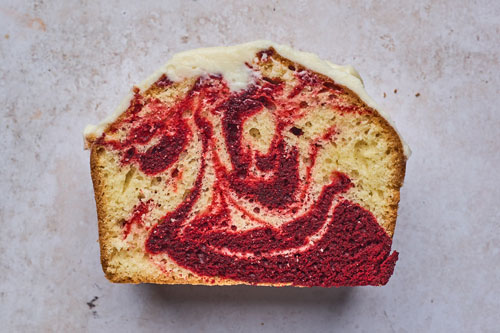
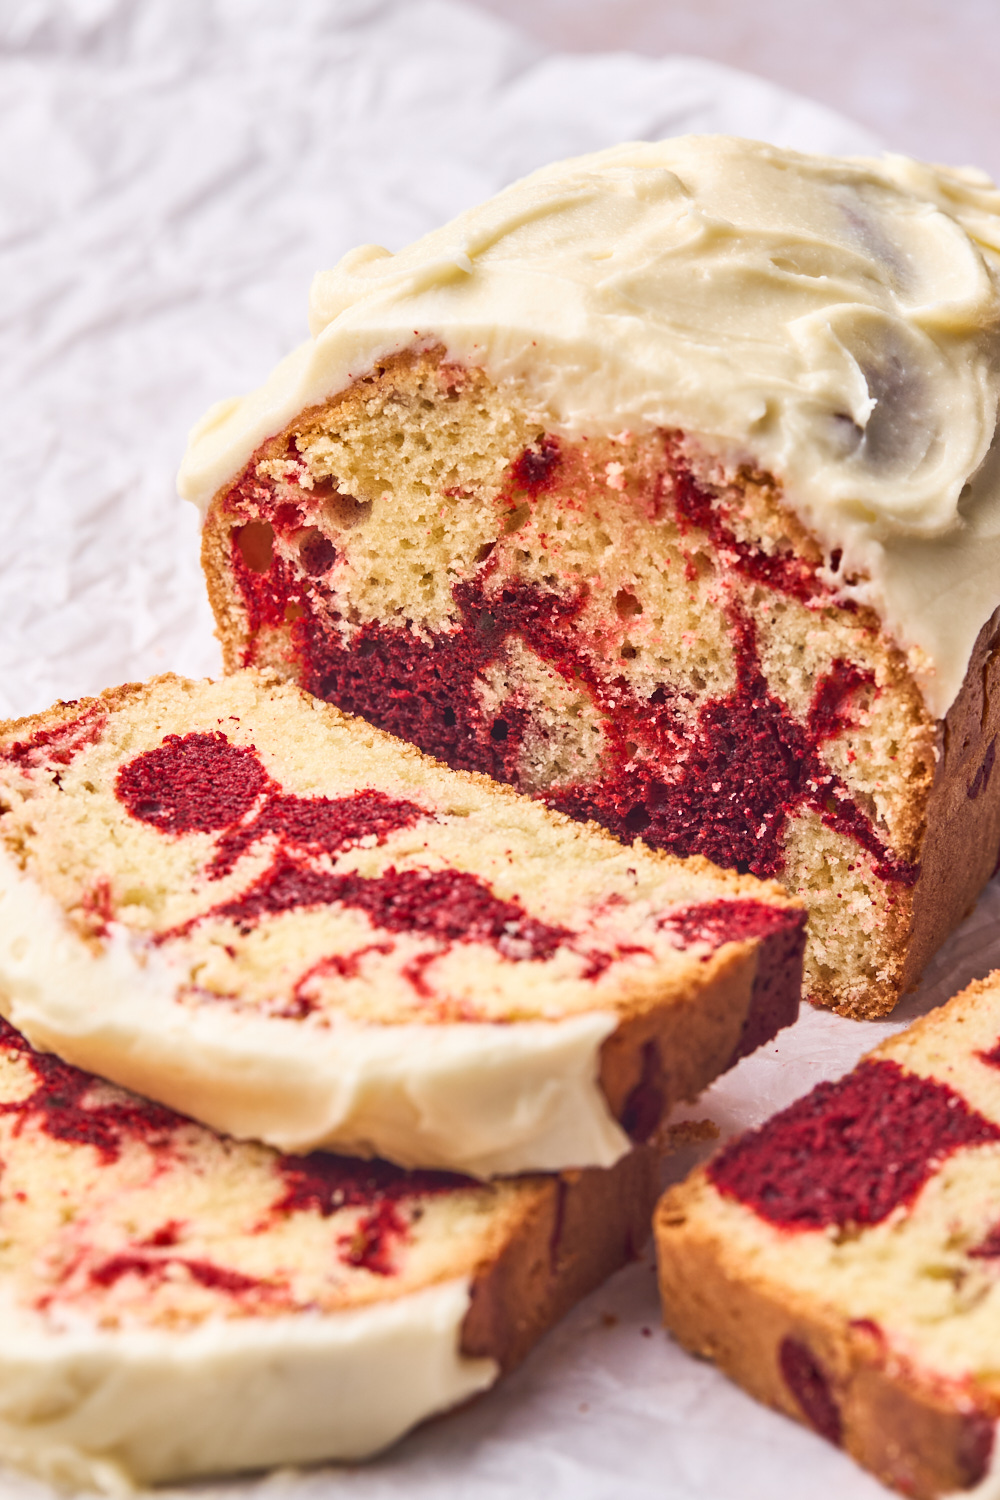
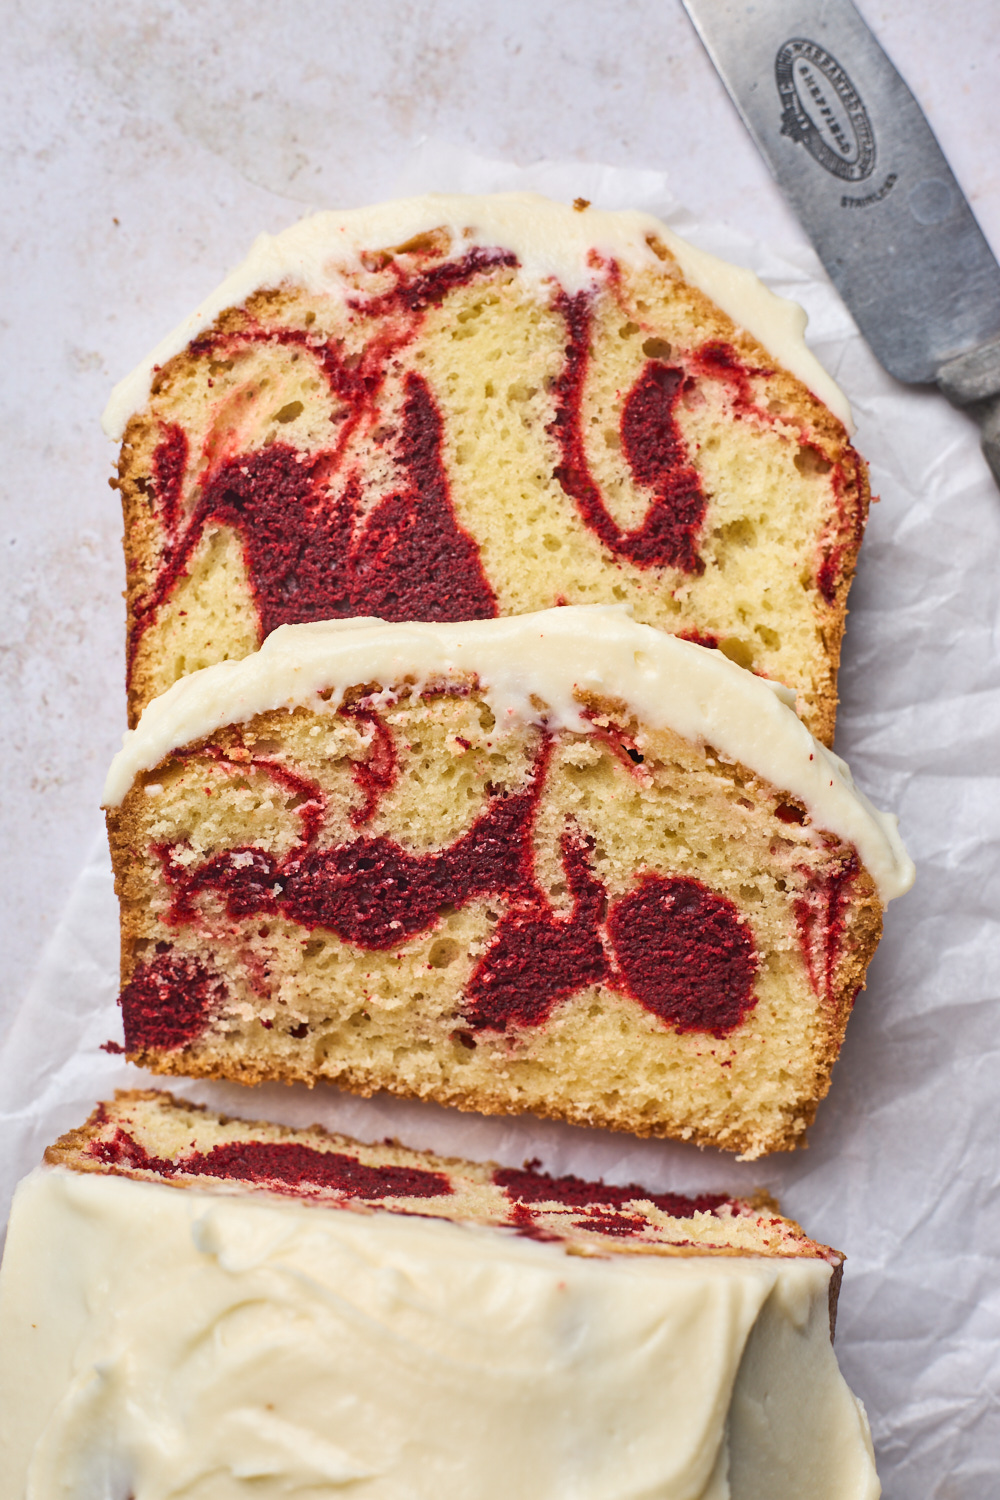
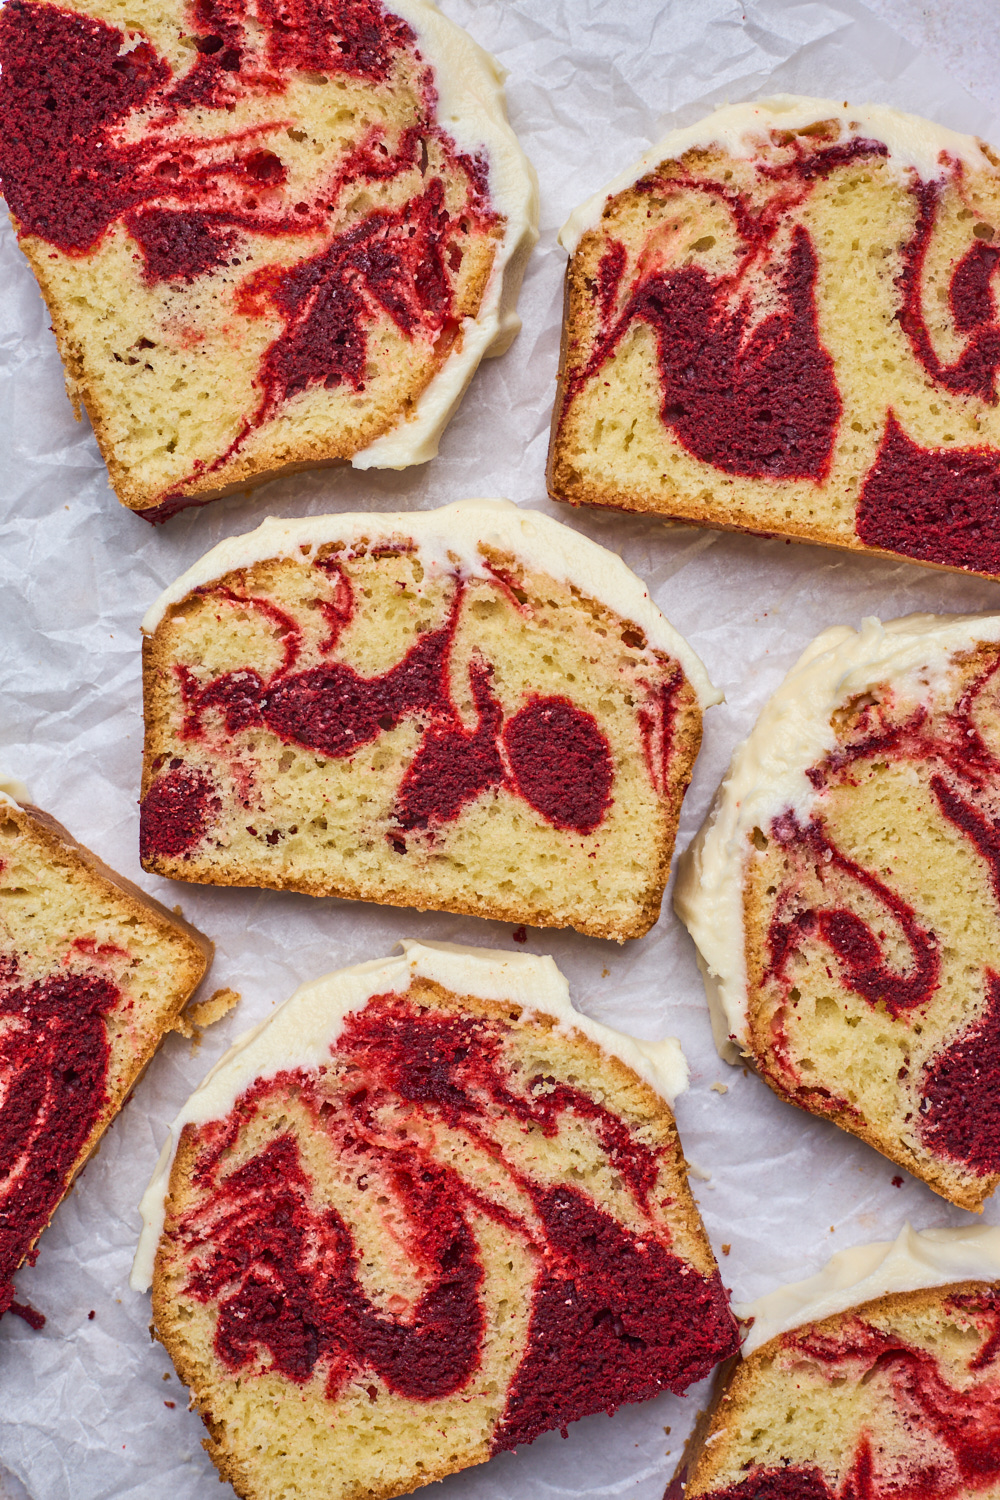
This Red Velvet Marble loaf Cake is a delicious cake with swirls of chocolatey red velvet with a springy soft crumb. Slather it with a vanilla cream cheese frosting or dust it with powdered sugar. I’m a sucker for red velvet, and have a hard time passing it up whether it’s cake or cupcakes. So as someone who adores it, this loaf cake had to happen. It’s inspired by Starbucks red velvet loaf cake. Delicious vanilla cake swirled with classic red velvet cake. Starbucks tops theirs with white chocolate icing but I opted for a creamy vanilla cream cheese icing or frosting - the kind I love with all my red velvet treats. On first bite make sure to get the vanilla, red velvet, and icing all in one to enjoy all the flavours together. It is rich without being too sweet. Moist, tender, and rich, every bite is decadent and delicious. This Vanilla and Chocolate Red Velvet Marble Loaf Cake is always perfect for afternoon tea, breakfast or dessert.
Why you are going to love this loaf cake:
- It’s very simple to make - a bowl and whisk kind of recipe - no mixer required
- No need to wait for the butter to soften because this cake is made with a combination of vegetable oil and melted butter
- No need to use pastry flour or a combination of flours - all purpose flour is all you need
- Marble cakes are always fun to create
- The cake is perfect for snack, breakfast or dessert
- It’s not too sweet and the crumb is tender, fluffy and moist
What is marble cake?
A marble cake is a cake that has a light and a dark batter swirled together. Chocolate and vanilla are the most common pairing, but this cake swirls chocolate red velvet and vanilla cake batters together. How to make a marble cake batter? The marble effect is created by combining a vanilla batter and chocolate red velvet cake batter into one pan, and it is always so fun to discover the marbled result once you get to slice the cake. The marbling technique for making the swirls is easy, and it gives you a great effect without the risk of blending the batters together.
Red Velvet Mable Cake Recipe Ingredients
To make this cake, you will need: very simple and basic pantry ingredients. (Scroll down to recipe card for all quantities):
- EGGS: You will need 2 large eggs. Make sure they are at room temperature.
- SUGAR: Granulated sugar is what I use for this recipe. 1 cup is all you need.
- VANILLA EXTRACT: I use pure vanilla extract for best flavor but you can use vanilla essence as well
- FLOUR: All Purpose / Plain - no need for any special blend or pastry flour - just regular all purpose
- BAKING POWDER & SALT: For leavening and flavor.
- OIL: I use a neutral vegetable oil like canola oil or olive oil - for a richer flavour.
- BUTTER: I use unsalted butter and melted for this recipe - the combination of oil and butter really gives this cake lots of moisture, richness and flavor.
- MILK: I use buttermilk for this recipe. It makes cakes moister, more tender, and adds a subtle tang, but feel free to use regular milk or non dairy milk here just make sure it’s room temperature.
- VINEGAR: I use white vinegar or apple cider vinegar to mix into the red chocolate batter to keep the crumb tender especially since the cocoa powder can sort of suck the moisture out of the batter. A little goes a long way. You will not taste any vinegar in the cake at all.
- COCOA POWDER: I suggest using unsweetened cocoa powder rather than Dutch-processed because it lets more of the red color come through on the swirl.
- RED FOOD COLOR: I like to use gel or liquid food colour rather than powder because it’s less messy to use but feel free to use either. A natural one is always best if possible, but sometimes the natural ones do not produce as an intense red colour (if you don’t add the red food colouring the cake is still lovely and will taste the same)
- OPTIONAL: To boost the chocolate flavour, you can also add some chocolate chips or chunks of chocolate in the chocolate batter.
How to Make Red Velvet Marble Cake (full recipe details in recipe card below)
- Preheat Oven & Prep Pan: Grease and line your pan for easy removal
- Whisk Dry Ingredients: flour, Baking powder, sugar and salt
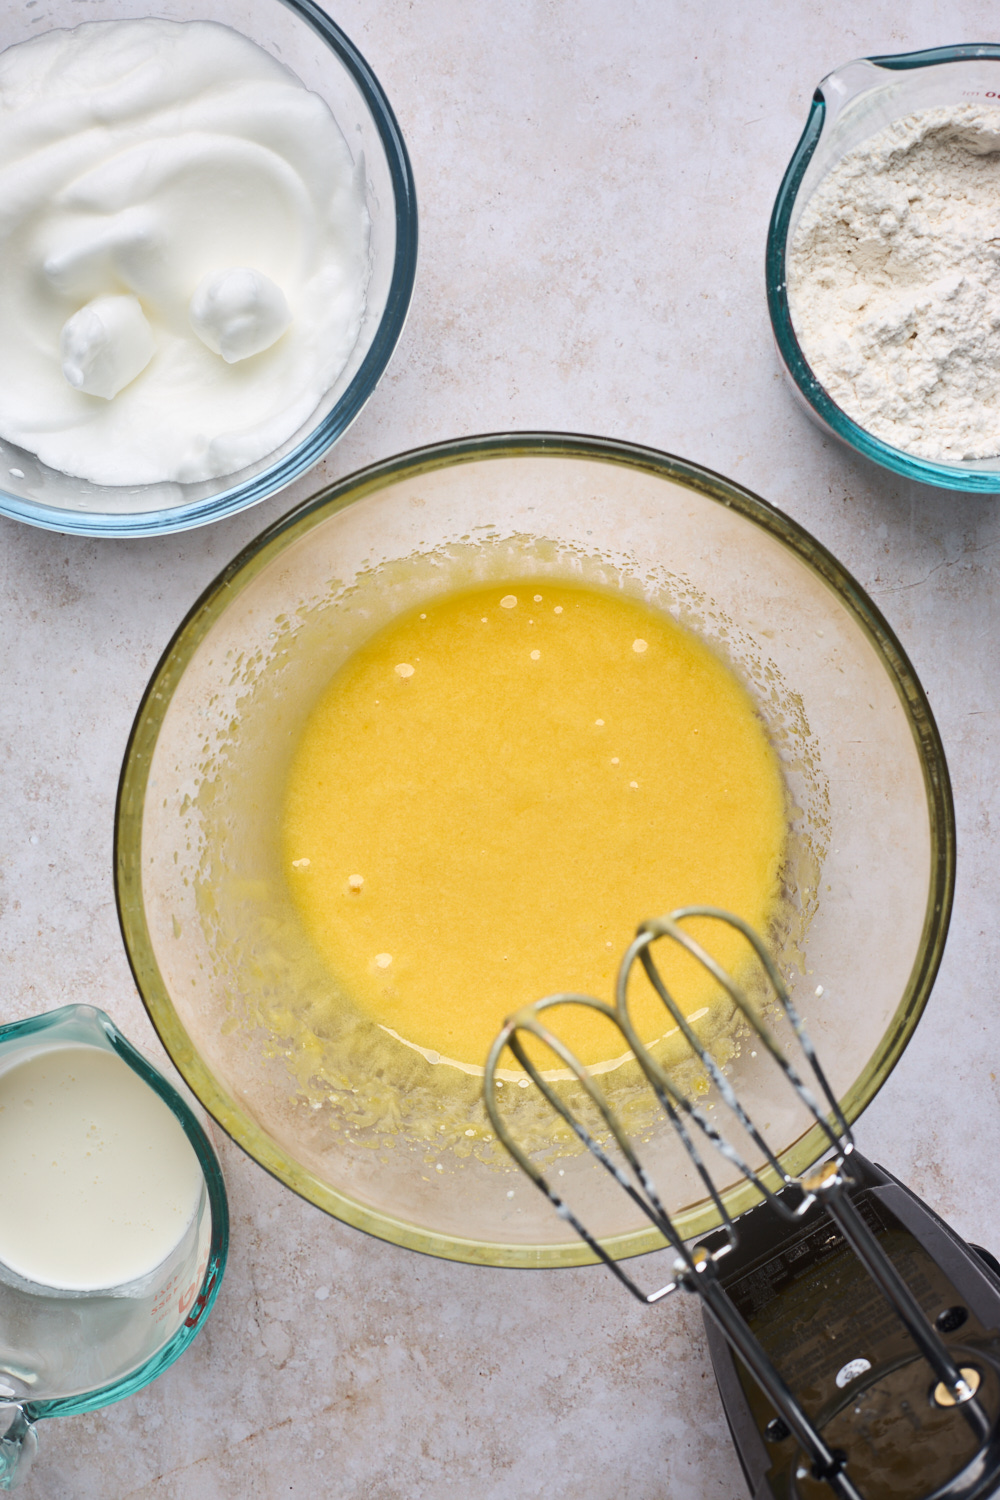
- Whisk Wet Ingredients: melted butter, eggs, buttermilk, oil and vanilla until well combined.
- Combine Wet & Dry Ingredients: Just until no lumps remain - do not over mix
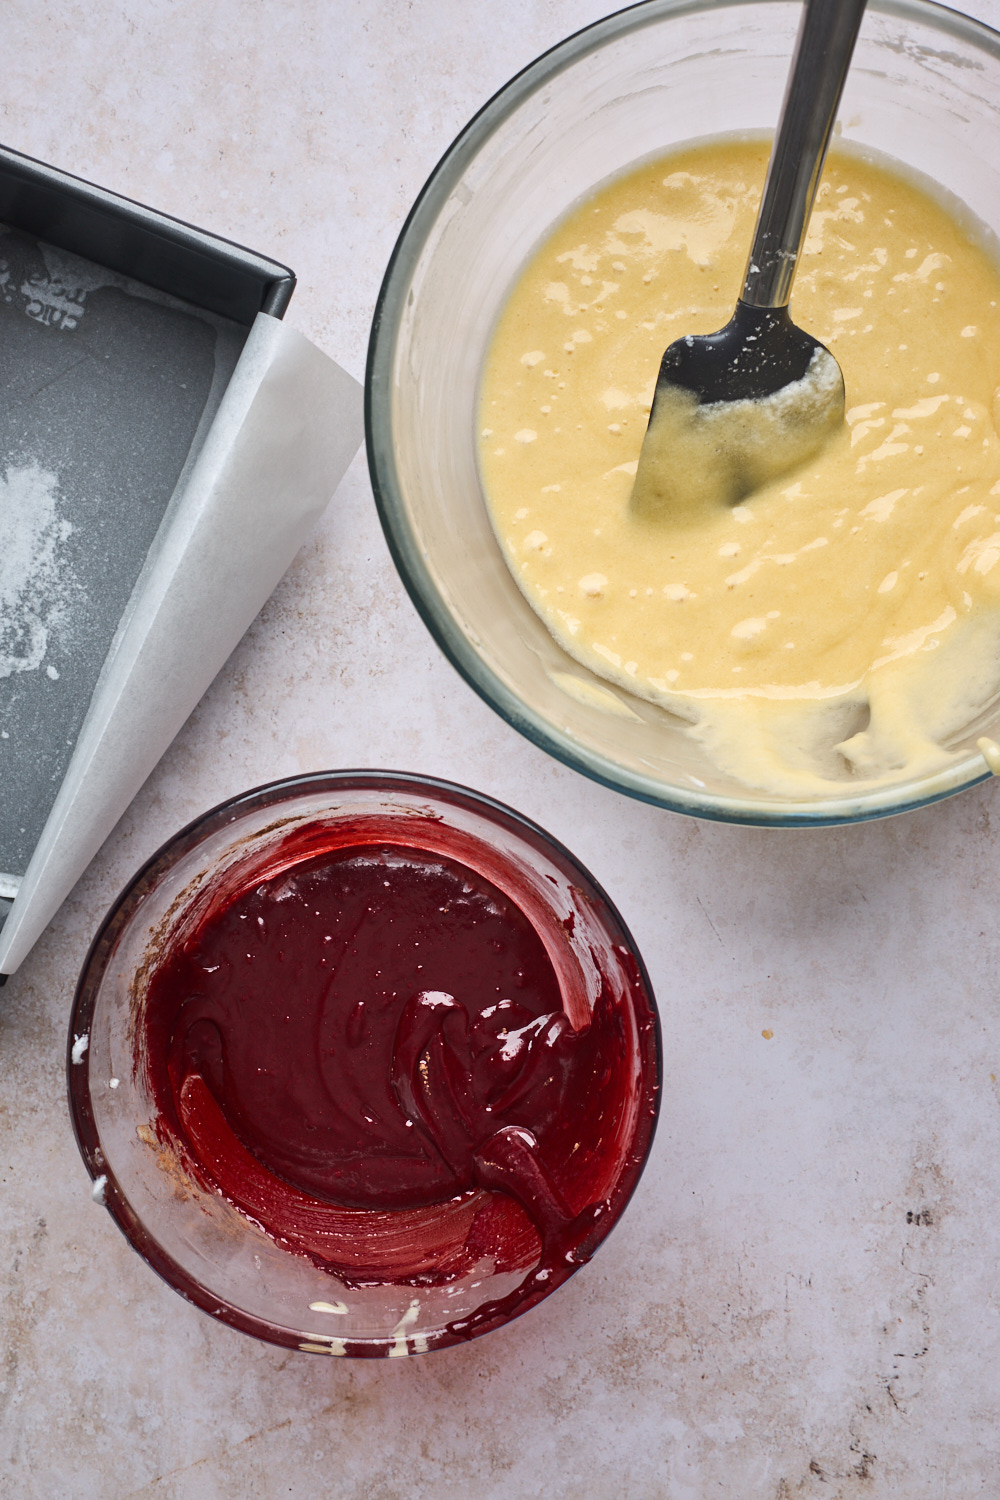
- Make Chocolate Batter: Mix approx 1 ½ cups of vanilla batter with cocoa powder, food color, vinegar, and hot water until combined.
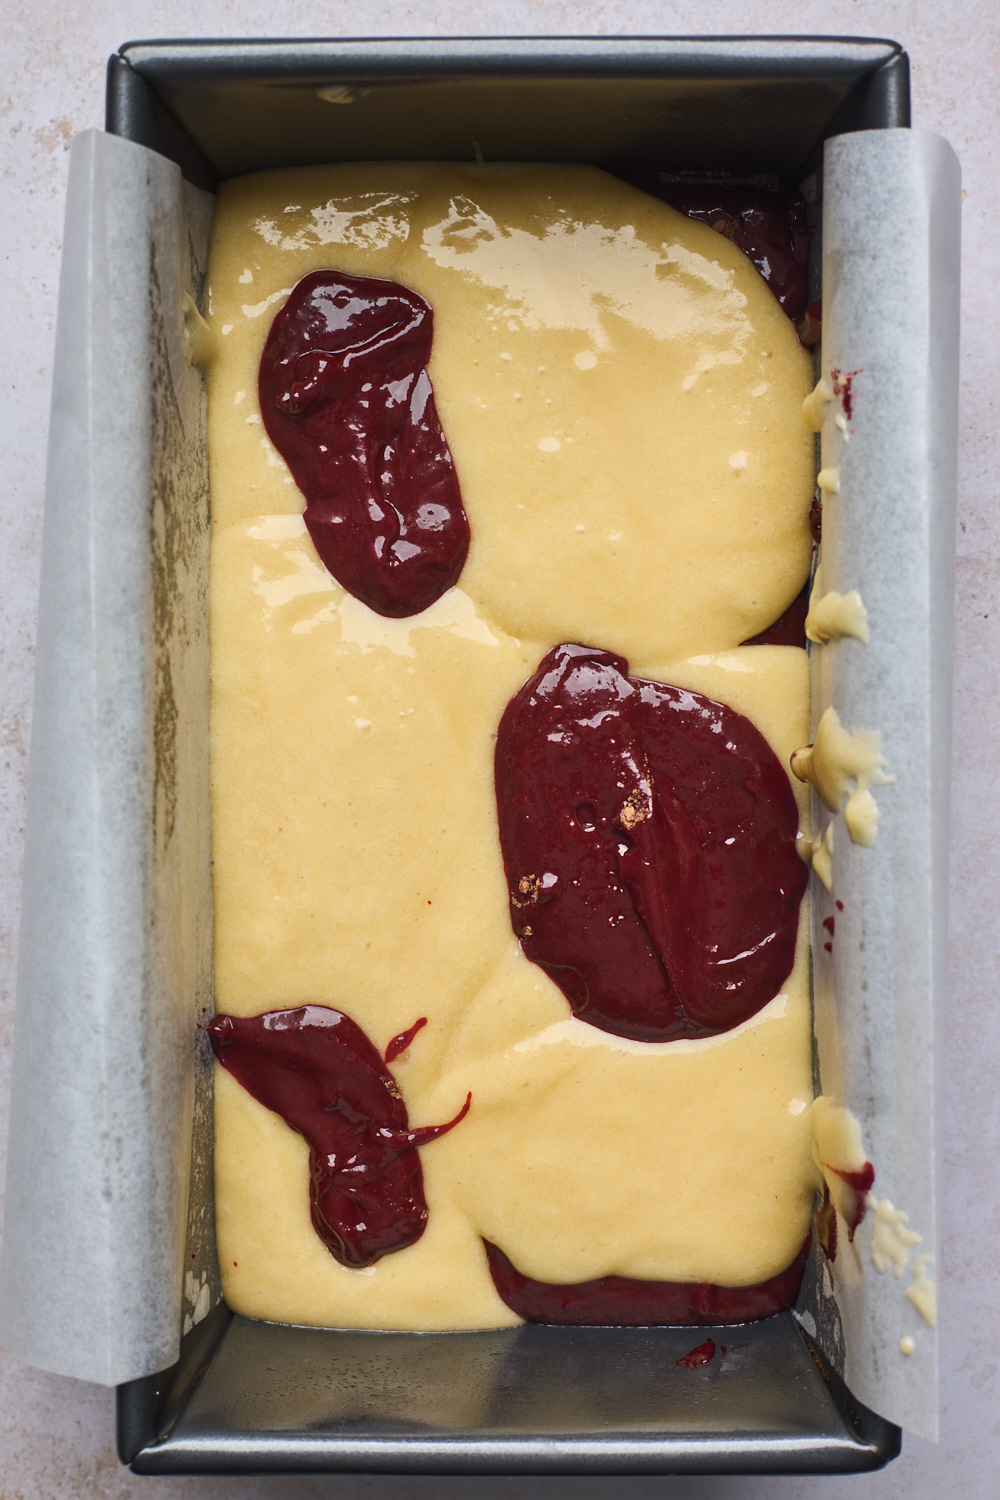
- Assemble Cake: Alternate scooping in the different batters into pan then swirl - more details below for this easy no fail marble cake method
- Bake, Cool & Serve: Bake until toothpick tester comes out clean or with just a few moist crumbs, cool on rack in pan for 10-15 mins, then remove from pan onto rack and cool completely. Top with either a dusting of powdered sugar or cream cheese frosting, slice and serve.
Tips for Making Red Velvet Marble Cake
- Check “doneness” with about 5 minutes to bake by inserting a toothpick in the center. If it comes out clean it’s done and can be removed, but if there is wet batter on the toothpick add 5 to 7 minutes to the baking time. Repeat this step until the toothpick comes out clean. Try not to over bake and definitely tent with foil if top of cake starts to brown too quickly.
- To create the “marble” effect on the cake you can simply layer the batter in the bundt cake pan or use a knife to very gently swirl the layers together and create a thicker marble look. Just be careful to not over-swirl the batters together.
- If adding the vanilla cream cheese frosting wait until the cake has cooled completely before frosting
If you loved this recipe you will love these:
Recipe
Ingredients
For the Vanilla Batter
- 2 cups all purpose flour
- 1 cup granulated white sugar
- 2 teaspoons baking powder
- ¼ teaspoon salt
- ½ cup unsalted butter, melted & cooled slightly
- 2 large eggs, room temperature
- 1 cup buttermilk, room temperature
- ¼ cup vegetable oil
- 2 teaspoons vanilla extract
For the Red Velvet Swirl
- ¼ cup unsweetened cocoa powder (baking)
- 1 teaspoon vinegar (white or apple cider)
- 2 teaspoons red food colouring
- 2 tablespoons boiling water
For the cream cheese frosting (optional)
- 4 ounces cream cheese, room temperature
- ½ cup confectioners’ sugar
- ¼ tsp vanilla extract
Directions
- Preheat oven to 350°F and grease and line 8x4 inch loaf pan with parchment paper with overhanging edges for easy removal In a large mixing bowl whisk together the flour, sugar, baking powder, and salt.
- In a medium size bowl whisk together the wet ingredients: melted butter, eggs, buttermilk, oil and vanilla until well combined.
- Make a well in the centre of the dry ingredients and pour in the wet ingredients. Use a spatula and gently fold until just combined with no lumps
- Transfer about 1½ cups of the batter into the bowl you had the wet ingredients in then mix in the cocoa powder, boiling water, food colouring and vinegar until just combined.
- Alternate ½ cup scoops of vanilla and red velvet batter into the center of prepared loaf pan layering them directly over top of each other until all batter is added. Run a knife through to swirl the batters a couple of times – not so much that you completely mix them. Tap loaf pan onto the counter once or twice to settle the batter.
- Transfer pan to preheated oven and bake for 45-55 minutes or until a toothpick comes out clean with a few sticky crumbs. Keep an eye on it towards the last 10-15 minutes of baking as ovens and pans differ and baking times can vary slightly.
- Allow to cool in pan for 10-15 minutes, then remove to a wire rack to cool completely before topping.
- For the frosting: When cake is cool and ready to serve, beat cream cheese with confectioners’ sugar and ¼ teaspoon vanilla extract until smooth. Spread with a spatula over top of cake. Slice and serve.
Recipe Notes
- Storage and freezing: You can store this cake in an airtight container for up to 4 days at room temperature without the frosting (frosted it should be refrigerated because of the cream cheese) – if you would like to store it longer, you can freeze it, well wrapped, for up to 2 months without the frosting)
- Do I need to add the food colouring? Yes if you want red velvet swirls - but if you don’t care for those and just want chocolatey ones then feel free to leave out the food colouring.
- Do I have to make this cake with the frosting? No this cake is delicious with or without the frosting. You could serve it as is or with a dusting of powdered sugar or even some chocolate ganache drizzles.