Easy Classic Strawberry Rhubarb Pie
 strawberries, rhubarb, pies
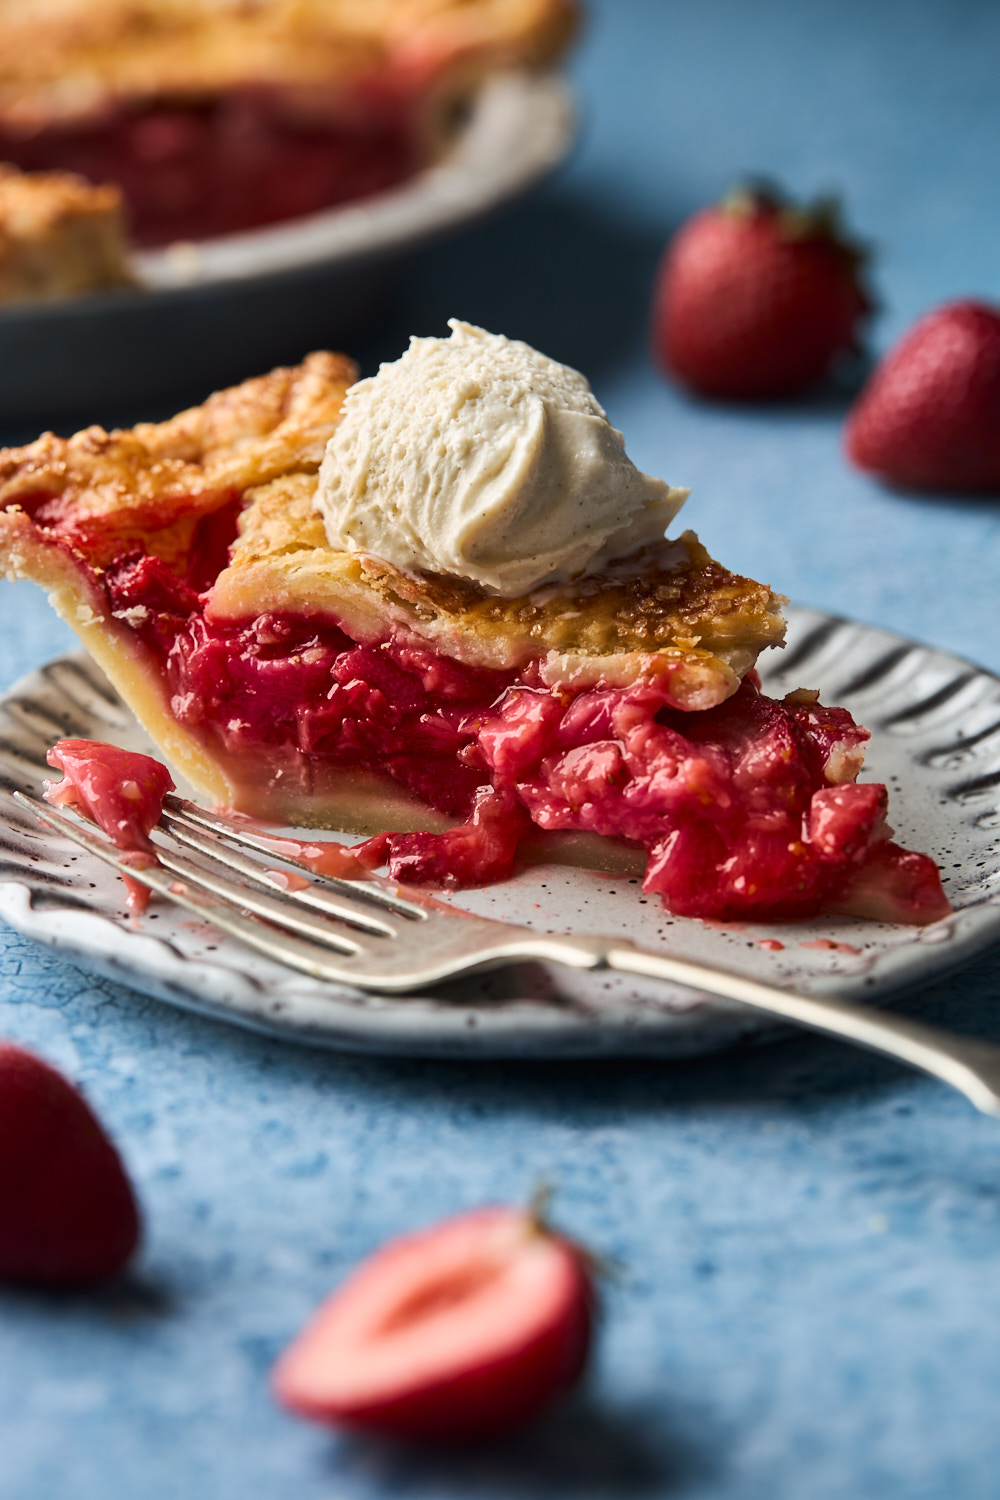
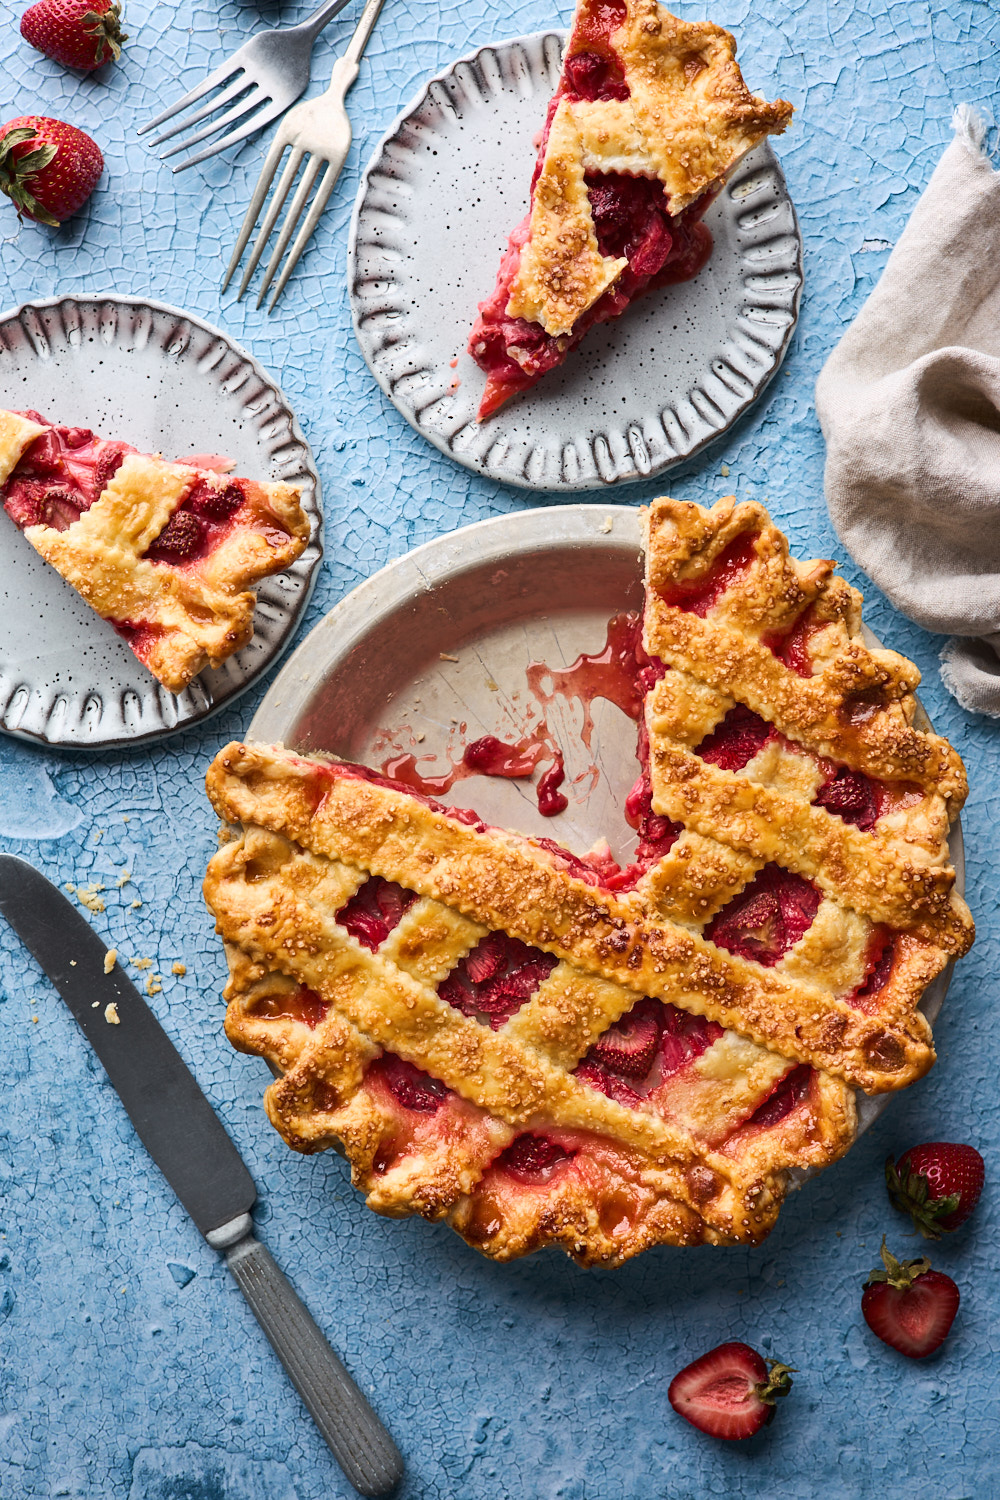
This classic Strawberry Rhubarb Pie is a spring and summertime favourite! A flaky, buttery homemade crust is filled with sweet fresh strawberries paired with tart rhubarb and a hint of orange zest. Top with a scoop of vanilla ice cream or a dollop of whipped cream and you have yourself the most perfect dessert!
I love fresh fruit pies because they are so simple and delicious. You just throw together some freshly-chopped fruit, some sugar, a bit of a thickener and you are good to go! I usually make my own pie crust, but when I’m short on time, I don’t mind using a good all butter store bought one too! You will love how easy this pie dough comes together in the food processor. If you don’t have one or don’t prefer using one - there are easy alternative instructions in recipe notes below. The filling is juicy but holds together enough to cut beautiful clean slices.
Can I use frozen fruit in this pie?
Nothing beats using fresh fruit in a pie but you can absolutely use frozen fruit in this pie. When I have the freezer space for extra frozen fruit I actually like to freeze my own. I love to buy a lot of rhubarb when it’s in season, slice it into small pieces, and freeze it for later use. The same can be done with the strawberries. Just arrange the slices in a single layer on baking sheets, then once they are frozen, place them in freezer bags and you have frozen fruit that is easy to measure and scoop out. When using frozen berries and rhubarb in this pie, simply thaw them completely in a strainer and drain them really well. I also recommend dabbing them with a couple paper towels to remove any excess moisture. Then use as directed in the recipe. You will be pleasantly surprised at how well frozen produce can work in this pie!
Tips for Making a tasty no fail Strawberry Rhubarb Pie
- My #1 tip: Keep the dough, filling, and prepared (unbaked) pie as cold as you can at all times. Refrigerate (or freeze) the prepared pie before baking for 15 min or up to 1 hour. Refrigerate the filling before you need it. Keep everything cold.
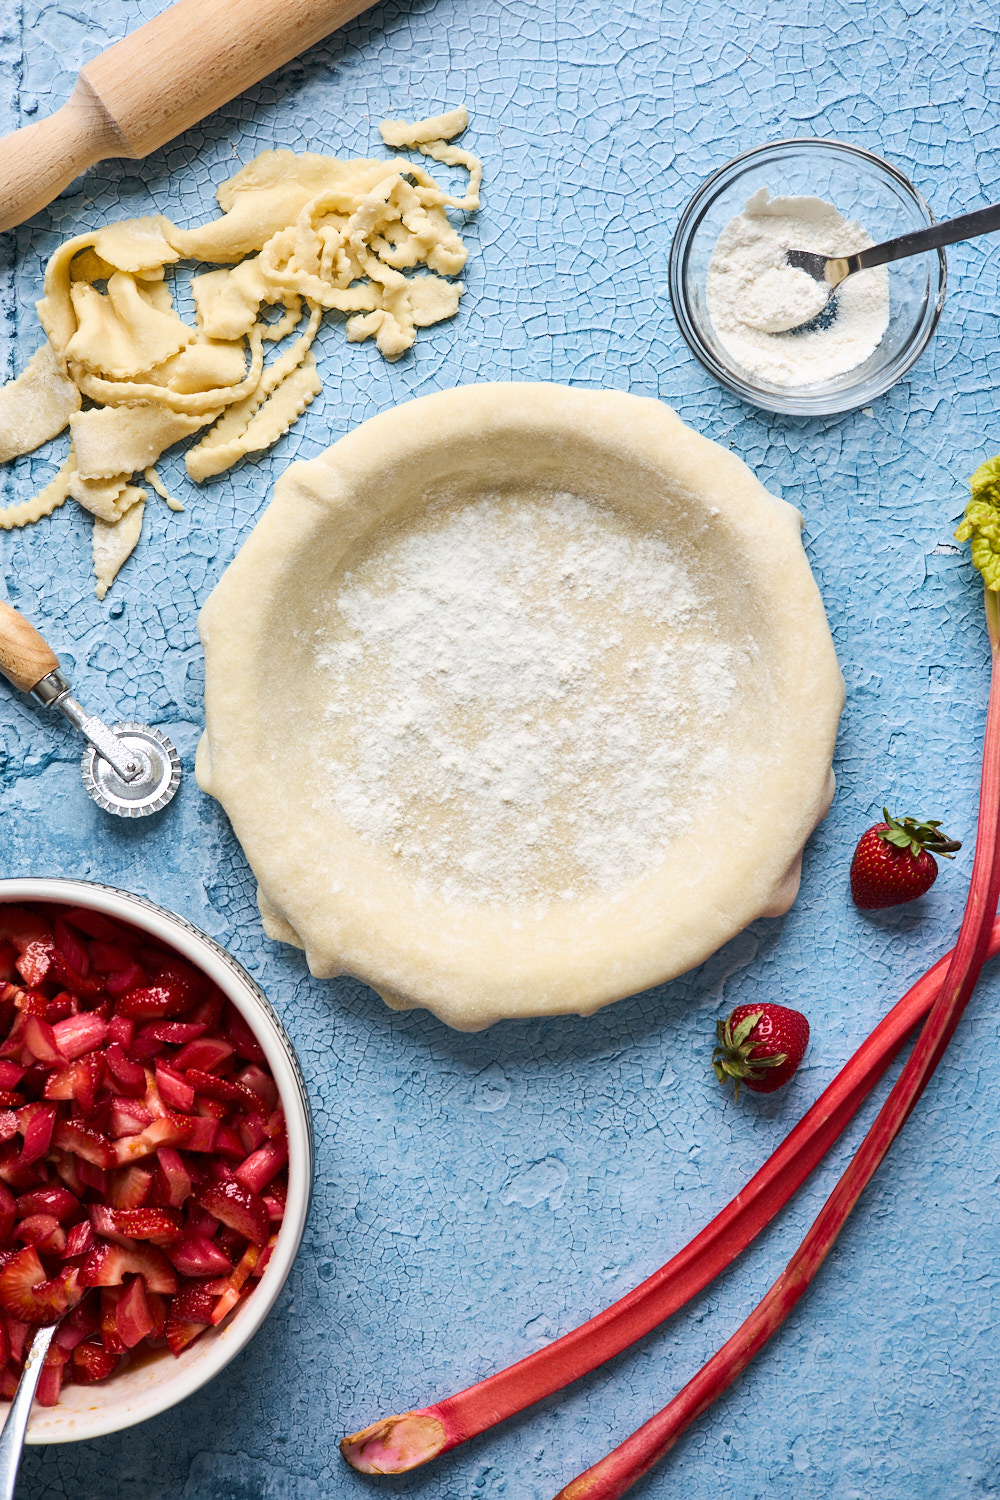
- If you are worried about a soggy crust, here’s a quick tip. I like to dust the base of my pie crust with a little bit of flour and sugar. Or another option is use a bit of your egg wash to brush the bottom crust before adding the filling. Both act as barrier as the pie bakes but don’t interfere with the flavours in the filling.
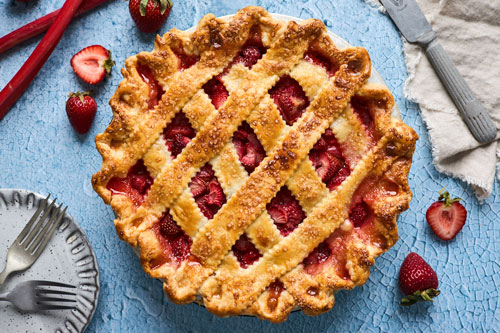
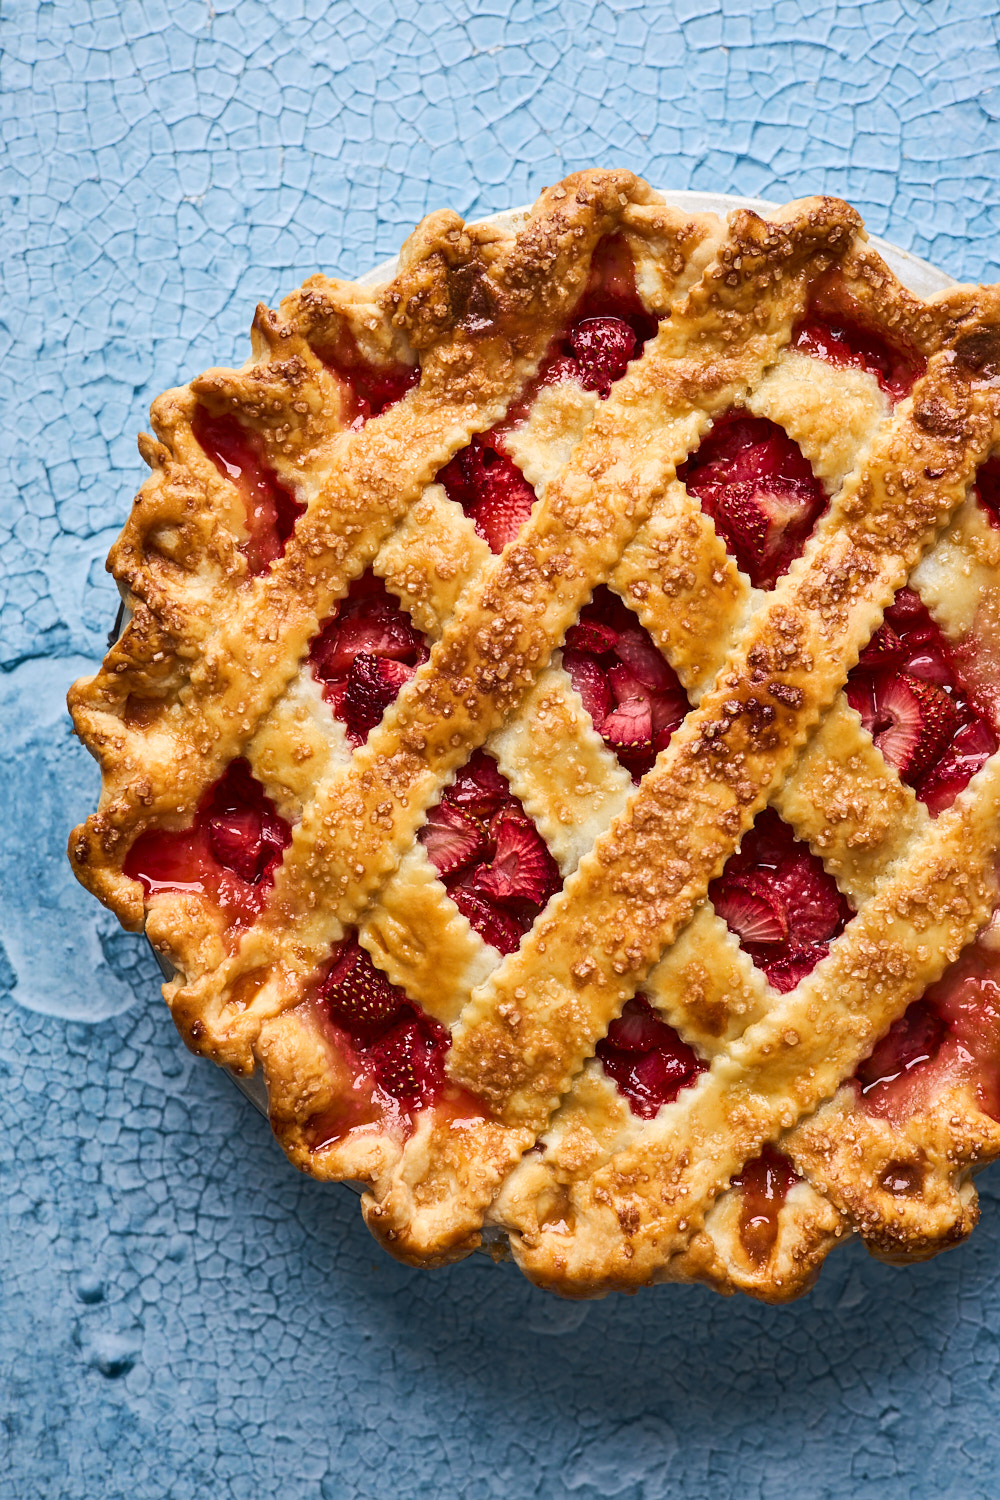
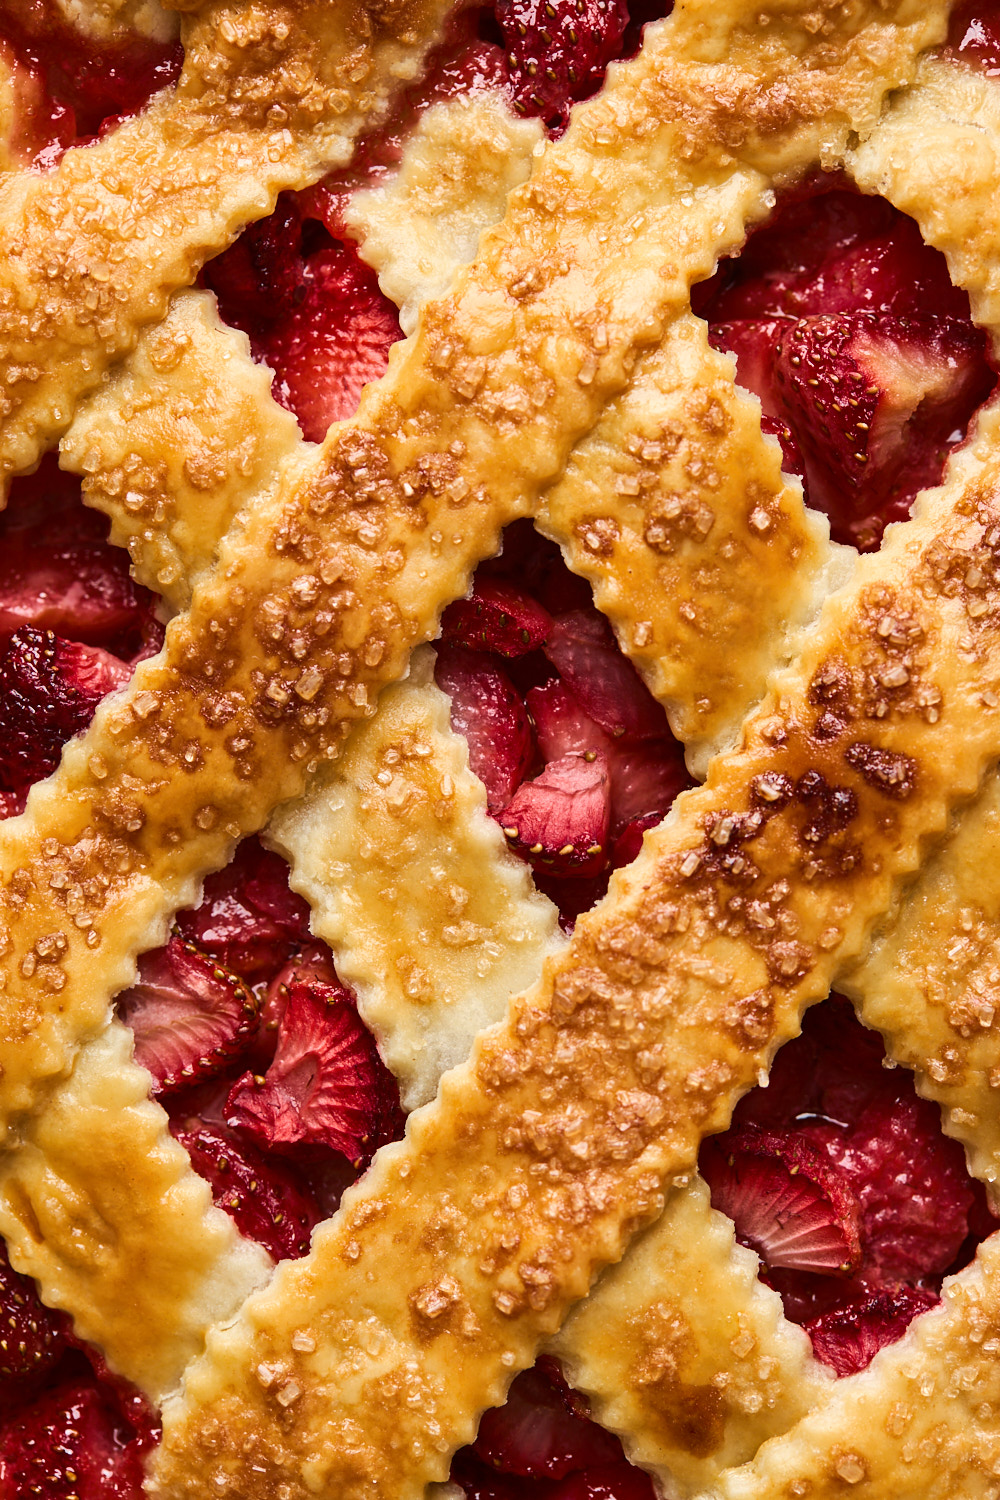
- Egg wash is also great brushed on the lattice crust to assist with browning. A sprinkle of coarse sugar gives the top some sparkle and crunch.
- Make sure to transfer the fruit into the pie using a slotted spoon leaving behind as much of the juices behind in the bowl. This will help prevent soggy bottom.
- Place a rimmed baking sheet in the oven as it preheats. Place the pie on the baking sheet to catch any juices that bubble out of the pie. The hot baking sheet will also help set the bottom crust by providing direct heat. This is optional but a good way to ensure an evenly baked crust.
- This is not a standard rule but I always find my pies bake up the best when I use my glass pie plate. Here is a the technical reason why this is the case that I learned from a little pie research that I did: ‘Although metal pans conduct heat better, glass more than makes up for that because it is clear, so radiant energy can pass through the pan and help the crust bake. Metal and ceramic pans impede this.’ So if you have a glass pie plate definitely use that over metal - I use both when I bake so don’t stress if you don’t have a glass one.
- If you’re not sure if your pie is done, look for pink juices to be bubbling from the openings in the lattice. And the pie should be deeply golden.
- Loosely tent pie with foil or use a pie shield if you notice the pie crust browning too quickly.
- Cool the pie for at least 3 hours before slicing. This will allow the filling and juices to set up.
Happy baking!! If you like this recipe you will love these:
Recipe
Ingredients
For pie crust (makes enough for top and bottom layers)
- 1 cup (2 sticks) unsalted butter, cold and diced
- 2½ cups all-purpose flour
- 1 Tablespoon sugar
- 1 teaspoon salt
- ½ cup ice water or you could use buttermilk plus more if needed
For filling
- 3 cups sliced rhubarb (½ inch slices)
- 2½ cups chopped strawberries
- ⅓ cup granulated sugar
- ⅓ brown sugar
- ¼ cup cornstarch
- ¼ teaspoon salt
- Orange zest
- 1 Tbsp orange juice or orange liqueour
For assembling pie
- 1 tsp sugar
- 1 tsp flour
- 2 Tablespoons unsalted chilled butter, cubed
- 1 large egg whisked for egg wash
- 1 Tablespoon milk or cream
- Coarse sugar, for sprinkling
Directions
Make pie crust
- Place flour, sugar and salt into the bowl of a food processor and pulse a few times to combine.
- Add cold diced butter and pulse the mixture until coarse crumbs form. Mixture should remain dry and powdery
- Add ice water and pulse just until moist clumps form. Press a piece of dough between your finger and if the dough sticks together, you have added enough water. If not, add more water a 1 teaspoon at a time. Be careful not to add too much water or the dough will be sticky and difficult to roll out.
- Transfer dough to a clean work surface, and gather dough together into a ball (it should not be smooth and DO NOT knead the dough). Divide dough in half and flatten to form 2 discs. Cover with plastic wrap and refrigerate 1 hour (and up to 5 days, if making ahead).
Make the filling
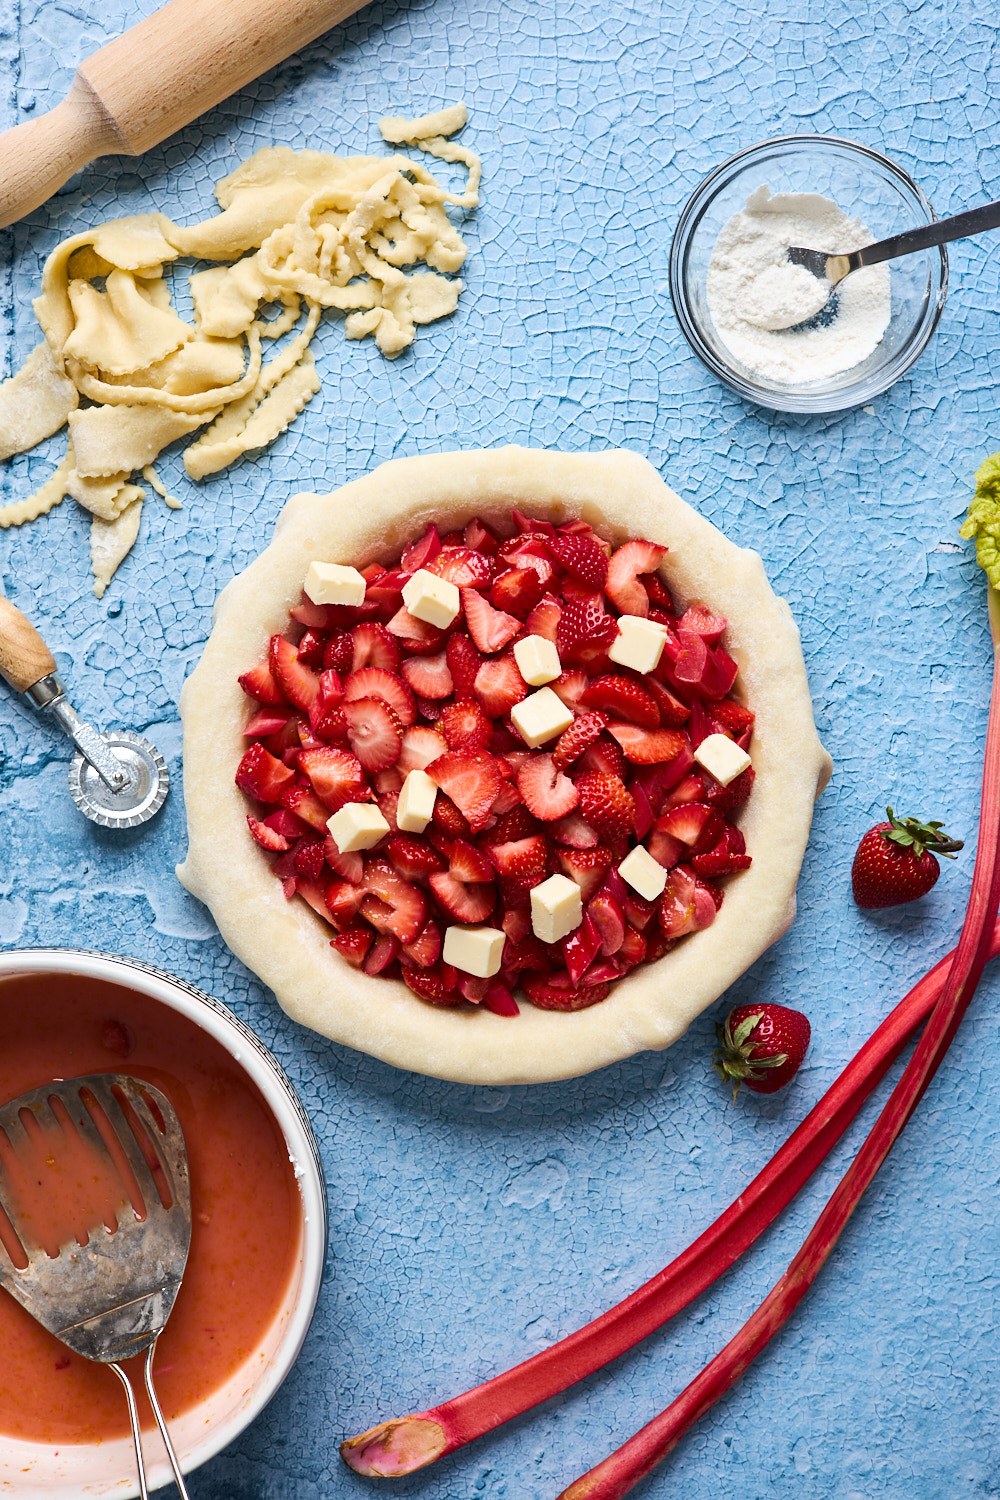
- Stir together the rhubarb, strawberries, sugar, cornstarch, orange juice,zest and salt in a large bowl until well combined. Set aside while you roll out the bottom crust.
Roll Dough & Assemble
- Roll out the first chilled pie dough: On a floured work surface, roll out one of the discs of chilled dough (keep the other one in the refrigerator) until you have a circle 12 inches in diameter. Carefully place the dough into a 9×2 inch pie dish. Gently press and tuck it in with your fingers, making sure it is smooth. Sprinkle remaining flour and sugar over base. Wrap with plastic wrap and chill while you roll out the second dough.
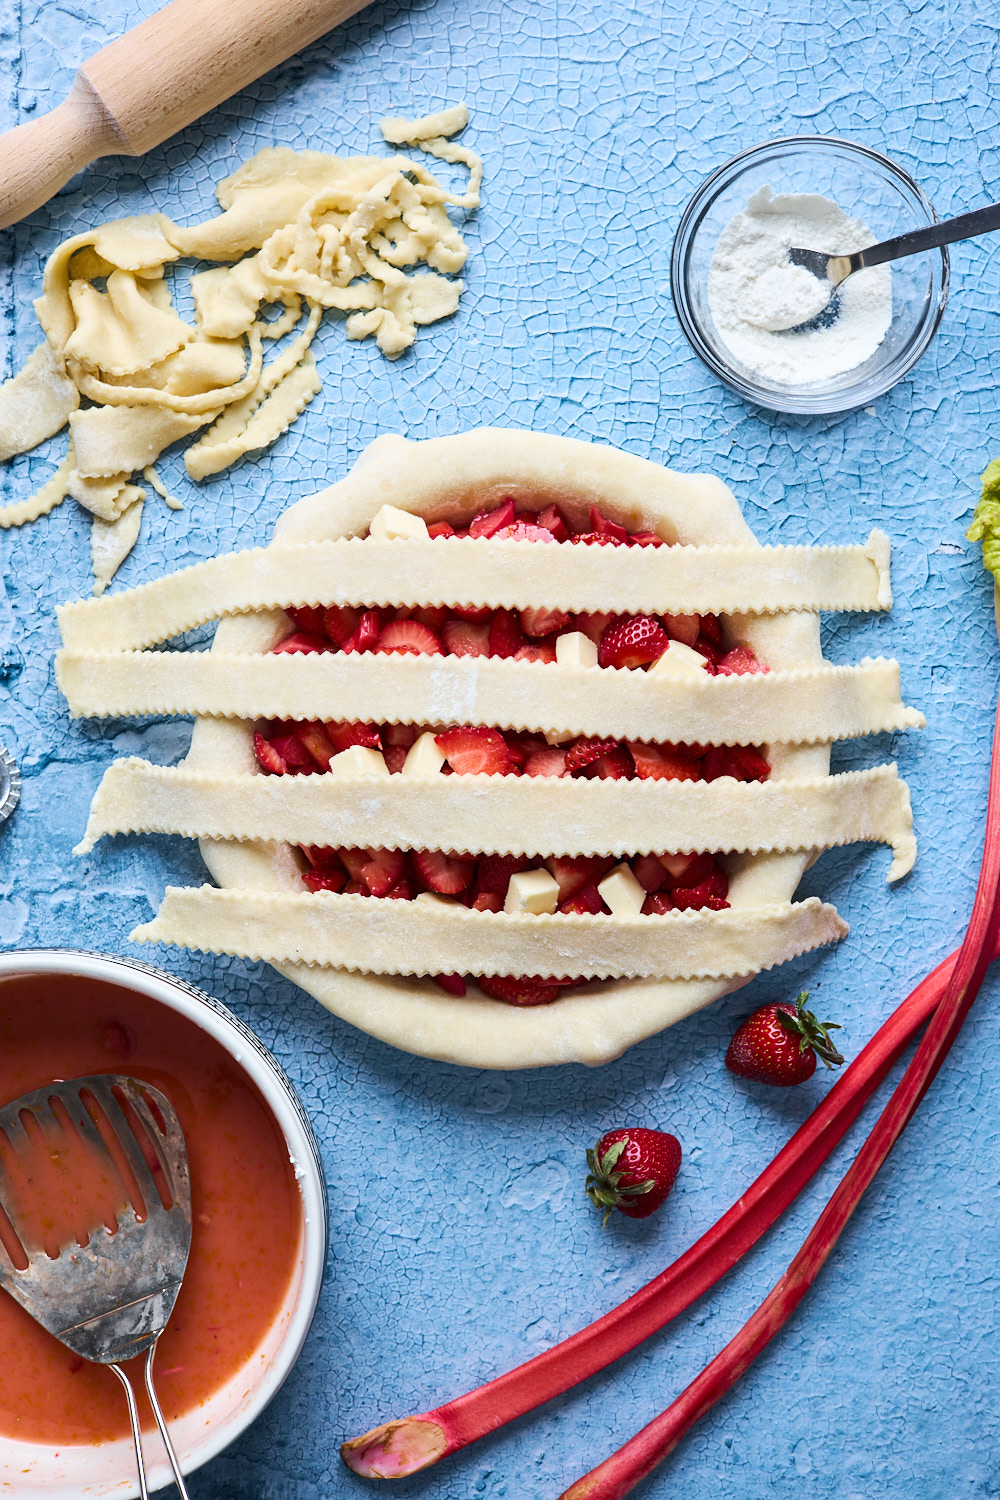
- Roll the second crust into a 12” circle and use a pizza cutter or knife to slice into whatever size strips you prefer.*
- Remove the pie pan from fridge and use a slotted spoon to transfer fruit to crust and discard any leftover juices in the bottom of the bowl. Dot the remaining pieces of butter on top of the filling.
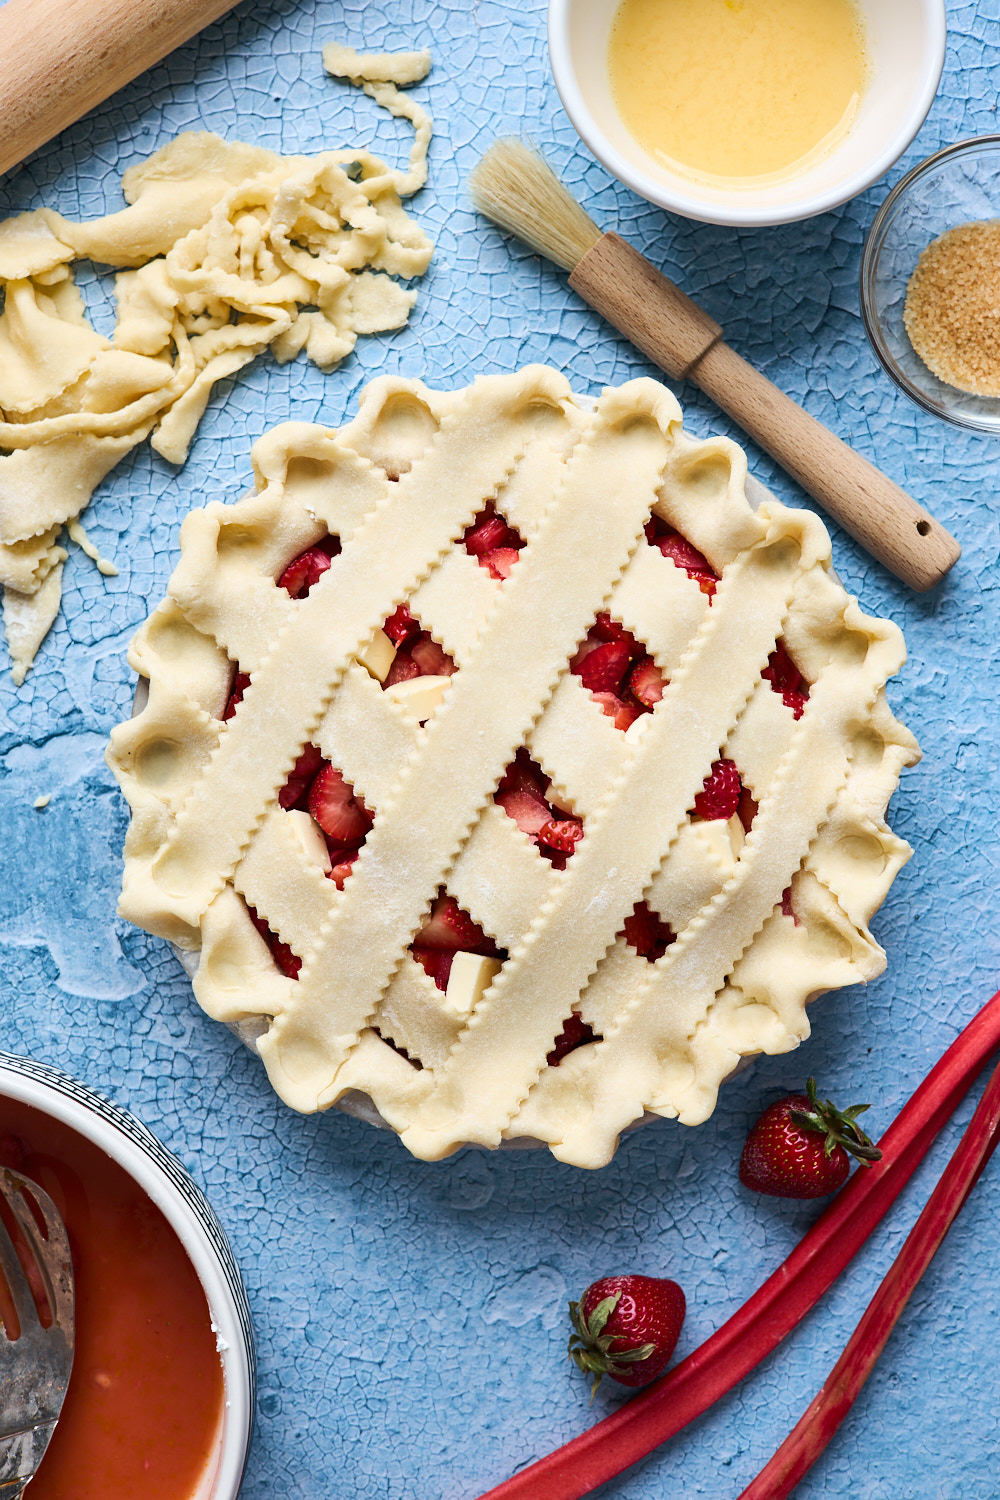
- Using the strips of dough, create a lattice crust over the top. Trim excess and tuck remaining dough at edges under then pinch the edges to seal or crimp edges if desired. Refrigerate pie 30 minutes (or freeze 15 minutes) while preheating oven to 400 degrees F
- Whisk together egg and cream and lightly brush the top of the pie crust with the egg wash. Sprinkle the top with coarse sugar, if using.
- Place the pie onto a large baking sheet and bake for 20 minutes. Keeping the pie in the oven, turn the temperature DOWN to 375°F and bake for an additional 30-35 minutes. Make sure to use a pie shield over pie or loosely cover with foil on top to prevent the edges from browning too quickly. Pie is done when the crust is golden brown and the filling is bubbling.
- Allow the pie to cool for 3 hours at room temperature before serving or overnight in the fridge. This time allows the filling to thicken. If refrigerating allow to come to room temperature before serving. Serve with whip cream or I cream.
- Leftovers will keep for up to 5 days covered tightly and refrigerated.
Recipe Notes
- If you do not have a food processor to make the pie dough or don’t want to use one that is not a problem. Place the dry Ingredients into a large bowl and whisk them to combine. Then add cold butter and cut into the flour with a pasty cutter or your hands. Pour In the water and mix to combine. Then continue with recipe as stated above.
- When making lattice: It’s easier to work with the dough if it is chilled, so if it the dough has softened too much, put the rolled-out piece on a flat cookie sheet and chill it in the refrigerator or freezer for a few minutes.
- This strawberry rhubarb pie can also be frozen once baked, tightly wrapped and covered, and stored in the freezer for 2-3 months; thaw in the fridge overnight and then warm in the oven or microwave to serve.
- Allowing the pie to cool completely is critical: let the pie cool completely for AT LEAST 3 hours, and preferably overnight, before serving. This allows the filling to set and makes its easier to slice beautiful pieces of pie. If you do not wait, your filling may be soupy.
- I diced my strawberries and rhubarb but if you prefer to have larger pieces of the fruit in this pie feel free to cut them to the size you prefer.