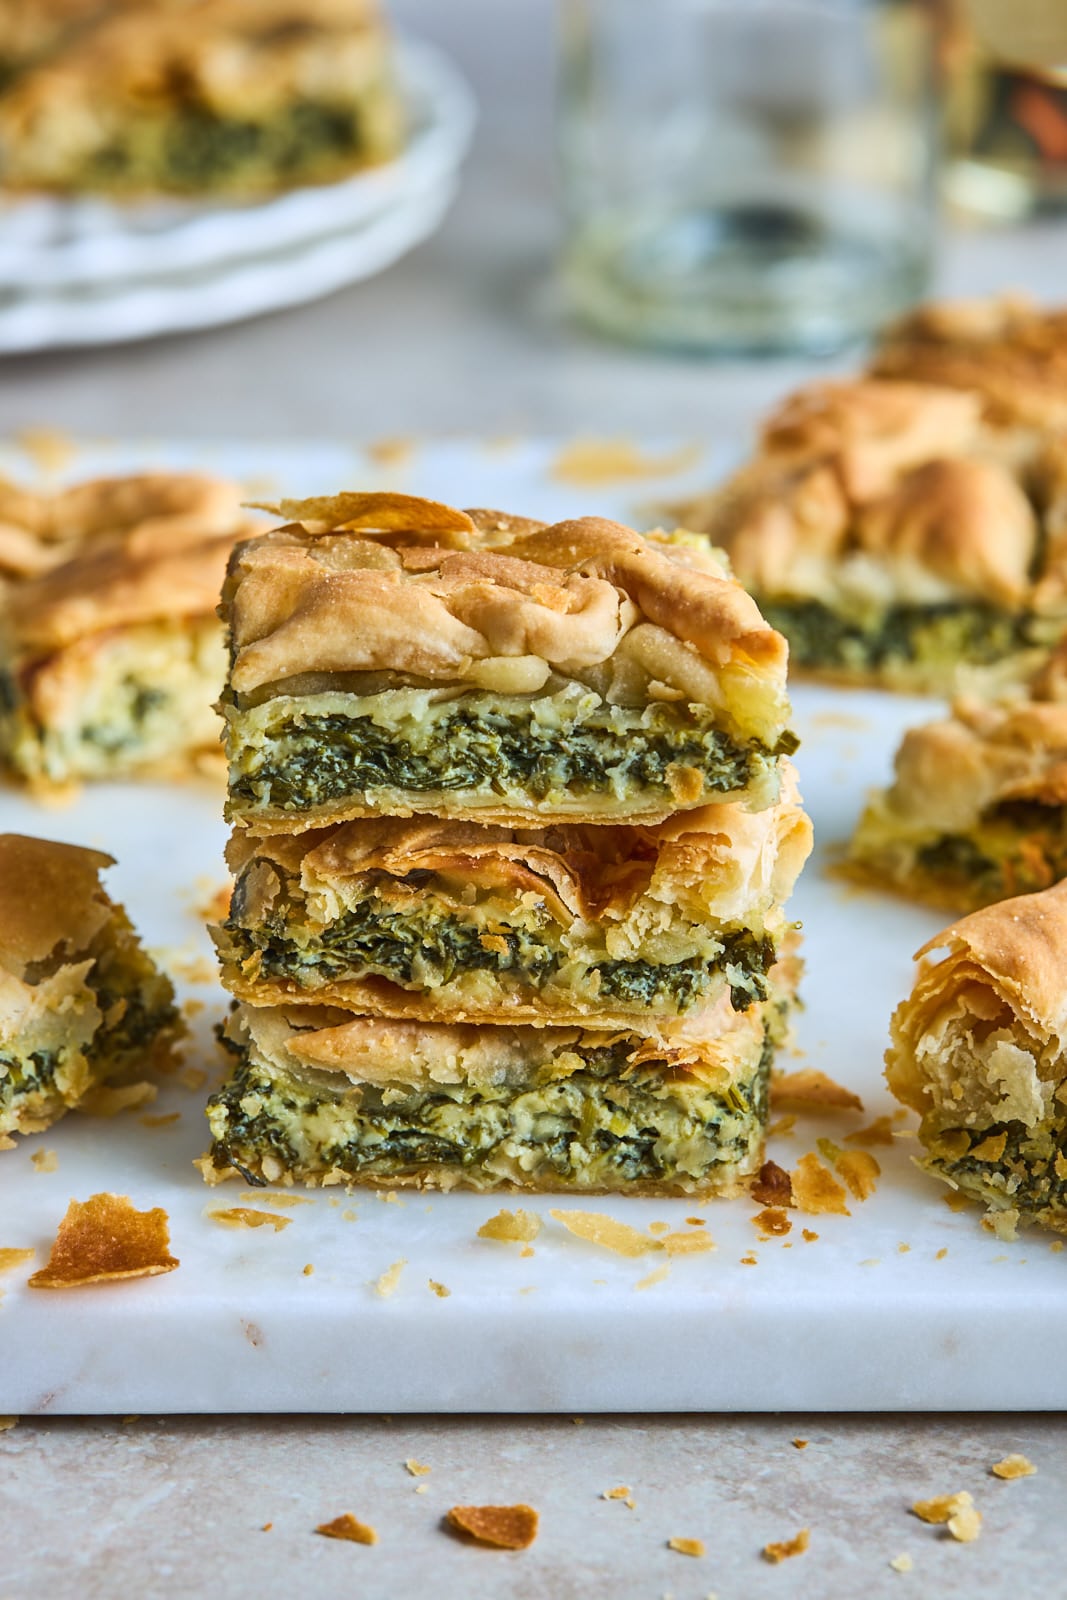
Traditional Homemade Spanakopita (Easy From Scratch Greek Spinach Pie)
Updated 29th August 2024
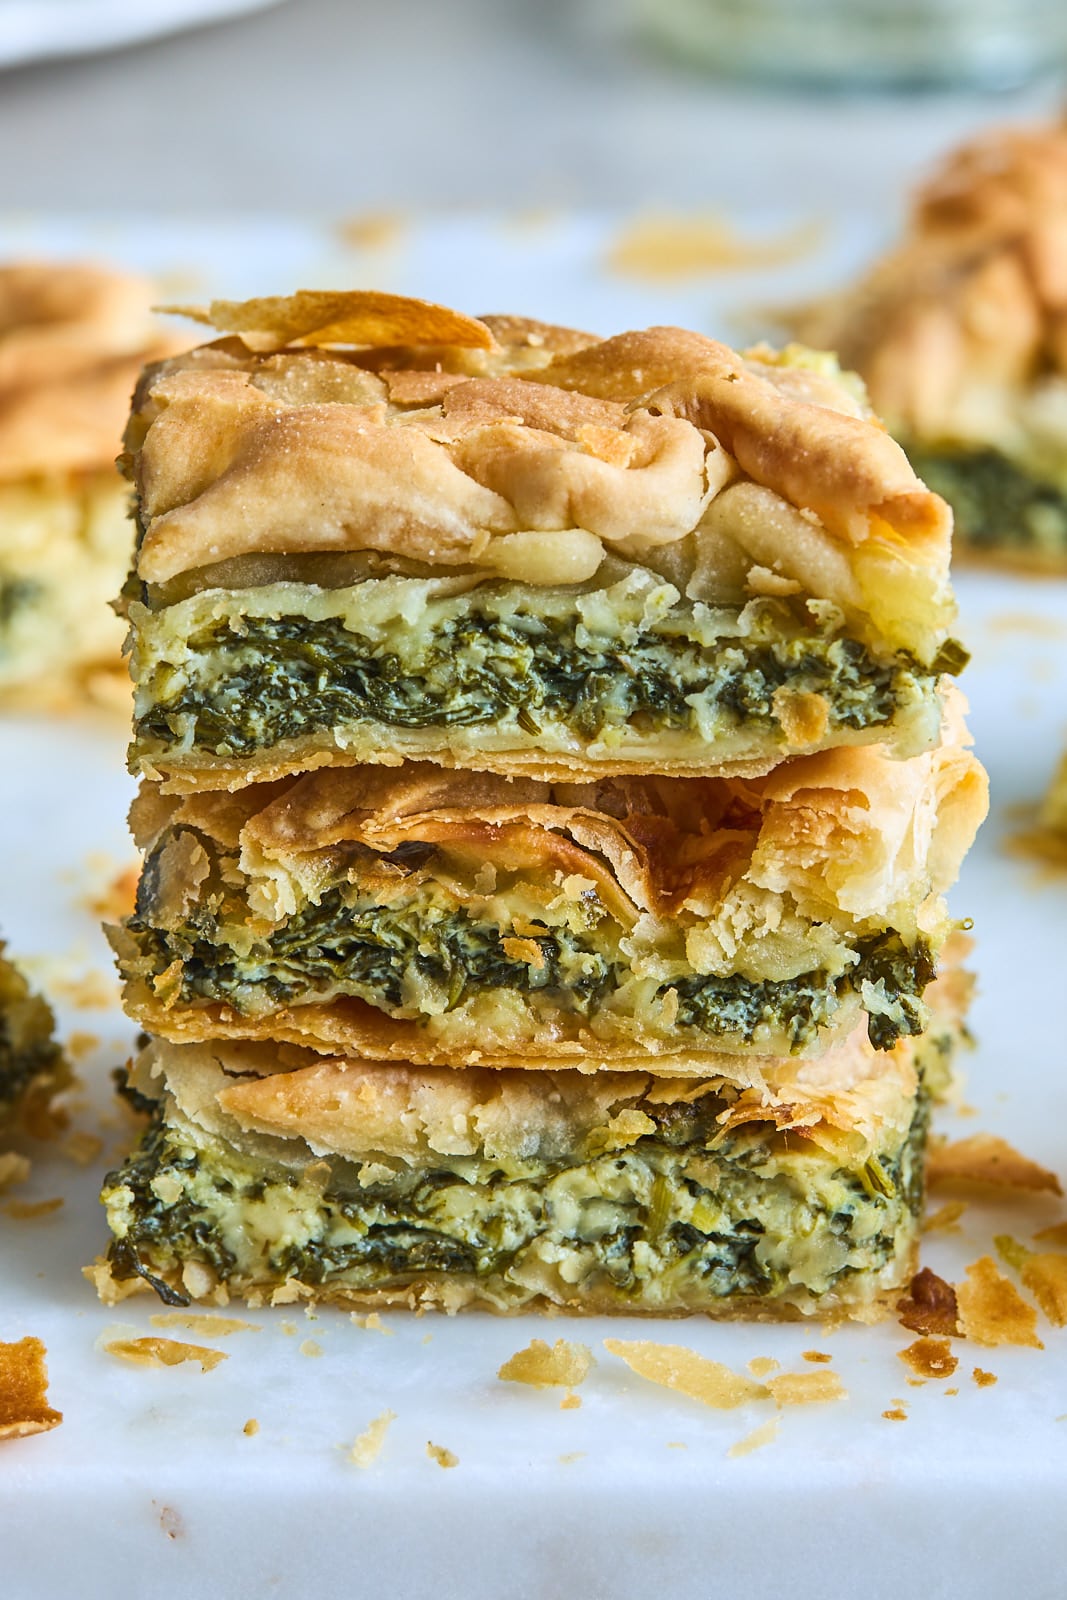
This Traditional Greek Homemade Spanakopita or Greek Spinach Pie is easy to make from scratch with homemade phyllo or filo dough. You will be surprised how easy it is to make the homemade phyllo/filo pastry, you may just never use the store bought stuff to make spanakopita ever again. The homemade phyllo pastry turns out so flaky, crispy and delicious and the spinach filling is made even more delicious with the addition of leeks - my personal favorite way to make spanakopita. This authentic spanakopita recipe can be made and served as an appetizer, a meal with a side salad (I recommend my Horiatiki salad or my Maroulosalata) and I have heard some enjoy theirs with my homemade Tzatziki too, or enjoy it as snack, it’s also perfect to pack for a picnic or basically anytime! Hope you enjoy and be sure to watch the short how to VIDEO which will help take out all the guesswork in making the tastiest homemade spanakopita.
What exactly is spanakopita?
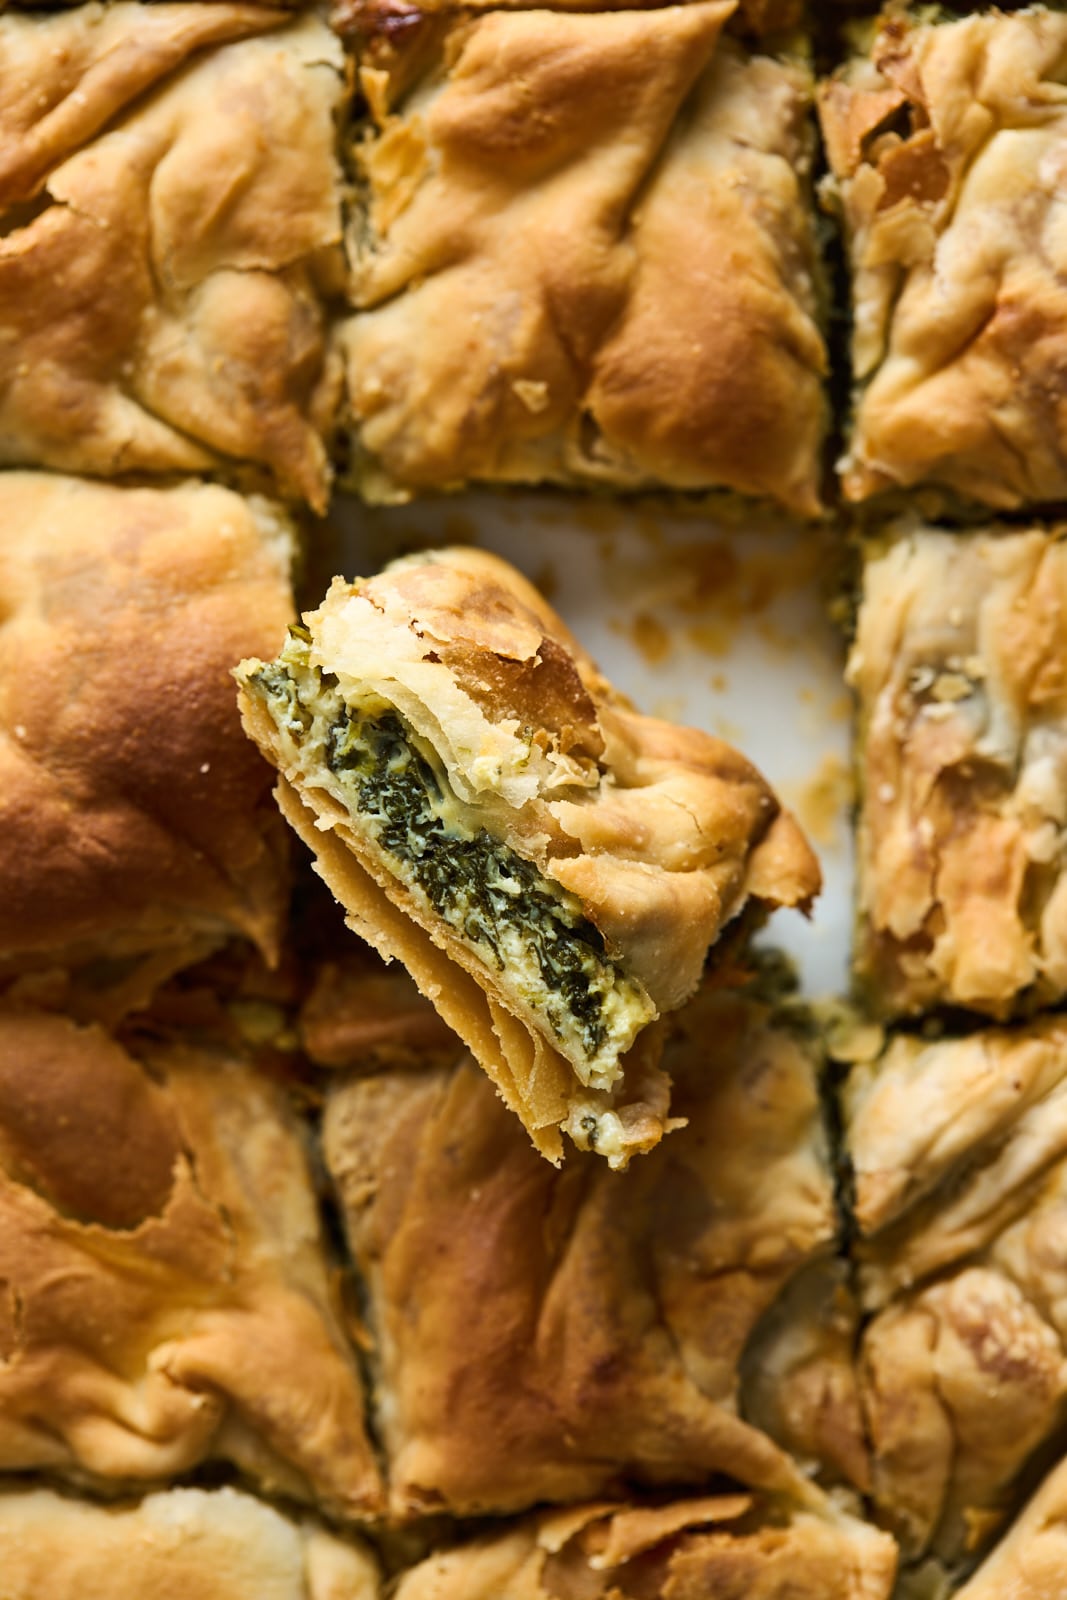
Greek “Spanakopita” (spinach pie), pronounced (spa-nah- KOH -pee-taa), is a Greek classic pie and probably one of the most popular ones. The Greek word for spinach is “σπανάκι and pie is πίτα” the two make up the word spanakopita. Spanakopita is made with loads of greens most often spinach, herbs, and briny feta cheese encased in layers of homemade, crispy phyllo. I like to add leeks to mine because the leeks add a sweet and delicious flavour to the filling.
What do you need to make spanakopita?
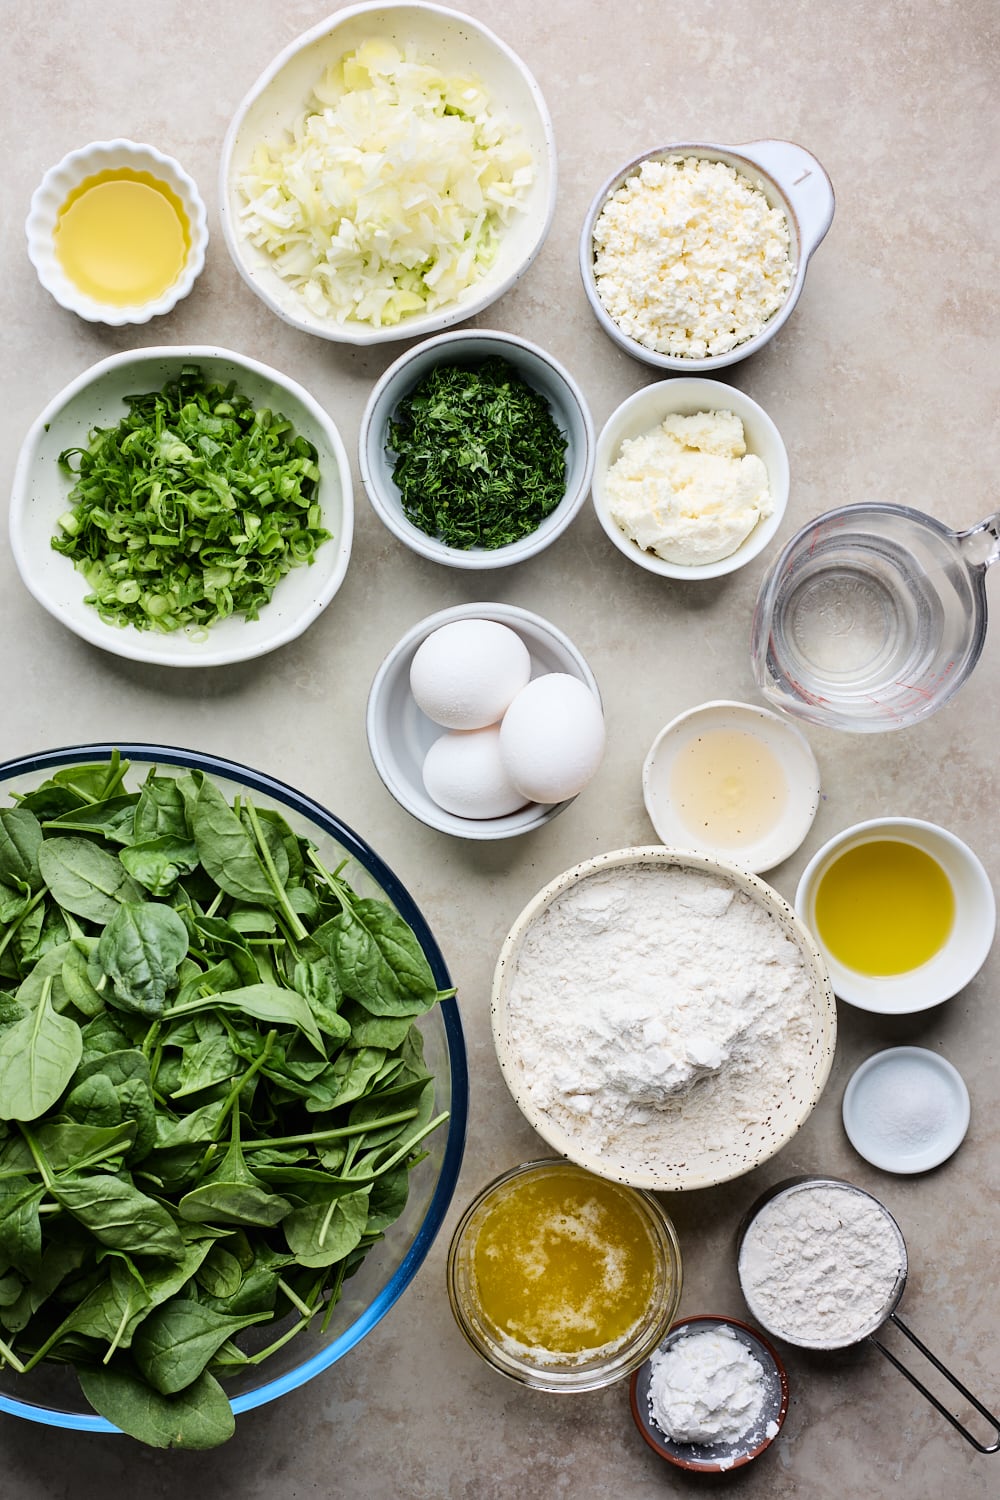
It requires basic pantry items for the dough and simple ingredients for the filling. Here are the basic ingredients you will need:
- FLOUR: All purpose flour I what I always use and have not experienced with other flours
- CORNSTARCH: I just use a touch of it mixed with flour to dust the layers of phyllo - helps make them light and crisp - but this is totally optional and you could use flour alone for dusting
- OLIVE OIL: Extra virgin olive oil is what I use and it is for brushing the phyllo with and sautéing the spinach
- BUTTER: I use unsalted butter and although this might be controversial I mix the olive oil with the butter for brushing and greasing the phyllo - I find that the combo is great for a crispy phyllo - but you could simply use all olive oil if you wish
- VINEGAR: Helps hydrate dough and also helps dough become crisp
- SPINACH: Can’t have spanakopita without spinach or ‘spanaki’. I usually use baby spinach but you can use any spinach - rough chop if needed. I always use fresh spinach but you can use frozen as well just take sure to thaw and drain very well.
- LEEK: I always add a leek - not even does but I do and it really makes the filling delicious - you could use a small yellow onion in its place
- GREEN ONIONS: Green onions add a fresh flavor to the filling - you could use chives also
- FETA CHEESE: Use the feta cheese you love
- RICOTTA CHEESE: This adds a lightly sweet creaminess the filling
- EGGS: You will need 3 eggs for the filling which help it set.
- FRESH HERBS: I like to do a combo of fresh dill and fresh parsley. You could also add in some fresh mint too.
How do you make spanakopita?
Although it may seem like a lot of work and many steps - it’s actually quite easy to make homemade spanakopita from scratch. And it comes together pretty quickly. Here are the basic steps:
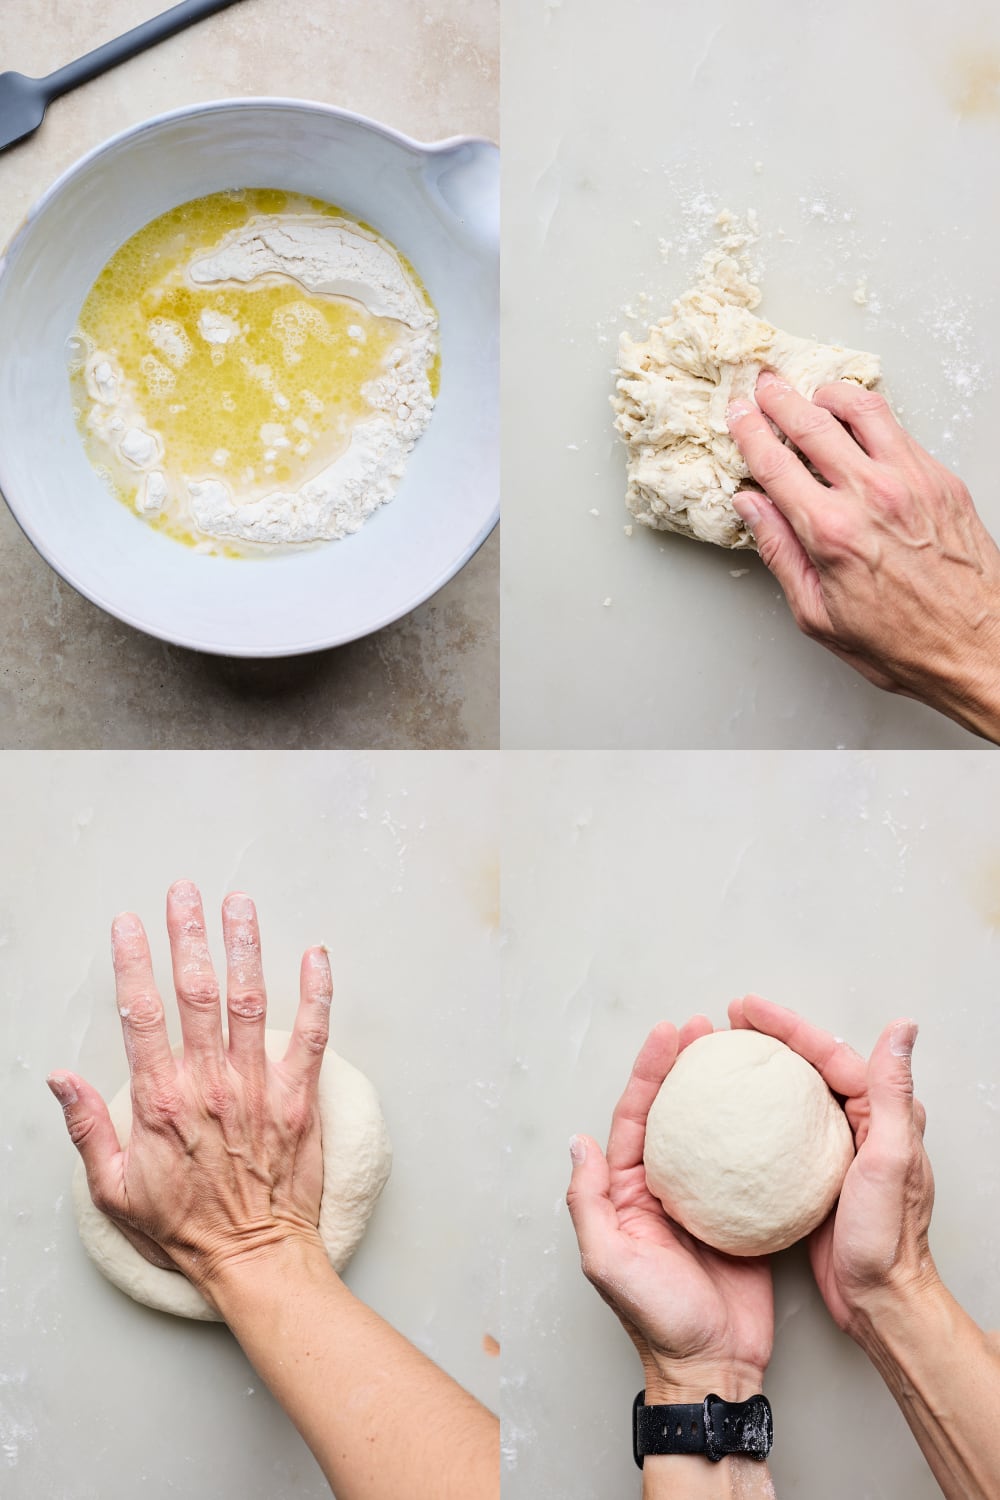
- MAKE DOUGH: Combine dough ingredients stir until you get a shaggy dough then knead dough until it comes together, approx 5-7 minutes then let rest for at least 30-60 min (make ahead instructions below)
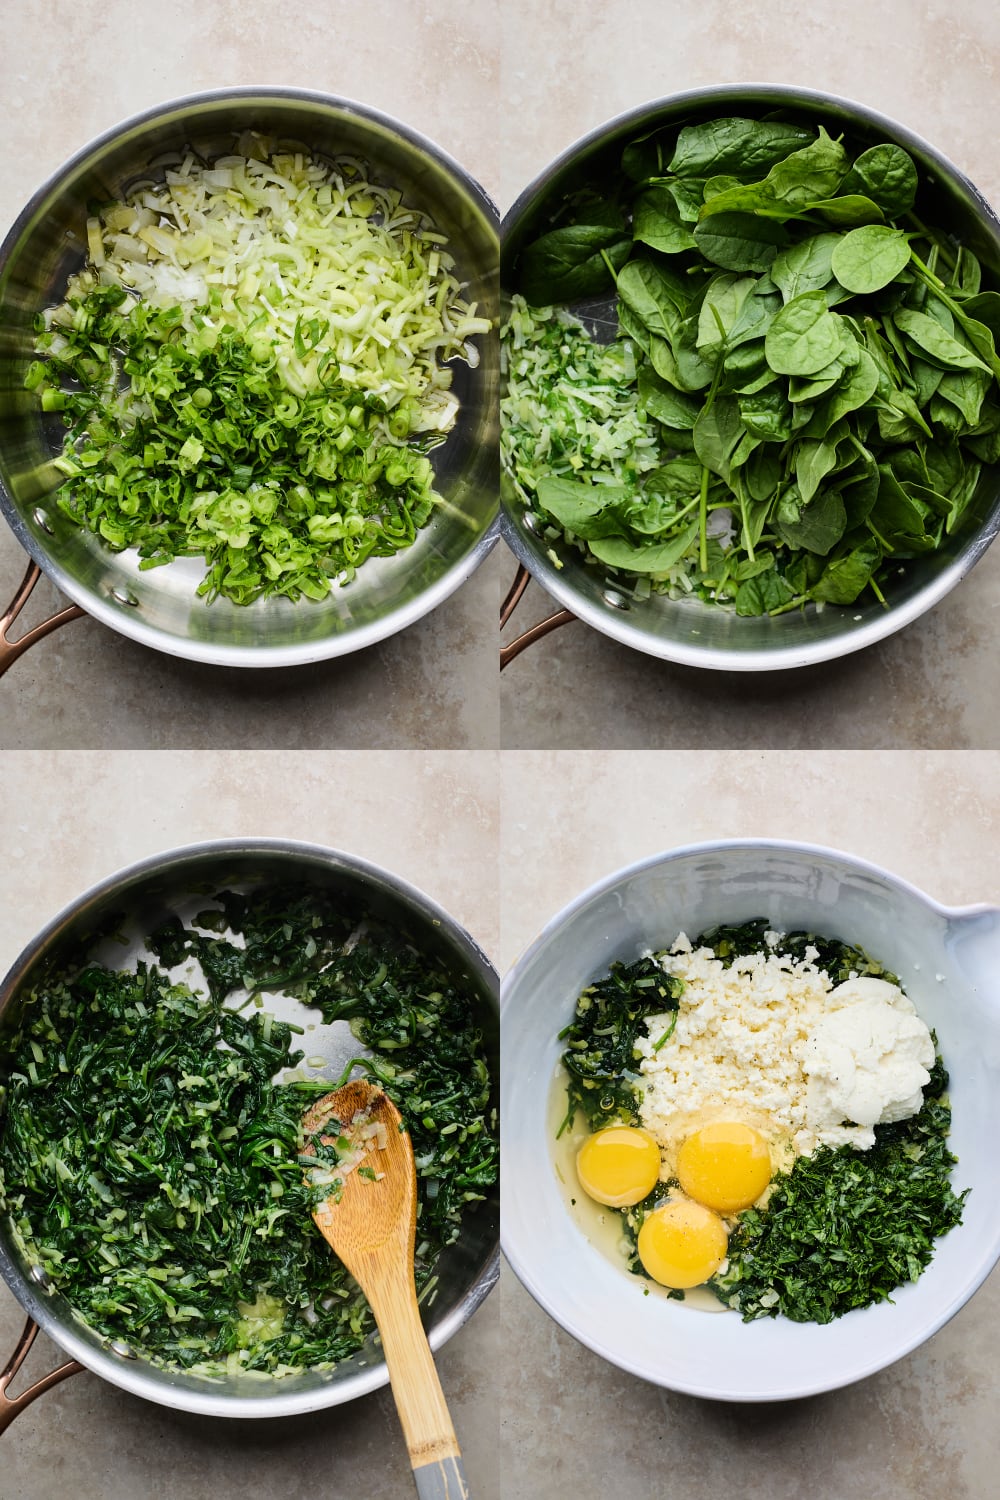
- MAKE FILLING: make filling while dough rests by pan frying the leeks, onions and spinach until softened - set aside to cool completely before adding the rest of the filling ingredients
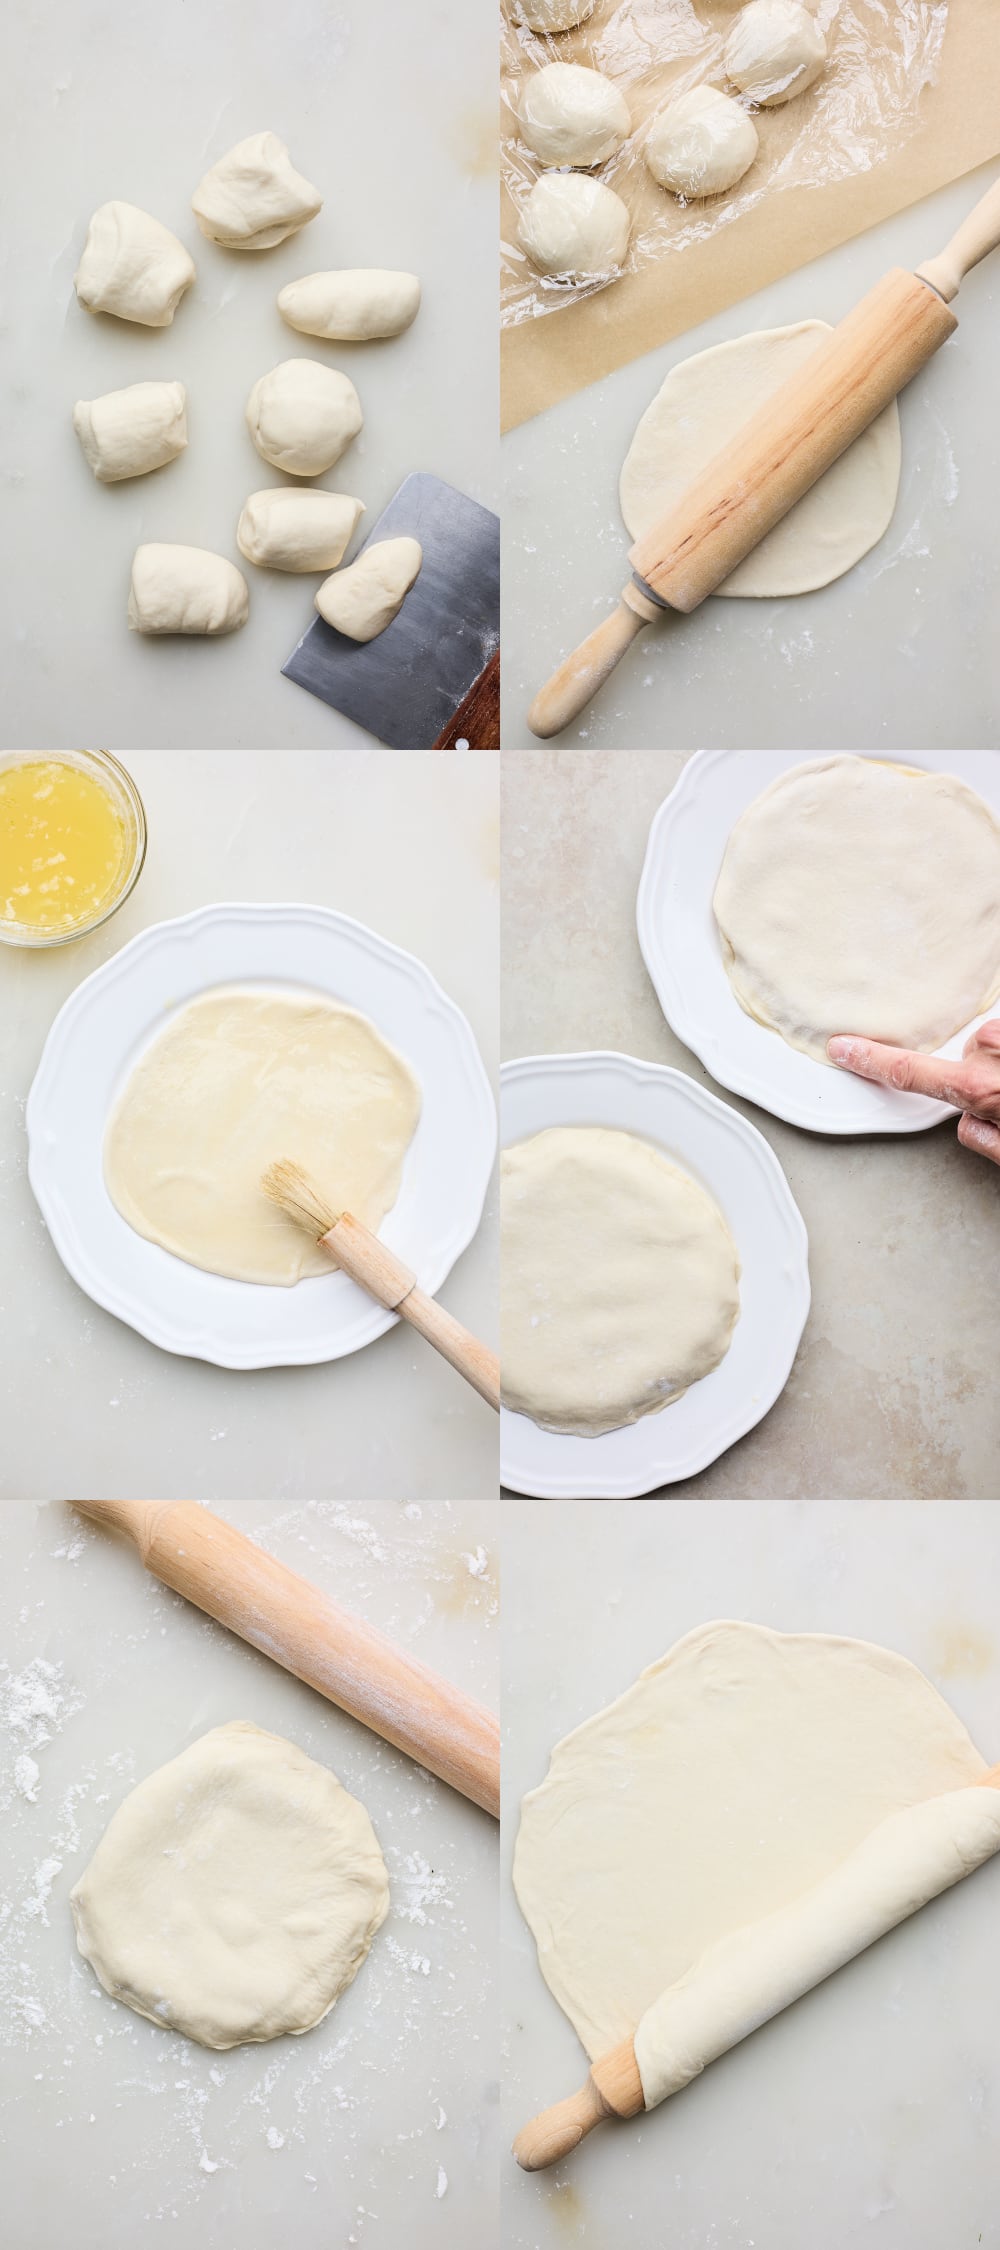
- CUT & SHAPE DOUGH BALLS: roll dough into a log and cut dough into 8 portions rolling each into balls
- ROLL OUT DOUGH BALLS & STACK: roll out dough balls into 5 inch circles then layer them into two stacks brushing each layer with olive oil/butter mixture (one stack with 5 layers for the base of the spanakopita and the other with the remaining 3 for the top of it) then chill while you grease your baking pan and stir in the remaining filling ingredients to spinach mixture
- ROLL OUT FIRST LAYER OF PHYLLO DOUGH: preheat oven then roll out the first stack (5 stack dough) out thin 2-3 inches wider than the pan you are baking your pie in then transfer It to baking pan leaving overhang over edges of pan
- ROLL OUT SECOND LAYER OF PHYLLO DOUGH: roll out the top layer (3 stack dough)
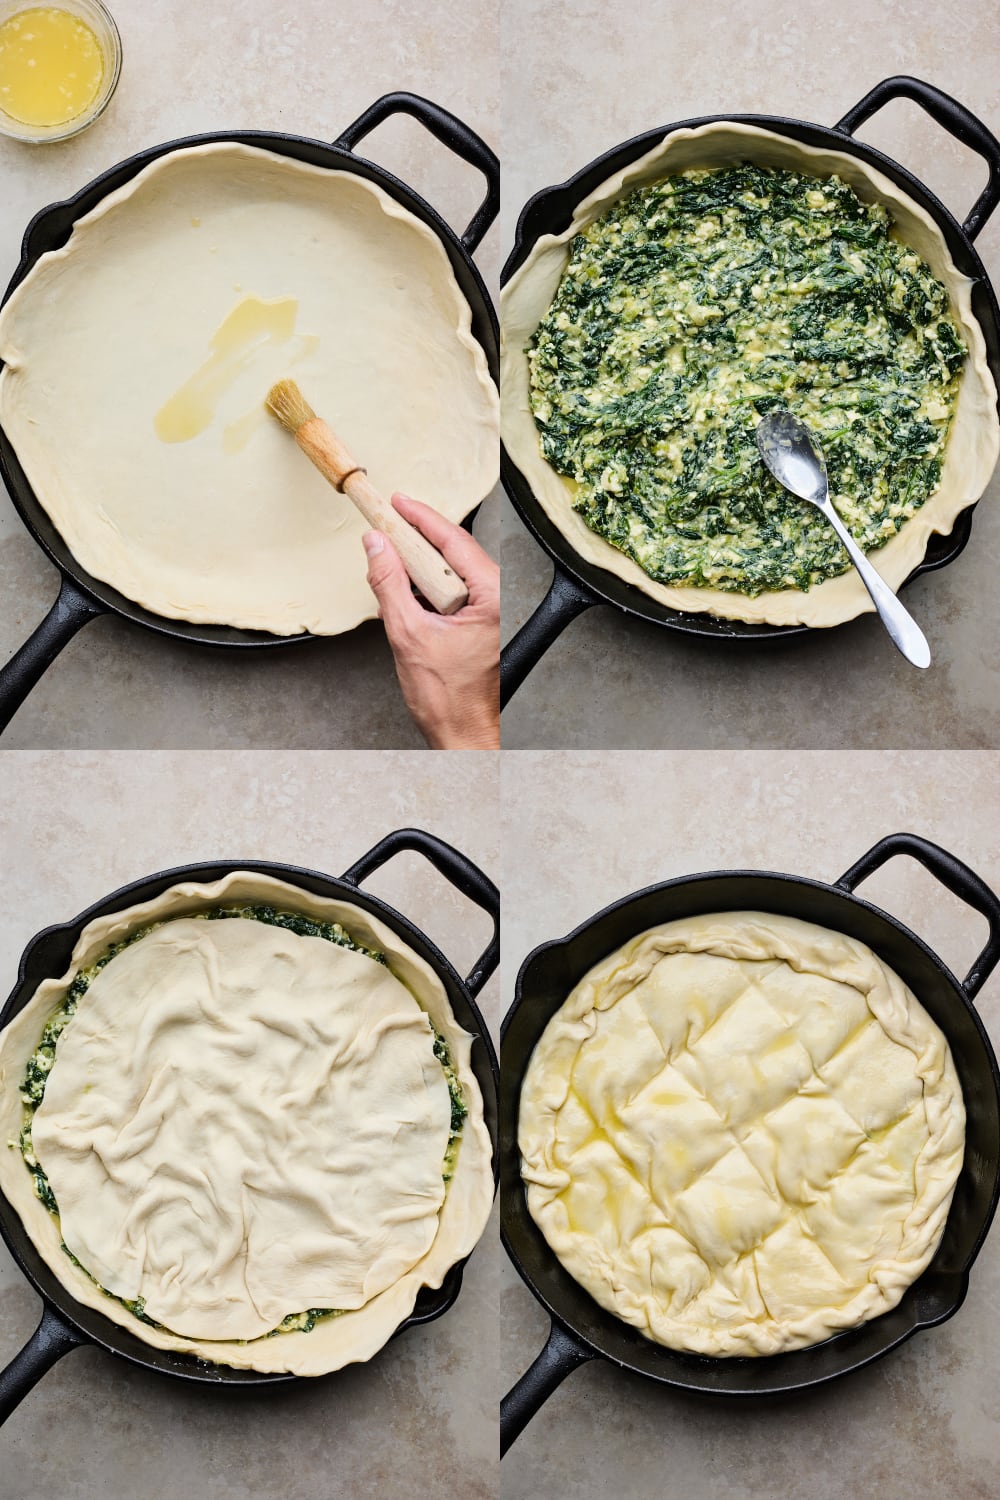
- ADD FILLING: Spoon out and spread filling into the pan over the bottom layer of phyllo
- ADD TOP LAYER OF PHYLLO: Place top layer over filling then roll up the bottom layers overhanging edges, drizzle with oil/butter mixture,
- SCORE TOP & BAKE: Score top of pita with a sharp knife and bake until golden.
Tips to making the best spanakopita every time:
- Chilling the buttered dough stacks for a few minutes or even up to 15 minutes before rolling them out. This really helps to get that flaky crust or phyllo we all look forward to eating
- The cornstarch is optional for dusting with the flour but I always find adding the fine cornstarch to the flour for dusting always helps my phyllo to get extra crispy
- Generously brush the layers of dough with the olive oil butter mixture - the butter really helps create those buttery flaky layers
- Do not over flour while rolling out the dough balls or the phyllo layers - too much flour absorbed but the dough will create dough’y phyllo layers instead of light crispy flaky ones
- Don’t be in a rush to add the filling to the pan. If you let it sit in pan over the bottom layer of dough for example while you roll out the top one it could result in a soggy bottom layer. Add the filling right before you are ready to place the top layer of dough on. Then work quickly to get the pita in the oven shortly after that.
- Everyone has different tastes when it comes to the filling. Please adjust seasoning according to taste and add extra herbs or spices as you wish.
- Some like a thick spinach filling but what they don’t realize is the thicker the filling the soggier the phyllo will be. That being said if you prefer more filling in your spanakopita feel free to double the filling
- When making the filling make sure to really cook off as much excess moisture from the spinach mixture when sautéing it. Use a slotted spoon if needed when placing filling into pan over the phyllo to reduce the amount of liquid going into the pita
This is my mom’s recipe that I worked with to create this easy no fail spanakopita recipe. My mom really doesn’t measure anything so I really had to test this several times to get it just right for you guys to be able to make without any kind of guesswork. It’s my fav kind of pita - more of a horiatiki or village style spanakopita that can be served hot or cold and enjoyed as a snack but also be served as a main dish. In Greece, it is a favorite choice for breakfast and a really popular street-food.
This recipe has been a long time coming cause I was quite intimidated to make the phyllo from scratch. I really wish I made it sooner cause it really can’t get easier than this. The dough is so easy to work with and very forgiving especially with my moms easy method of preparing it. I really couldn’t wait to share this recipe with you guys and I can’t wait to see you guys make it and enjoy it! Happy baking!!
If you like this recipe you will love these:
- Spanakopita Tarte Soleil (Spinach and Feta Pie)
- Crispy Spanakopita Spring Rolls
- Spanakopita Dip
- Spanakorizo (Greek Spinach Rice)
- Creamy Chicken and Spinach Pasta
Serve this Spanakopita with my:
Recipe
Ingredients
For the phyllo dough
- 2 cups all-purpose flour, plus more for kneading
- 5 teaspoons olive oil
- ½ teaspoon fine salt
- 2 teaspoons white wine vinegar or plain white vinegar
- ¾ cups warm water (just above Lukewarm but not hot)
For Dusting and Brushing Phyllo
- 2 tablespoons of corn starch for dusting
- ¼-½ cup flour for dusting
- ¼ cup melted butter, plus more if needed
- 2 tablespoons of olive oil, plus more if needed
For the Filling
- 2 tablespoons of olive oil
- 312 g or 11 oz of spinach (I use baby spinach but if you are using regular spinach make sure to roughly chop it)
- 1 leek white and light green parts only, cleaned well and sliced
- 3 spring onions, white and green parts sliced
- 1 cup of crumbled feta cheese(approx 200 grams)
- 3 eggs
- 3 tablespoons ricotta cheese
- ¼ cup chopped fresh herbs (I always do a combination of fresh dill and parsley)
Directions
Make The Phyllo Dough
- Place flour in a medium mixing bowl and make a well in the center of it. Drizzle in olive oil and add salt; and add the white wine vinegar and warm water. Mix until a rough dough starts to come together. Then empty it out onto a lightly floured work surface.
- Knead until dough is smooth, using just enough flour to keep it from sticking to the work surface or your hands, 2 or 3 minutes. Continue to knead until dough is supple and elastic, about 5 more minutes. Wrap dough ball in plastic wrap and let rest at room temperature, ½ hour or for up to 3 hours. If making a head you can wrap and refrigerate for up to two days.
Make The Filling
- While the dough is resting it’s time to get started with the filling. In a large skillet heat olive oil over medium heat and add the leeks and the green onions and allow to cook 3-5 min stirring often until softened. Add the spinach and cook tossing and stirring until wilted another 5-7 minutes adding a little extra olive oil If needed. (It looks like a lot of spinach but it will wilt down fast) Once wilted continue to cook an extra 1-2 minutes to cook off as much extra moisture as possible. Set aside to cool while you prep the dough.
- Once cool add dill and parsley, feta cheese and ricotta cheese to the spinach mixture stirring well to combine, then season with salt and pepper to taste. (Now is the time to taste it before adding in the eggs). Then stir in the eggs until well incorporated. Set aside.
Shape Phyllo Dough & Roll Out
- Once ready to make your pita. Unwrap and place on clean working surface. Roll it into a log trying to keep it as even as possible in thickness from one end to the other, approx 10 inches long. Cut log into two right down the middle then each half into two and then each of those halves into two, so you have 8 portions. No need to use a scale but you can if you are picky. (I tend to reserve the larger pieces for the bottom part of the pita and the smaller ones for the top of it - don’t worry if they aren’t totally even) Roll each portion into a ball. Place on plate or parchment paper and cover with plastic wrap to prevent dough balls from drying out while you begin to roll them out.
- Mix cornstarch with a ¼-½ cup of flour for dusting while you roll out your balls. Dust a work surface and the first dough ball lightly with the cornstarch/flour mixture. Flatten out the dough ball with your fingers and then roll it out with a rolling pin into a flat disc/circle, about 5 inches in diameter. Set circle to one side. Then repeat with the rest of the dough balls. Try to keep the circles as close to the same size and shape as possible. They don’t have to be perfect just as close as possible.
- Melt butter and place in a small bowl and allow to cool slightly then stir in the olive oil.
- Place one of the circles of dough onto plate and using a pastry brush, generously brush dough with the olive oil/butter mixture. Repeat with four more circles brushing each in between but DO NOT brush the top of the last one. Then use your fingers to press down on the edges of the stack sealing them. Place plate in fridge to chill while you do the same for the remaining 3 on a separate plate then chill that stack too while you finish making filling
Assemble Spanakopita
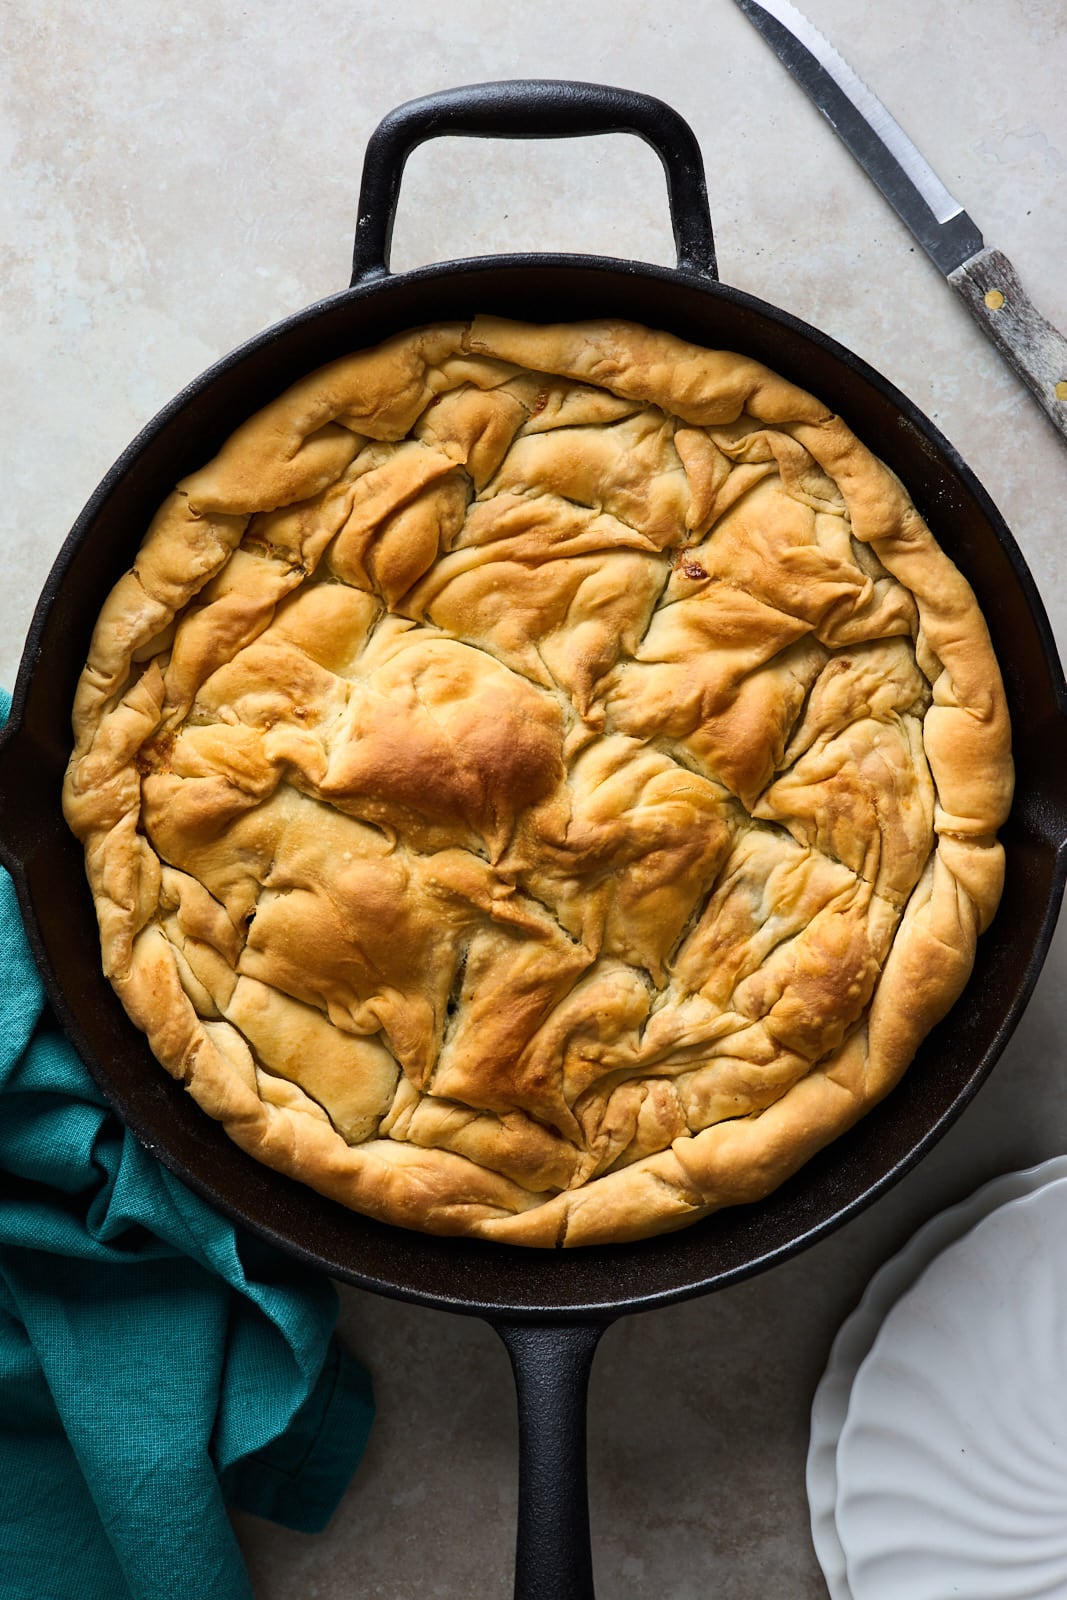
- Prepare Pan: Preheat oven to 350°F. Prepare a 10-12 inch skillet or baking pan by brushing the bottom and sides of the pan generously with the butter/olive oil mix and set aside.
- Roll Out Bottom Phyllo: Take the 5 layer stacked dough out of the fridge. Peel it off the plate and place on working surface dusted with the flour/cornstarch mixture. Start rolling it out dusting with flour lightly if needed and peeling it off the work surface to dust if needed so that it’s not sticking to surface. Roll out nice and thin - a thin as possible until you have rolled it out 2-3 inches beyond the size of the pan (approx 12-14 inches depending on pan size) you are using to bake it in. Pick dough up by rolling it onto your rolling pin. Then roll it off onto the prepared baking pan or skillet. Then use your hands to place it in pan evenly with excess phyllo hanging over the edge of pan.
- Drizzle top of dough with olive oil/butter mixture and set aside.
- Roll Out Top Phyllo: Take out the remaining 3 layer dough disc and roll out the same way and the same width as the last. Pick it up by rolling it on to rolling pin and set aside
- Add Filling: Spoon filling onto the dough in pan and smooth out evenly into pan. I like to use a slotted spoon and leave back Amy excess juices the have accumulated.
- Place Top Layer Over Filling: Unroll the top portion of dough over the pan then use your hands to tuck it into pan over filling - letting it sag in areas and overlap like a messy tablecloth.
- Roll Up Edges & Grease Phyllo: Roll up the overhanging portion from the base layer working your way around the entire pan. Brush the edges with butter/oil mixture then drizzle the top of it generously with it.
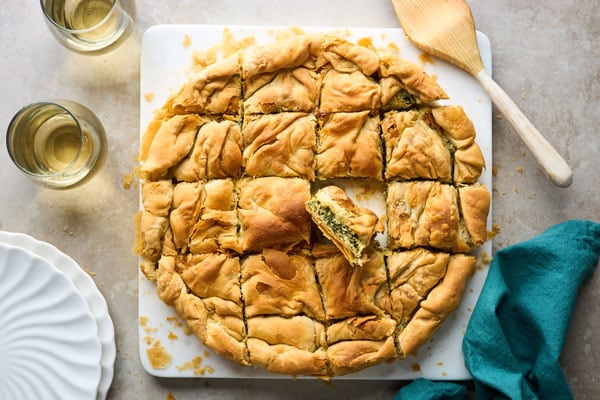
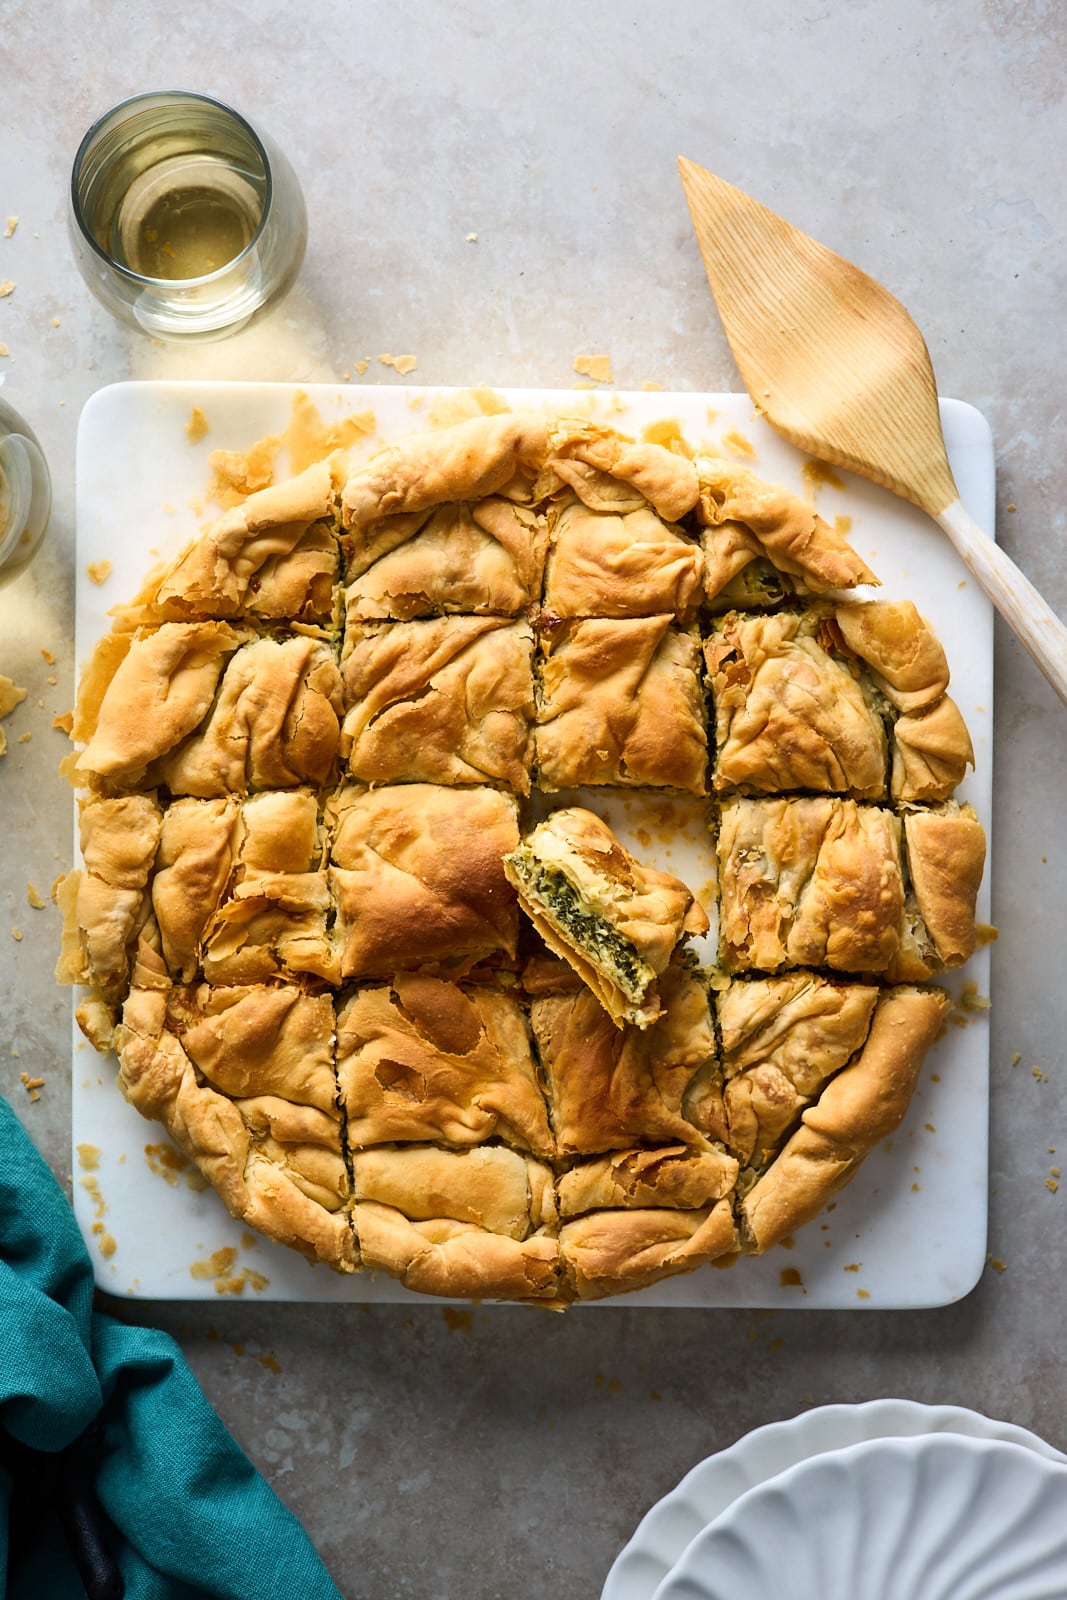
- Score Phyllo & Bake: Score the top of the dough with a sharp knife portioning it out into slices (gently - no need to cut right through the dough). Bake in preheated oven for about 55-60 minutes until the phyllo is crisp and deeply golden brown.
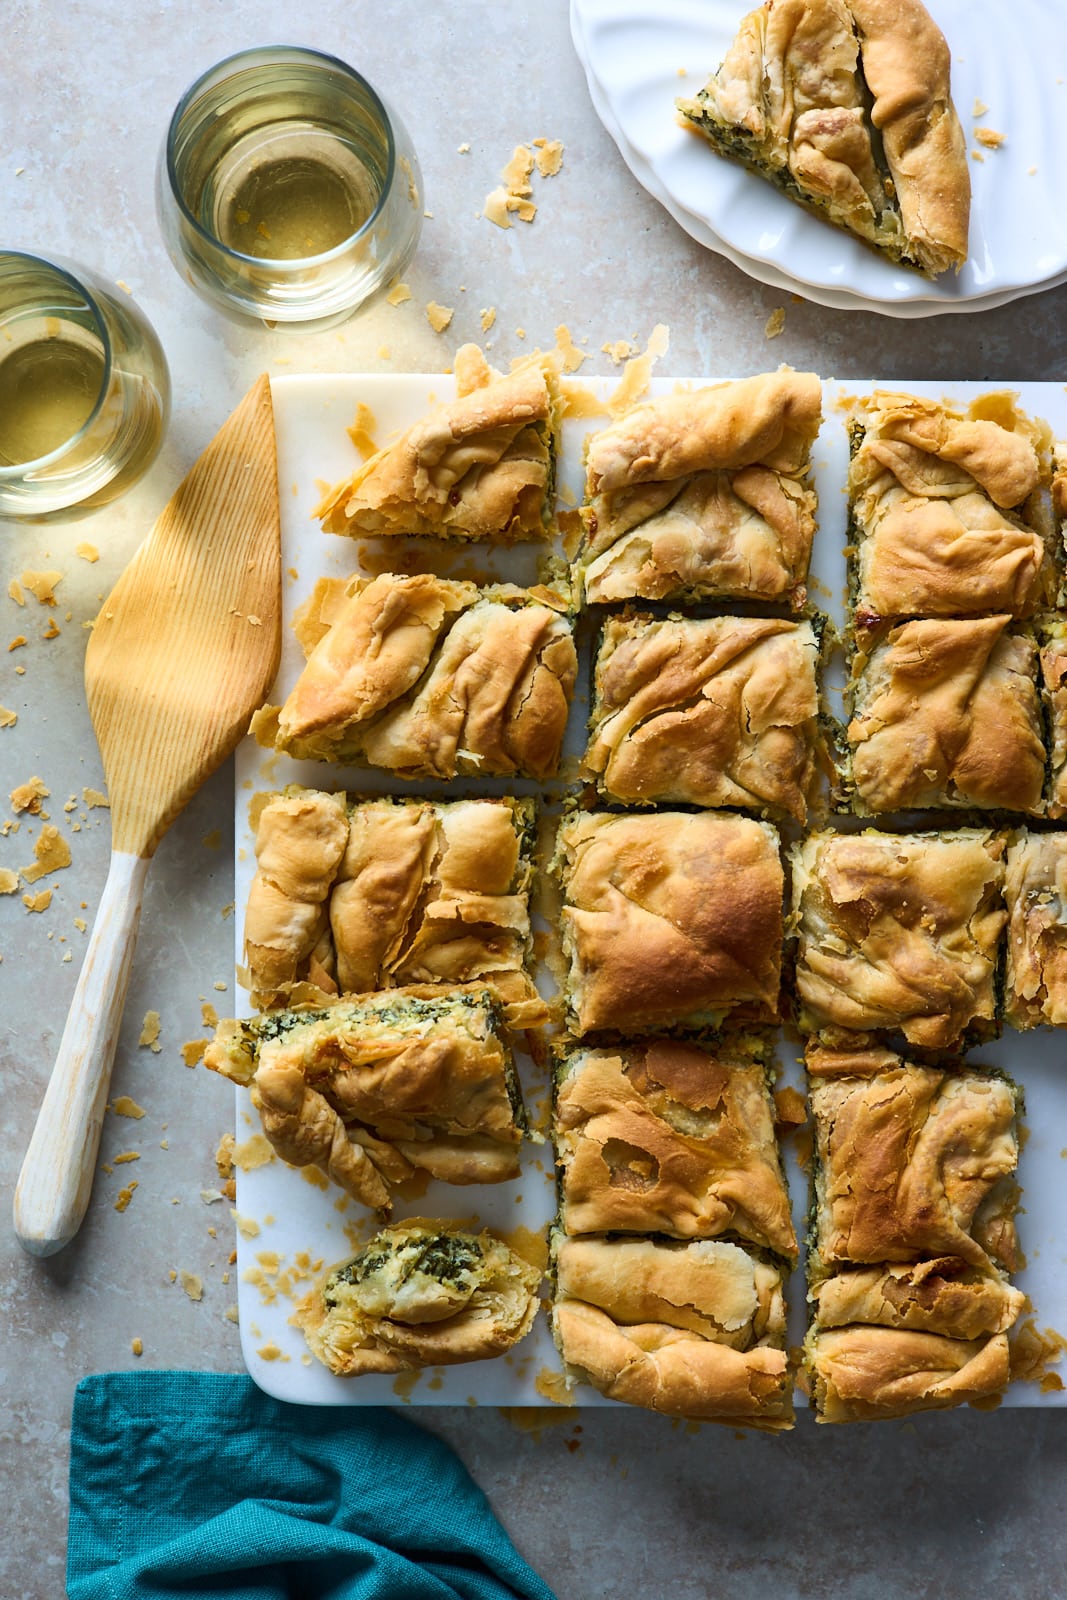
- Cool & Slice: Remove from the oven and allow to cool 5-10 minutes before cutting into pieces using the scored markings as a guide. Enjoy as is or serve the spanakopita with my Greek salad section Classic Greek Village Salad (Horiatiki) or my Classic Greek Lettuce Salad (Maroulosalata).
Recipe Notes
- To make ahead: You can knead your dough and let it rest for up to 3 hours wrapped at room temperature. Or you can wrap and refrigerate it for up to 2 days. Allow it to come to rom temperature before rolling it out.
- You can roll out your circles or discs of dough and butter them up in 5 and 3 layers and make these ahead as well. I would just cover the plate with plastic wrap and refrigerate for up to 1 -2 days ahead. When ready to roll them out allow them to sit at room temperature for a couple minutes before rolling so it’s easier to roll them out.
- Your filling can me be made a day ahead and stored in a sealed container in the fridge.
- I DO NOT recommend freezing the spanakopita AFTER it has baked. If you are freezing it do it BEFORE you bake it. Make as directed above right up to scoring the pieces. Then wrap in plastic wrap and then foil tightly and place in the freeezer - then bake right from frozen removing the foil and plastic wrap, allowing more baking time as needed.
Storage
- Leftover spanakopita will keep well in a sealed container stored in the fridge for up to 2 to 3 days. It’s best reheated In the oven until warmed through. Unfortunately it will lose its initial flakiness but will still be delicious.
For the dough
- For a 10-12 inch pan I find this dough amount just perfect. It could even work well for a 9 inch pan too although your phyllo layers might be a bit thicker. If you want to make a large pan of this spanakopita round or rectangular or a large sheetpan of it I recommend doubling the dough and filling recipe.
- The reason I separate the dough discs into 5 and 3 layers is because I always need extra layers on the bottom to hold the filling without it getting soggy. You can switch it up and do half and half if you prefer that. But I would not go less that 3-4 sheets sheets of phyllo on the bottom cause no one likes a soggy spanakopita or one that falls apart because the bottom can’t hold the filling.